

What if the ultimate ceiling of your song's potential is decided before your mastering engineer even opens the project? You've poured your soul into every vocal take and drum fill, yet the final export phase often feels like a technical minefield. Preparing files for mastering is the critical bridge where your creative energy meets professional precision. No more guesswork. No more clipping. We know the pressure of staring at a master fader, wondering if digital distortion is ruining your dynamic range or if your sample rate choices will hold up in an immersive audio suite.
It's natural to feel protective of your mix while questioning every plugin on your master bus. You want your music to sound massive, vibrant, and ready for the world. This guide provides the technical roadmap you need to move from uncertainty to absolute confidence. We'll walk through a definitive checklist for exporting your tracks, covering everything from bit depth to the human elements that make a handoff successful. You're about to ensure your files are pristine. Your vision, amplified. Let's get your music ready for the global stage.
Key Takeaways
- Understand the mastering handoff as a creative partnership where an objective expert ear bridges the gap between your studio and the world.
- Learn the technical precision required when preparing files for mastering, including why native session settings and bit depth are your best allies.
- Stop the headroom guesswork by focusing on waveform integrity and peak levels rather than just chasing a specific number on your master fader.
- Ensure every detail translates by mastering sonic housekeeping, from preserving delicate reverb tails to providing clear, reference-driven communication.
The Philosophy of the Mastering Handoff
The transition from mixing to mastering is often viewed as a purely technical event, a simple export from a digital audio workstation. However, the philosophy of the handoff is much deeper. It represents the moment your art leaves the safety of your studio and meets its first objective listener. Preparing files for mastering isn't just about checking boxes; it's about clearing the path so your vision can be fully realized. When you hand off a project to a professional facility like Starsound Studios, you're inviting a fresh set of ears to evaluate the sonic balance and emotional impact of your work.
A professional Mastering (audio) engineer acts as a high-level bridge. Their primary goal isn't to fix mistakes that should have been handled during recording or mixing. Instead, they aim to enhance the existing energy and ensure the music translates across all playback systems. If your files are prepared correctly, the engineer can focus their entire creative capacity on the art. They can work on the "feeling" of the low end or the "shimmer" of the highs rather than spending hours trying to undo digital clipping. You fix in the mix so you can enhance in the master.
Understanding the Mastering Engineer's Perspective
When Steve 'The Mix' sits down at the console in our Cleveland facility, he isn't just looking at meters. He's visualizing the final sonic stage. He's looking for depth, width, and how the transients hit the listener's chest. To do this effectively, an engineer needs room to breathe within your audio files. This is the difference between a sterile, automated process and a human-centric approach. At Starsound, our philosophy is rooted in a collaborative spirit. We see ourselves as mentors, ensuring your track exceeds industry standards with a unique identity only a human ear can sculpt.
Mastering vs. Mixing: Where One Ends and the Other Begins
It's vital to define the boundary between these two stages. Mixing is the art of balance. It's the process where you decide the relationship between the kick drum and the bass or the lead vocal level. Mastering is the art of translation. It ensures those balances sound powerful in a car, on headphones, or through a club system. A common misconception is that mastering saves a poor mix. It doesn't. Mastering often highlights hidden mix flaws. Avoid "pre-mastering" your own tracks. Heavy limiting might make a track loud, but it strips away the dynamic range an engineer needs. When preparing files for mastering, deliver a mix that is dynamic, clean, and ready for its final evolution.
Technical Specifications: Sample Rates, Bit Depth, and Formats
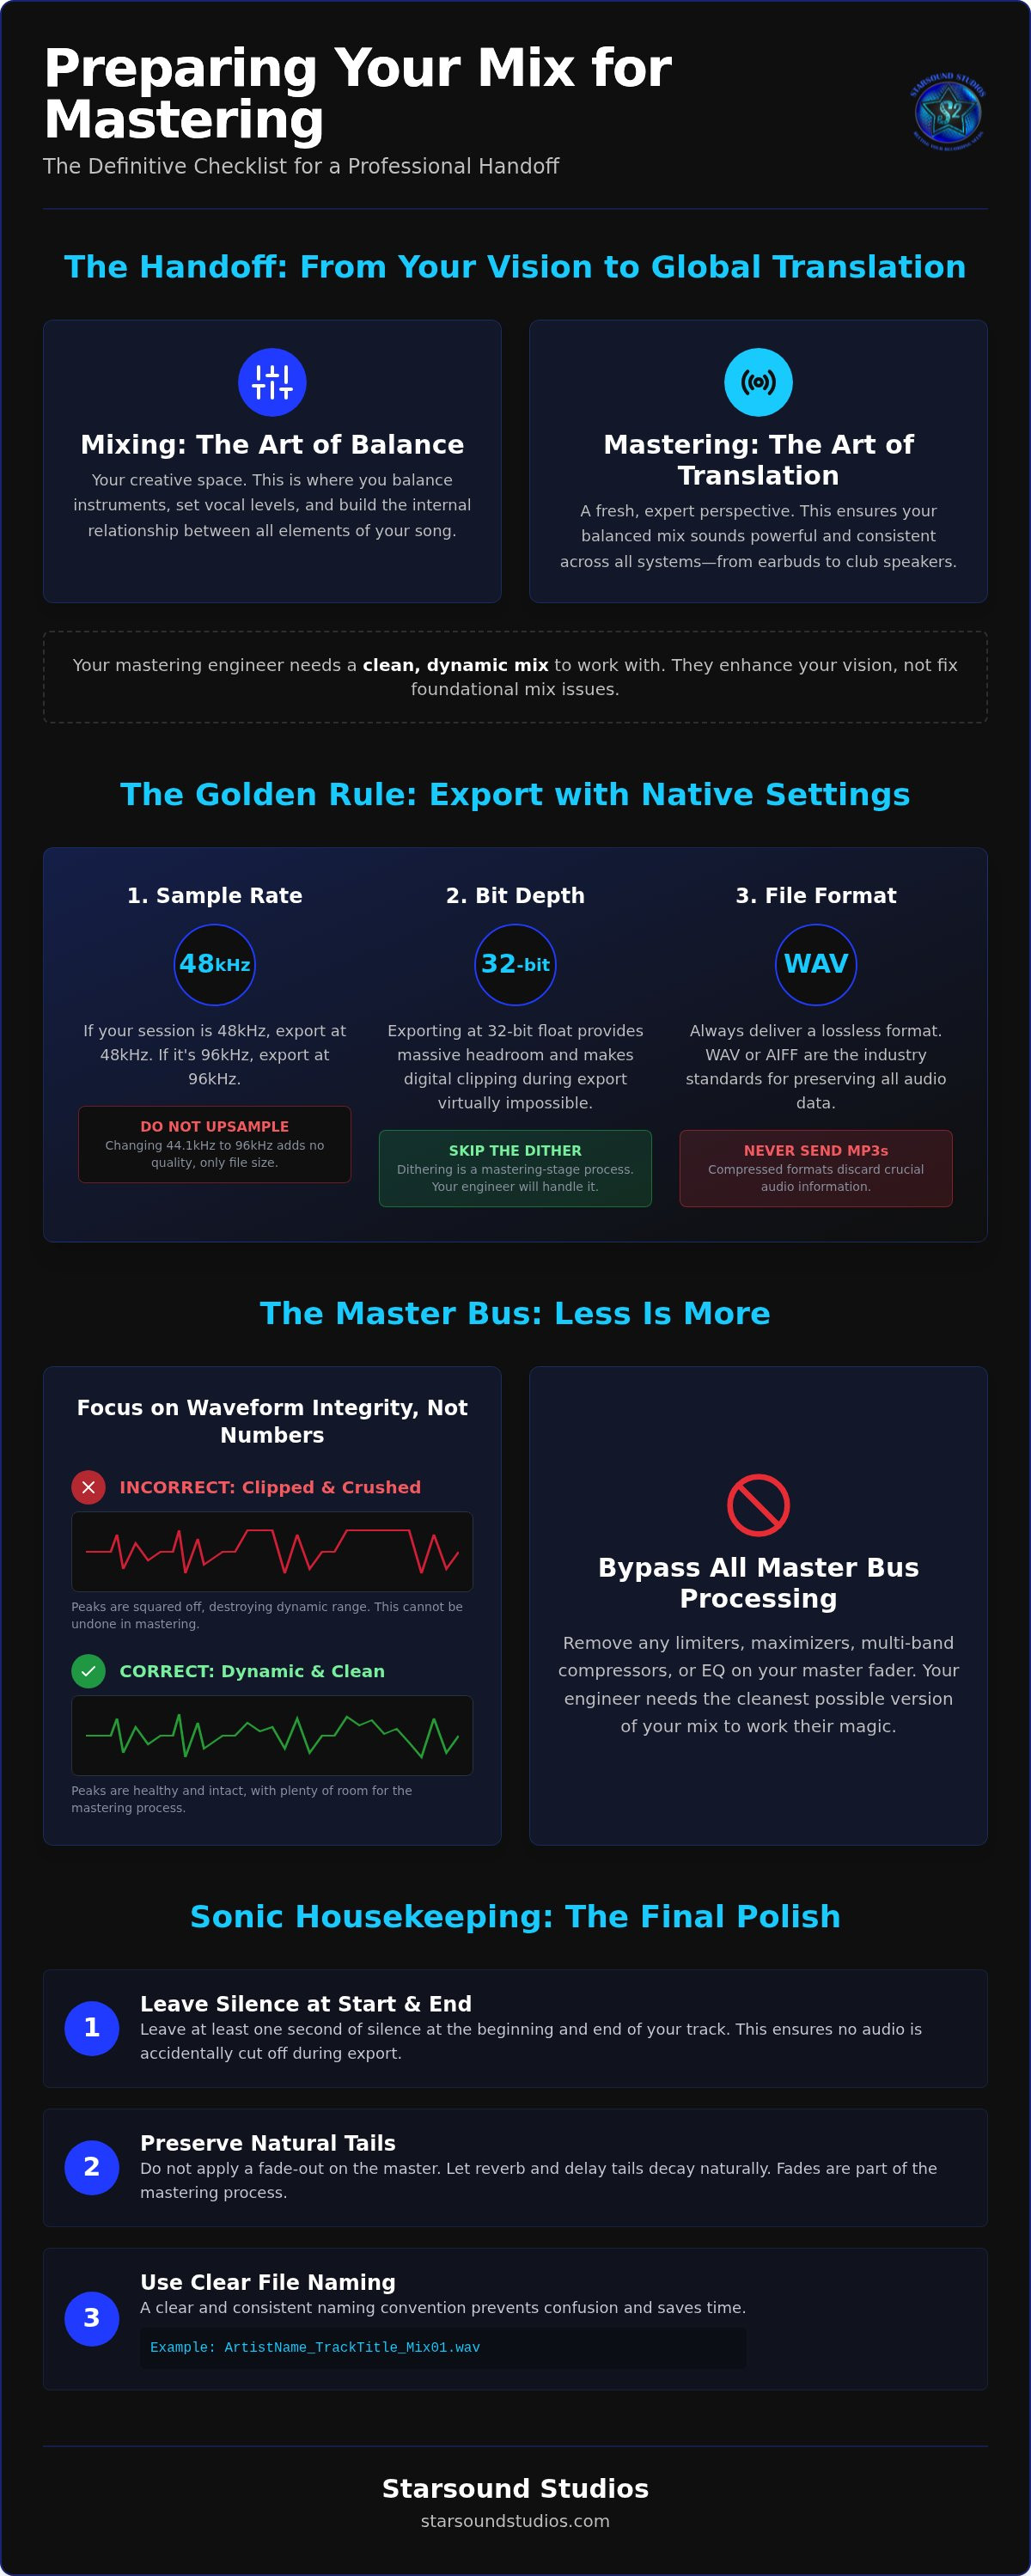
The golden rule for preparing files for mastering is simple: stay native. If your project session started at 48kHz and 24-bit, keep it there. Changing these settings during the final export often introduces unnecessary artifacts or jitter. You won't gain quality by forcing a 44.1kHz session into a 96kHz file. Precision starts with consistency. While high sample rates are great for capturing detail, bit depth is the true hero of dynamic range. It dictates the distance between your loudest peak and the quietest whisper. Lossless formats like WAV or AIFF are the only acceptable choices for a professional handoff. They preserve every bit of data you've worked hard to capture, unlike compressed MP3s which strip away essential harmonics.
Demystifying Sample Rates (44.1kHz to 96kHz)
Choose your sample rate based on the intended destination, but don't overcomplicate it. Upsampling a finished mix is a sonic placebo; it adds file size without adding fidelity. If you're planning for high-res streaming or immersive Dolby Atmos projects, starting your session at 96kHz is a wise move for future-proofing. For most creators, staying at the session's original rate ensures the cleanest path to a professional sound. Many of our Cleveland artists find that the audio format aiff provides the metadata stability and high-fidelity results they need for a world-class delivery.
Bit Depth and the 32-Bit Float Advantage
Bit depth is where the technical science of audio meets the art of creation. While 24-bit is the industry standard, 32-bit float is a game changer for the modern studio environment. This format essentially removes the fear of digital clipping during export by providing a massive amount of internal headroom. It keeps your noise floor practically non-existent, allowing the subtle nuances of your mix to shine through. When preparing files for mastering, skip the dither. Dithering is a corrective process used when reducing bit depth, and it's a step your mastering engineer will handle with absolute precision at the very end of the chain. If you want to dive deeper into these technical workflows, our audio engineering classes offer hands-on training to refine your studio skills.
The Master Bus Debate: Headroom, Limiters, and Compression
The most heated discussions in the studio often revolve around the master bus. Many creators believe they need to hit a specific peak level, like -6dB, to give their engineer enough space. The truth is more nuanced. Headroom isn't just about where your fader sits; it's about the integrity of your waveform. When preparing files for mastering, your goal is to avoid digital clipping while preserving the transients that give your music life. If your mix is already smashed into a brick wall of limiting, lowering the fader won't magically restore the lost dynamics. We look at the relationship between your peak levels and your RMS (average) levels to see how much energy is left to sculpt.
The best approach is often the "two-print" solution. Deliver one version of your mix exactly how you've been listening to it, even if it has a limiter for volume. Then, deliver a second version with that "make-it-loud" plugin turned off. This gives Steve 'The Mix' a reference for your sonic vision while providing the clean, dynamic canvas needed for professional mastering at our Cleveland facility. This collaborative strategy ensures your track keeps its "glue" without sacrificing the punch that makes it stand out on a massive system.
The 'No Clipping' Rule
Digital clipping is the enemy of high-fidelity audio. It creates harsh, non-harmonic distortion that can't be undone. It's vital to distinguish between intentional saturation, which adds warmth and character, and digital overs that square off your waveforms. Use a true-peak meter to check for inter-sample peaks. These are hidden "overs" that occur when the digital signal is converted back to analog. If you see red on your master bus, don't just pull down the master fader. Go back into the mix and adjust your subgroups to create natural air. This technical discipline is a hallmark of a pro-ready handoff.
Tonal Processing vs. Dynamic Destruction
Don't be afraid to keep your "vibe" processing active. If a specific bus compressor or EQ is essential to the character of your song, leave it on. We want to hear your artistic intent. However, there is a fine line between tonal shaping and dynamic destruction. Preparing files for mastering requires the courage to peel back the layers of heavy limiting that might be masking mix issues. By providing a clean export alongside your limited reference, you allow us to use world-class outboard gear to achieve that same loudness with far more clarity and depth. It's about reaching your highest potential through a dedicated, human-centric process.
Sonic Housekeeping: Trimming, Fades, and File Naming
Technical hygiene is where professional respect meets artistic excellence. When you're preparing files for mastering, the small details speak volumes about your commitment to the craft. Abrupt cuts, hidden clicks, or truncated reverb tails can pull a listener out of an immersive experience. We want your music to feel seamless and intentional. This starts with setting proper markers in your DAW. Give your song room to breathe. Provide at least two seconds of silence before the first note and after the final ring-out. This "breathing room" ensures that no transients are clipped at the start and no delicate delay tails are lost in the fade.
Take the time to scrub your tracks for "silent" errors. Check your vocal booth recordings for headphone bleed, chair squeaks, or air conditioning hum that might have crept into the mix. These artifacts become much more apparent once the mastering process brings the overall level up. Cleaning these elements now prevents them from becoming distractions later. If you're providing alternative versions like instrumentals or "vocals up" mixes, ensure they are sample-accurate and perfectly aligned with your main mix. Consistency is the foundation of a world-class result.
The Art of the Fade
Leave the final fade-out to the professionals. Unless a fade is a specific, baked-in creative choice, providing a full-length tail gives the mastering engineer more control over the noise floor and the emotional exit of the track. Hard cuts at the beginning of a file can cause audible pops on certain playback systems. By following the "two-second rule" for lead-in and lead-out, you provide a clean canvas for us to apply precision fades that feel natural and polished. This technical discipline allows us to focus on the spirit of the music rather than surgical repair.
File Organization and Naming Strategy
Naming conventions are your best defense against studio errors. In a high-energy mastering studio environment, clarity is speed. Use a standardized format like: Artist_SongName_Version_SampleRate_Date. Avoid the trap of "Final_Mix_V2_REALLY_FINAL," which leads to confusion and potential mistakes during the handoff. Organize your delivery folder logically, keeping your main mixes, instrumentals, and reference tracks in clearly labeled subfolders. This level of organization signals that you are ready for the global stage. Ready to see how your vision translates through world-class gear? Submit your project for Remote Mastering and let's bring your sound to life.
Final Delivery and Communication with Starsound Studios
The final step in preparing files for mastering is assembling your delivery pack. This is where your technical precision meets our professional workflow. We recommend a single, organized ZIP folder containing everything we need to bring your vision to life. This isn't just about the audio; it's about the context. Include your high-resolution WAV or AIFF files, but also include your "sonic North Star." These are reference tracks that represent the energy, depth, and tonal balance you aspire to achieve. They give us a clear window into your artistic intent.
As Ohio's first Dolby-certified facility, we are uniquely equipped to handle the transition from stereo to immersive sound. If you are preparing for Dolby Atmos mixing, your preparation shifts slightly toward object-based prep and stem delivery. Our 9.1.4 immersive audio suite in North Royalton is designed to translate these complex files into a world-class experience that surrounds the listener. Whether you are aiming for a traditional stereo master or a cutting-edge spatial mix, the quality of your handoff dictates the height of your project's ceiling.
Alternative Mixes and Stems
Don't forget your alternative prints. An instrumental and a "TV mix" (vocals minus lead) are essential for licensing, sync opportunities, and live performances. Ensure these are sample-accurate and perfectly aligned with your main mix. If you feel your mix has specific balance issues that require a more surgical approach, providing stems rather than a stereo interleaved file can give us the flexibility needed to achieve perfection. This collaborative approach ensures that every version of your song maintains the same high-level output and sonic identity.
Communication: Notes for Steve 'The Mix'
When writing notes for Steve 'The Mix,' focus on the feeling and the energy of the music. You don't need complex engineering jargon to get your point across. Tell us if the low end feels "cloudy" or if you want the lead vocal to feel more "intimate" and forward. Identifying specific problem areas early allows us to address them with absolute precision using our world-class outboard gear. This human-centric communication is what separates a sterile AI process from a professional studio experience. Whether you are working with us remotely or booking a session at our North Royalton recording studio, clear communication is the bridge to a world-class result. We are just as invested in the final product as you are.
Elevate Your Sound to a World-Class Standard
Mastering is the final, essential transformation of your creative vision. By preparing files for mastering with technical precision, you've ensured that your transients stay sharp and your dynamic range remains entirely intact. You've moved past the master bus debate and handled the sonic housekeeping that separates bedroom demos from professional releases. Now, it's time for the human element to take over and push your project across the finish line with absolute clarity.
At Starsound Studios, we provide the expert ear and high-end environment your music deserves to shine. As Ohio's only Dolby-certified Atmos studio, we combine decades of authority from Steve 'The Mix' with a premier 9.1.4 immersive audio facility. We don't just process audio; we mentor your project through its final evolution to ensure it translates perfectly in every environment. Your music is ready to be heard by the world. Let's make sure it sounds exactly the way you've always imagined.
Ready for the final polish? Book your mastering session at Starsound Studios today.
Frequently Asked Questions
Should I leave my master bus compressor on when exporting for mastering?
Yes, you should keep your master bus compressor active if it is integral to the "glue" and character of your mix. However, you must distinguish between tonal compression and aggressive brick-wall limiting. If the compressor is working hard just to achieve commercial loudness, it's better to bypass it. Providing a version with and without bus processing gives your engineer the most flexibility to enhance your specific sound.
How much headroom do I actually need to leave for the mastering engineer?
You don't need to hit a magic number like -6dB as long as your peaks aren't hitting 0dBFS. Modern 24-bit and 32-bit float systems provide a massive dynamic range, so "headroom" is more about avoiding digital distortion than reaching a specific fader position. Ensure your loudest transients have a few decibels of space to breathe. This allows our equipment to process your signal without introducing artifacts or losing punch.
What is the best file format for sending music to a mastering studio?
The industry standard for a professional handoff is a high-resolution, lossless WAV or AIFF file. These formats ensure that every harmonic detail and transient remains intact during the transfer. When preparing files for mastering, always export at the native sample rate of your session, such as 48kHz or 96kHz. Avoid compressed formats like MP3 or AAC, as these remove essential data that a mastering engineer needs to sculpt a world-class final product.
Do I need to dither my files when exporting from my DAW?
No, you should not apply dither when exporting your mix for a professional mastering session. Dithering is a process used to mask quantization errors when reducing bit depth, and it should only be applied once at the very end of the signal chain. Since your engineer will be working at high resolutions and performing the final bit-depth reduction for distribution, adding dither now just increases the noise floor unnecessarily. Keep your exports clean.
Should I provide reference tracks for the mastering process?
Providing reference tracks is highly encouraged as it gives us a clear "sonic North Star" for your project. Choose one or two commercially released songs that capture the tonal balance, low-end energy, or vocal presence you want to achieve. These references don't dictate the final sound, but they help Steve 'The Mix' understand your artistic intent. This collaborative communication ensures the final master aligns perfectly with your vision for the track.
What is the difference between stereo mastering and Dolby Atmos mastering preparation?
Stereo mastering typically requires a single interleaved file, while Dolby Atmos preparation involves a more complex delivery of stems or object-based tracks. For immersive projects, you need to provide individual elements like dry vocals, drums, and melodic groups so they can be positioned within the 9.1.4 spatial field. Preparing files for mastering in Atmos requires higher attention to detail regarding phase and timing to ensure the immersive experience feels cohesive and powerful.
Can I send an MP3 for mastering if I lost the original WAV file?
While we can technically master an MP3, it is far from ideal because the compression has already permanently removed audio data. If you have absolutely lost the original WAV, we can use our high-end outboard gear to restore some life, but the ceiling of the song's potential will be lower. Always exhaust every option to find the lossless original. Mastering a lossy file often highlights the "swirly" artifacts and loss of high-frequency detail.
How do I align instrumental and vocal-up mixes for the engineer?
The most reliable way to align alternative mixes is to ensure every export starts at exactly the same timecode, such as Bar 1, Beat 1. This sample-accurate alignment allows the engineer to swap between the main mix, instrumental, and vocal-up versions without any timing shifts. Before sending your delivery pack, import these files back into a clean DAW session to verify they sit perfectly on top of each other. Consistency saves time.


