

A clipped take isn’t automatically a lost take. The first step in learning how to fix clipping in audio is finding where the distortion entered the signal chain. A microphone preamp pushed too hard, an overloaded plugin, and a master that hits zero can all leave different clues. The right repair depends on where the problem started.
It’s understandable to worry that a vocal or instrument take is unusable when it sounds harsh or fuzzy. But clipping can be confused with saturation, which may add warmth, or background noise, which has a different cause and calls for a different approach. Treating every rough sound the same can damage the performance without fixing the problem.
This guide will help you identify clipping, trace it to its likely stage, and judge whether the damaged peaks can be repaired or the harshness can only be reduced. You’ll also learn how to protect the rest of the recording while cleaning up the sound, then prevent clipping with better gain staging on future takes and mixes. Start with the source, not another layer of processing. That gives a strong performance its best chance to shine.
Key Takeaways
- Learn how to fix clipping in audio by tracing the distortion to its source before applying repair tools.
- Use waveform peaks and track, bus, plugin, and master meters to pinpoint where the signal overloads.
- Assess whether the damage is mild and isolated or too severe for full restoration, then choose a repair accordingly.
- Work on a duplicate session or file so you can compare changes and protect the original recording.
- Build a simple recording checklist for input gain, monitoring, and headroom, and know when mixing or mastering support could help.
How to Fix Clipping in Audio: Recognize the Problem Before You Repair It
Clipping occurs when an audio signal exceeds the level a recording or processing system can represent. The peaks are cut off instead of reproduced cleanly. That ceiling may be reached while recording, inside a plugin or output stage, or during export. Before deciding how to fix clipping in audio, work out whether the sound is actually clipped and whether the distortion is already baked into the file.
Clues can appear in both the waveform and the sound: unusually flat peaks, harshness, crunch, or crackling on loud moments. A meter touching its ceiling or showing red is a reason to investigate, not a complete diagnosis. It only tells you that the meter’s point in the signal path has reached its limit. It doesn’t reveal what caused the overload or whether the recorded audio itself is damaged. For a broader overview of the concept and its causes, see Clipping (audio).
What does clipped audio sound and look like?
Zoom in on loud transients, such as a sharp consonant, drum hit, or picked string. If the waveform peaks look squared off, the signal may have hit a level ceiling and lost the natural shape of those peaks. Listen to the same moment, too. Clipping can sound harsh, crunchy, or crackling, especially on loud or sustained sounds, but those qualities alone don’t prove clipping. Compare the sound with the waveform and meter. One visual clue isn’t enough to diagnose the cause.
Keep other unwanted sounds separate in your mind. Background noise is typically audible in quieter gaps or beneath the performance, while clipping distorts the signal at moments of overload. A rough tone might also be intentional saturation or another kind of distortion. Clipping is a signal exceeding its available level; loudness describes how strong it sounds, while background noise is unwanted sound under or between the performance.
Can lowering the volume fix audio that already clipped?
Not by itself. Lowering a track fader or turning down the exported file reduces playback level, but it doesn’t redraw peaks that were cut off during recording or processing. The damaged waveform simply plays back quieter. That’s the key difference between a clipped recording and a healthy recording that’s merely too loud. Lowering the healthy recording can bring its level down without fixing any distortion, because its peaks remain intact.
Try a simple check: lower the playback level, then listen again at a comfortable volume. If the harsh crackle remains on the same peaks, the distortion is likely part of the audio, not just excessive playback level. A less damaged source, with only occasional or mild clipping, may still allow a useful but imperfect repair. If the distortion is severe, lowering the volume can make it less intrusive, but it can’t restore missing performance detail. Preserve the original file while you assess it. An important take may have more usable character than the first listen suggests.
Trace the Audio Signal Chain to Find Where Clipping Starts
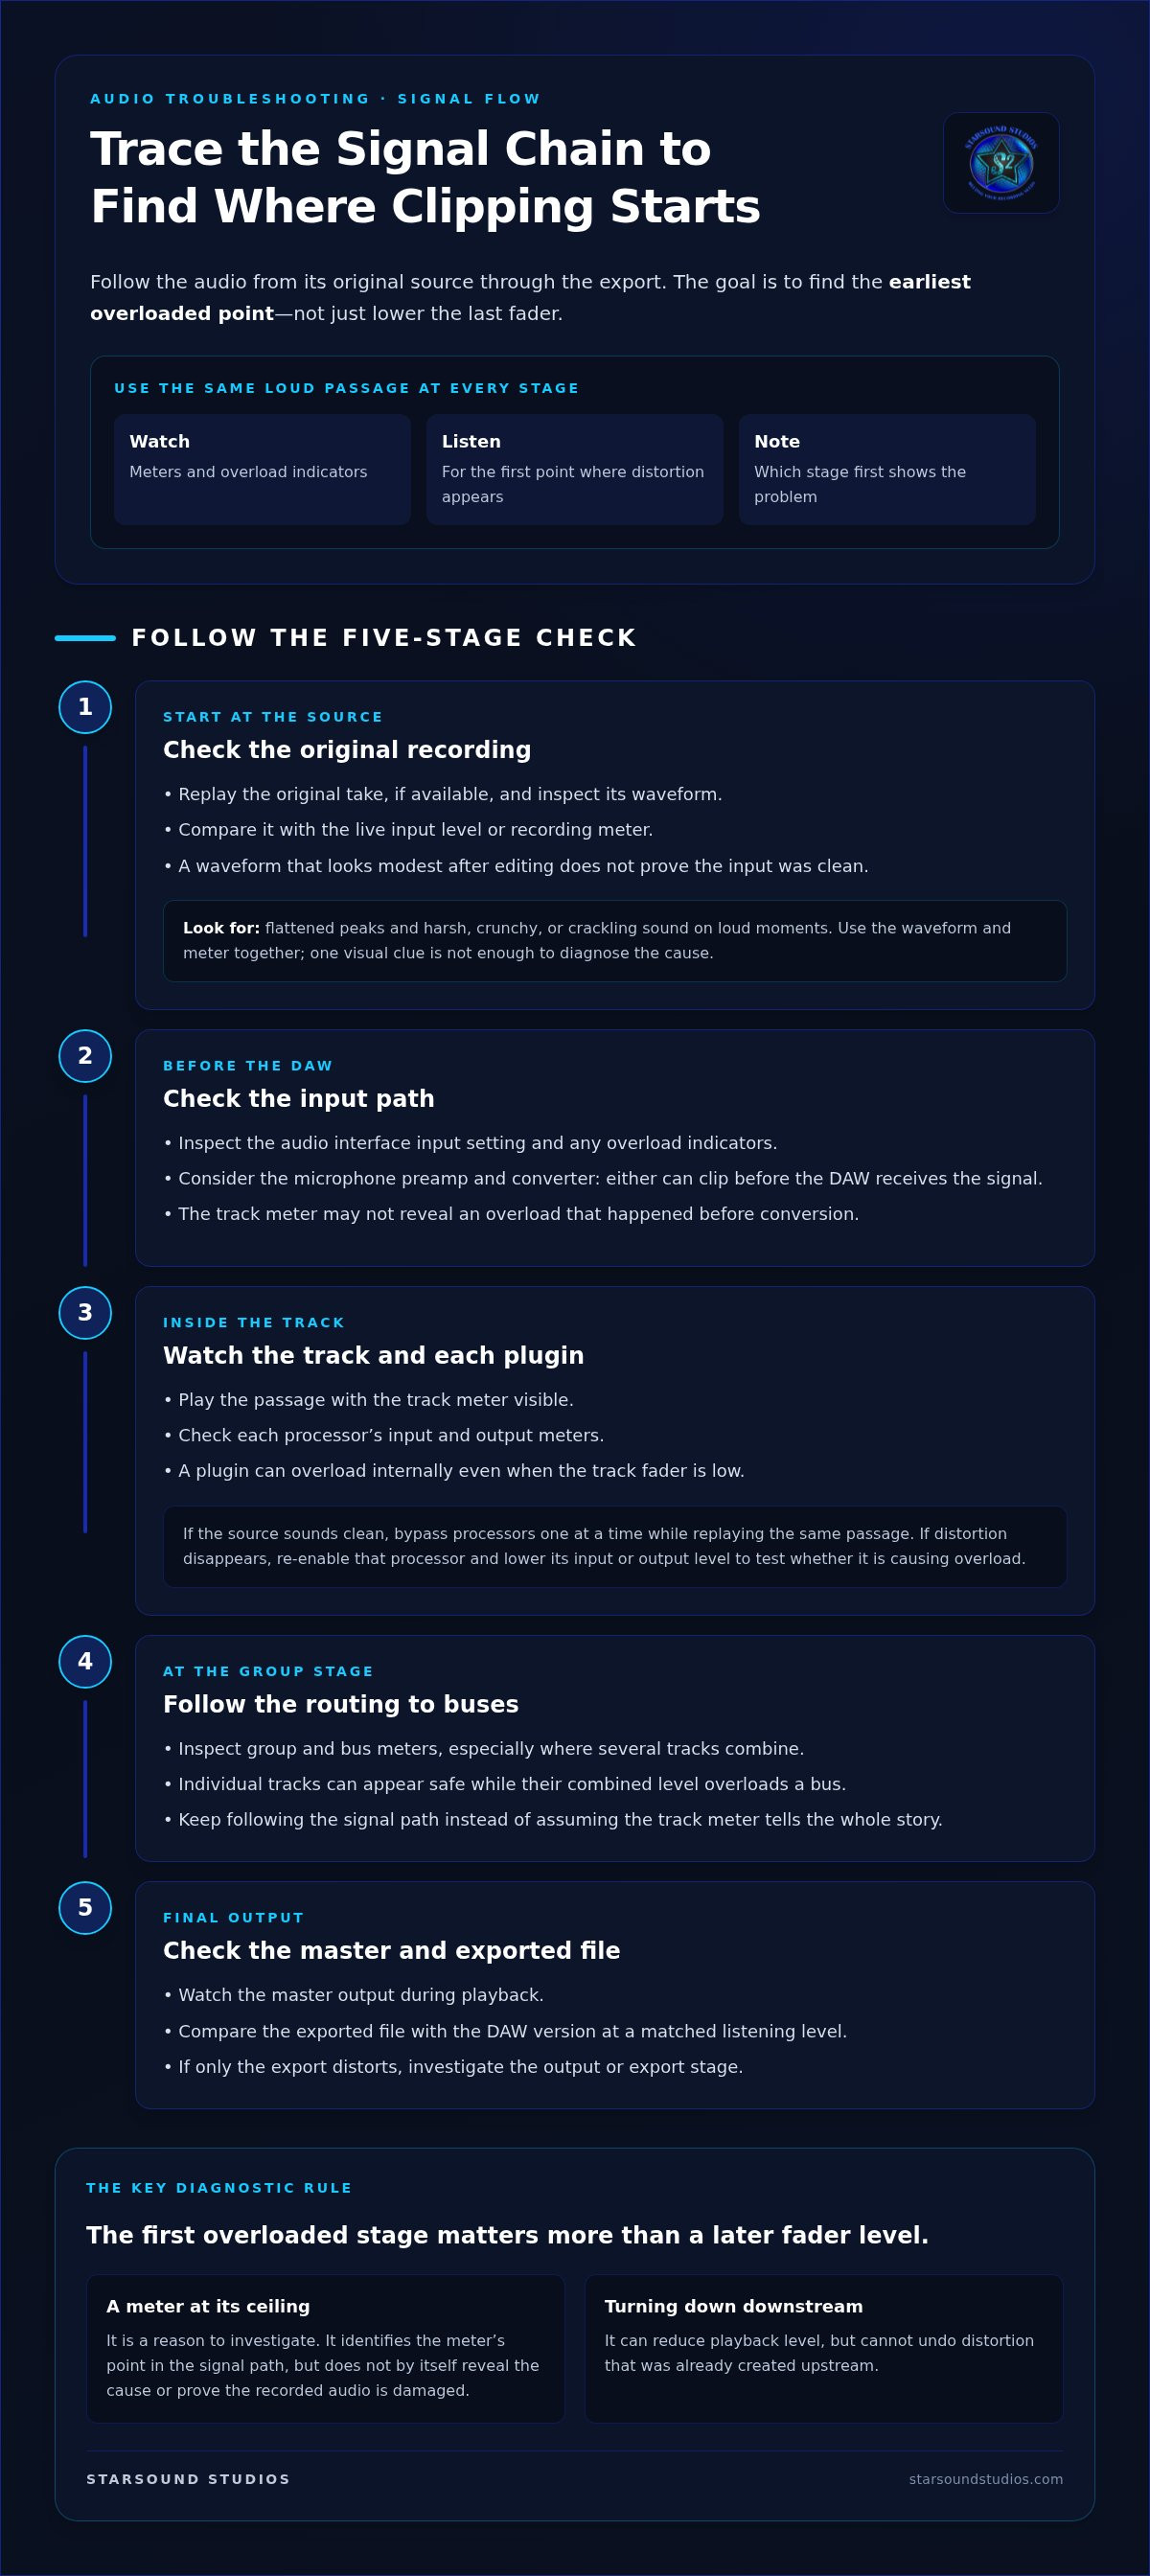
Clipping can enter the signal before it reaches your DAW, appear during processing, or occur on the way to the final export. Find the earliest overloaded point instead of simply turning down the last fader. A quiet master output can hide a problem earlier in the chain. The first overloaded stage matters more than the later fader level, because turning down downstream audio can’t undo distortion already created upstream.
Use this check in order, playing the same loud passage each time. Watch the meters while listening, and note where the sound first becomes distorted.
- Start at the source. Replay the original recording, if available, and inspect its waveform. Compare it with the live input level or recording meter. A waveform that looks modest after editing doesn’t prove the input was clean.
- Check the input path. Look at the audio interface’s input setting and any overload indicators. A microphone preamp or converter can clip before the DAW receives the signal, so the track meter may not show the original cause.
- Watch the track and plugins. Play the passage with the track meter visible, then check each processor’s input and output meters. A plugin can overload internally even if the track fader is low.
- Follow the routing. Inspect group or bus meters, especially where several tracks combine. Individual tracks may appear safe while their combined level overloads a bus.
- Check the master and export. Watch the master output during playback, then compare the exported file with the DAW version at a matched listening level. If only the export distorts, investigate the output or export stage.
Check the input, recording path, and DAW meters
Begin with the earliest version of the take you have. If the original recording is distorted, lowering its fader in the session only makes that distortion quieter. Check the interface input and recording indicators as well as the DAW meter, since overload before conversion may not be obvious from the track’s current level. Understanding signal flow is a core part of production education, including programs such as Ohio University’s Music Production and Recording Industry Program.
Inspect plugins, buses, and the master output
If the source sounds clean, bypass processors one at a time while replaying the same passage. When the distortion disappears, re-enable that processor and lower its input or output level to test whether it’s causing overload. Then check the bus and master meters. Compare the export against DAW playback. A difference points you toward the final output path rather than the original take.
For a complex session or a release-critical mix, a collaborative stereo mixing session at Starsound Studios can help assess the signal chain and shape the final sound. The studio in North Royalton, Ohio, serves artists in the Cleveland area and also provides remote mixing.
Choose the Right Fix: Repairable Clipping, Irreversible Peaks, or Intentional Saturation
Once you’ve found where distortion begins, match the remedy to its cause. Clipping at the recording input has already altered the captured waveform. Clipping inside a session may be avoidable by adjusting levels before the overloaded stage. Saturation, meanwhile, may be a deliberate part of the sound, adding density and character. These can look or sound similar, but they call for different decisions.
Clipping at capture
Cause: The input or recording path exceeded its available level. Clues: Distortion is present in the original take. First response: Find an alternate take, stem, or earlier clean version. Limitation: If peaks were cut off in the only source, their original shape isn’t preserved.
Clipping during processing
Cause: A plugin, bus, or output stage overloads during mixing. Clues: The source is clean, but distortion appears with a particular processor or routing stage. First response: Adjust levels before the overload point or change the processing. Limitation: Lowering a fader after that stage won’t undo distortion already generated.
Intentional saturation
Cause: A creative process adds harmonic coloration. Clues: The added density or warmth fits the performance and arrangement. First response: Judge it in context, not by waveform appearance alone. Limitation: Removing it may strip away character the artist intended.
When can a clipped recording be improved?
Look for a clean alternate take, stem, or earlier version before attempting repair. If none exists, dedicated declipping tools can estimate the shape of missing peaks, but results vary and reconstructed detail isn’t guaranteed to match the original. Test a short copy first, then compare repaired and untouched versions at matched playback levels. Listen for clarity and tone, not just a smoother-looking waveform.
The outlook depends on the damage. A brief, mild overload may respond better than distortion spread across a vocal or instrument. The less severe and more isolated the clipped section, the more useful a repair may be. Restoration can soften harsh artifacts, but it can’t promise a perfect return of lost detail. For an important take, preserve the source and treat repair as a careful attempt, not a guaranteed reset.
How is clipping different from saturation or limiting?
Saturation adds harmonics and may be a purposeful musical color, from subtle warmth to audible grit. Don’t remove it solely because a waveform looks dense. A limiter, by contrast, controls peaks by reducing their level. It can help prevent clipping later in the chain, but it doesn’t necessarily restore audio that was clipped before the limiter. To decide how to fix clipping in audio, listen in context and identify whether the sound is damage, a processing choice, or part of the intended performance.
How to Fix Clipping in Audio Step by Step in Your DAW
Work on a copy first. Duplicate the session or make a copy of the source file, then leave the original untouched so you can return to it if a repair dulls the performance or introduces new artifacts. Keep the test focused: choose a short passage that includes the distortion and a little audio before and after it. That context makes it easier to judge the repair.
The workflow depends on where the clipping began. If it was introduced during mixing, adjust the stage causing the overload. If it’s already printed into the recording, preserve the cleanest source you can find before attempting restoration. This distinction is central to how to fix clipping in audio without needlessly changing the rest of the take.
Repair clipping introduced during mixing
Start at the overloaded processor or bus, not the master fader. Reduce the level feeding that stage, then replay the same passage and check whether the distortion has cleared. If the signal passes through multiple processors, adjust them in order and listen after each change. This helps isolate the cause instead of masking it with a broad level reduction.
Once the mix sounds clean, export a new copy and audition its loudest passages, including transitions where several elements enter together. If you use AIFF for an export copy, give it a clear filename so you can distinguish the test from the untouched source. Keep versions organized by format and revision. The audio format itself won’t repair clipping, but careful file handling makes comparisons safer.
Work carefully with clipping printed into a recording
Before reaching for restoration, check for an alternate take, stem, or earlier version with less damage. If the clipped sound exists only in the recording, apply a declipping process to a test copy or a short region first. Compare it with the untreated original at matched playback levels, listening for crackle as well as changes to the vocal or instrument’s natural tone.
Use small, deliberate changes. Avoid stacking several aggressive processes in the hope that each one will solve what the last could not. A repaired waveform may look smoother while sounding less convincing, so trust careful listening over appearance. If the tool adds more distracting artifacts than the original clipping, undo the change and try a different approach, or keep the least-damaged version.
- Duplicate the session or source and label the working copy.
- Locate the passage where distortion is clearest.
- Identify whether the overload happens in the DAW or is already in the recording.
- Adjust or repair only the relevant stage, then listen before making another change.
- Export and compare the result with the original, especially at the loudest moments.
If clipping affects an important release and the repair choices feel uncertain, work with a mixing engineer at Starsound Studios to assess the source and shape the cleanest result the recording allows.
Prevent Future Clipping, and Know When to Bring in a Mix Engineer
Good prevention starts before you press record. Set input gain while performing the loudest passage you expect to capture, not just during a quiet sound check. A vocal that swells into a powerful chorus or an instrument played harder than usual can create peaks a brief test won’t reveal.
There’s no universal recording peak target that suits every source and signal path. Microphone output, preamp gain, processing, and the recording setup all affect how much headroom makes sense. Avoid overload at each stage, and leave enough room for the performance’s natural dynamics rather than chasing a meter reading in isolation.
Build a repeatable clipping-prevention routine
Use this quick checklist before and during a session. The goal is a clean, flexible source and mix decisions you can revisit.
- Set input gain with the loudest expected passage. Have the performer sing or play at full intensity while you watch the input and recording meters.
- Monitor throughout the signal path. Check track, plugin, bus, and master levels during recording, processing, and export. A safe reading at one stage doesn’t guarantee that every later stage is clear.
- Keep an untouched source. Save the original take and make mix changes in manageable steps, so you can compare versions and reverse a decision that dulls the sound.
- Listen to the finished export. Give the loudest sections and transitions a focused check, where layered parts or rising energy may expose a level problem.
A repeatable routine helps you catch trouble early, but it won’t make every performance or mix predictable. Different sources respond differently, and a chain of individually reasonable choices can still create overload when signals combine.
When professional mixing or mastering can help
Consider an experienced second listen if clipping persists on a key vocal, instrument, or the overall mix, especially after you’ve traced the signal path and tried conservative adjustments. A fresh perspective can help distinguish a repairable technical issue from an intentional production choice, then assess the best path toward a balanced final sound. No mixing or mastering process can promise to restore details that were lost at capture.
Starsound Studios offers stereo mixing and mastering from its recording facility in North Royalton, Ohio, as well as remote mixing and mastering for artists beyond the Cleveland area and around the world. If you’d like an experienced perspective on your project, discuss your mix with Starsound Studios. A careful review can help you move forward while keeping the character of the performance at the center.
Move Your Track Forward With Confidence
A distortion problem doesn’t have to define the final sound. Decide what serves the performance: preserving a rough edge that adds character, refining a section that distracts, or shaping the mix around what the recording can support. That creative judgment matters as much as the technical fix.
Knowing how to fix clipping in audio also means knowing when a fresh perspective could help. If you’re unsure how much processing to apply, or the issue affects a key part of your release, professional stereo mixing and mastering can bring focused listening and careful decisions to the project without promising to recreate detail the recording has lost.
Starsound Studios welcomes artists who want to give their music a thoughtful next step. Explore a collaborative mixing or mastering session with the studio in North Royalton, Ohio, and keep the sound, energy, and identity of your work at the center.
Frequently Asked Questions
Can clipping happen if my DAW master meter never reaches 0 dBFS?
Yes. The master meter only reflects the signal at its point in the chain. A recording input or plugin can clip before the master, and an output stage after it can overload even if the displayed reading stays below 0 dBFS. Some meters show sample peaks rather than true peaks, so reconstructed peaks between samples may exceed the ceiling during conversion or playback. Check the meter type and each stage.
What happens if I normalize a clipped audio file?
Normalization changes a file’s level to a selected peak or loudness. It doesn’t rebuild flattened waveform tops. Normalize a clipped take downward and the distortion remains, only quieter. Normalize it upward and the clipped shape gets louder too, which can make artifacts more noticeable. Use normalization for level management, not repair. If possible, work from an earlier or cleaner source instead of relying on a normalized damaged file.
Can a limiter repair clipping in a recording?
A limiter can control peaks that reach it, but it can’t reliably restore waveform detail clipped before the limiter. On an already damaged vocal, it may reduce later peaks while leaving the original crackle intact, or make the sound denser. Treat limiting as prevention or peak control, not declipping. Compare the limited and bypassed versions at matched loudness so a level change doesn’t make one seem better by default.
Is clipping always bad in music?
No. Clipping can be a deliberate effect when a producer wants an aggressive edge or density on a guitar, drum, or synth. The question is whether the distortion supports the arrangement and works at the intended playback level. Accidental clipping on a lead vocal may distract, while a shaped, intentional edge can add energy. Decide by listening in the full mix, not by waveform appearance alone.
Can clipping happen when recording at 24-bit?
Yes. Recording at 24-bit doesn’t make the input stage or converter immune to overload. If a microphone preamp is driven beyond its range, or the converter receives too much level, the signal can still distort. Bit depth affects digital precision and the noise floor; it isn’t protection against excessive input gain. Set levels while checking the loudest part of the performance, not only during a quiet sound check.
Why does my exported audio sound clipped when the project plays cleanly?
The export path may differ from session playback. Codec conversion can create inter-sample peaks, an offline render may expose different plugin behavior, or export settings may apply processing you didn’t hear while mixing. Import the exported file into a fresh track, compare it at the same playback level, and inspect its peak meter and processing settings. Trying another export format can help isolate whether conversion is contributing to the distortion.
Should I remove clipping from a vocal if it sounds expressive?
Not automatically. If the distortion carries urgency or attitude, removing it may flatten the performance. Compare repaired and untreated copies at matched loudness in the full arrangement, and consider whether the emotion comes through or the crackle draws attention away. If only a few words sound distracting, focus on those moments instead of processing the entire take. Cleveland-area artists can bring that tradeoff into context during a stereo mixing session.


