

You've spent weeks perfecting that snare and layering synth pads, but your mixing engineer might be about to delete half of your hard work just to make it audible. It's a frustrating reality for many artists. You want that professional, competitive polish without losing the unique energy that made you fall in love with the demo in the first place. Learning how to prepare stems for mixing is the most effective way to protect your creative identity while ensuring your tracks are ready for a world-class sound.
We understand that the technical handoff can feel like a cold, clinical hurdle in an otherwise vibrant process. You're likely balancing the fear of losing your "vibe" with the uncertainty of 2026 technical standards like 24-bit depth and 48 kHz sample rates. Mastering this transition is a creative act. It ensures your artistry survives the move from your home studio to a high-end facility. This guide provides a clear roadmap for organizing your session, from distinguishing stems from multitracks to exporting pristine WAV files ready for an immersive 9.1.4 suite. You'll learn how to deliver a professional package that maximizes your budget and ensures your final mix sounds absolutely legendary.
Key Takeaways
- Lock in the technical foundations of your project by mastering 2026 standards, including the shift toward 32-bit float for maximum dynamic range.
- Distinguish between multitracks and stems to provide the exact level of control your engineer needs to bring your vision to life.
- Streamline your studio workflow with our checklist on how to prepare stems for mixing, ensuring every file is consolidated, cleaned, and perfectly aligned.
- Protect the unique energy of your demo while leaving enough sonic headroom for professional processing to elevate your track to a competitive level.
- Set the stage for a world-class handoff that allows for a smooth evolution from traditional stereo into high-fidelity immersive audio environments like Dolby Atmos.
Why Professional Stem Preparation is Your Secret Weapon
The difference between a chart-topping hit and a cluttered demo often lives in the hours before the first fader even moves. In the studio, we live by a simple truth: "Garbage In, Garbage Out." If your source files are riddled with digital clipping, poor fades, or buried in excessive master bus compression, even the most expensive analog gear can't fully restore that lost fidelity. Learning how to prepare stems for mixing is more than a technical chore. It's the process of refining your raw creative energy into a format that can actually be sculpted into a world-class record.
A "demo" is a sketch of your vision, often held together by temporary plugins and rough levels. A "mix-ready" production is a different beast entirely. It's a collection of high-fidelity assets that preserve the "vibe" you love while stripping away the technical limitations that would otherwise tie your engineer's hands. By delivering clean, intentional files, you give your mixer the sonic room to add depth, width, and that elusive professional sheen that makes tracks compete on a global scale.
Saving Time and Money in the Studio
Every minute your engineer spends hunting for a missing lead vocal or fixing a poorly timed crossfade is a minute they aren't using to make your kick drum punch through the speakers. Disorganized sessions eat up billable hours with "audio janitorial work." When files aren't consolidated or labeled clearly, the setup phase of a session can stretch from thirty minutes to three hours. Technical errors like digital clicks or missing files often lead to expensive revision cycles that could've been avoided at the export stage. Proper prep ensures your budget goes toward the art, not the logistics.
The Psychological Edge of a Clean Handoff
There is a powerful, often overlooked benefit to professional organization: it changes the way your engineer feels about your music. When a mixer opens a session that's meticulously labeled and perfectly aligned, it signals that you're a serious professional who respects the craft. This builds immediate trust. It eliminates the technical friction that kills creative momentum. Instead of getting frustrated by a messy timeline, the engineer is inspired to go the extra mile. They can dive straight into the emotional heart of your song, applying their expertise to the energy and spirit of the project from the very first playback. This collaborative synergy is exactly what moves a project from good to legendary.
The Technical Specifications Checklist for 2026
Technical precision is the foundation of every great record. Stem preparation is the process of rendering individual tracks or groups into high-fidelity audio files for post-production. It's the bridge between your creative session and the professional mixing environment. When you understand how to prepare stems for mixing, you ensure that every ounce of your project's sonic integrity remains intact. This isn't just about moving files. It's about preserving the resolution and depth you worked so hard to capture.
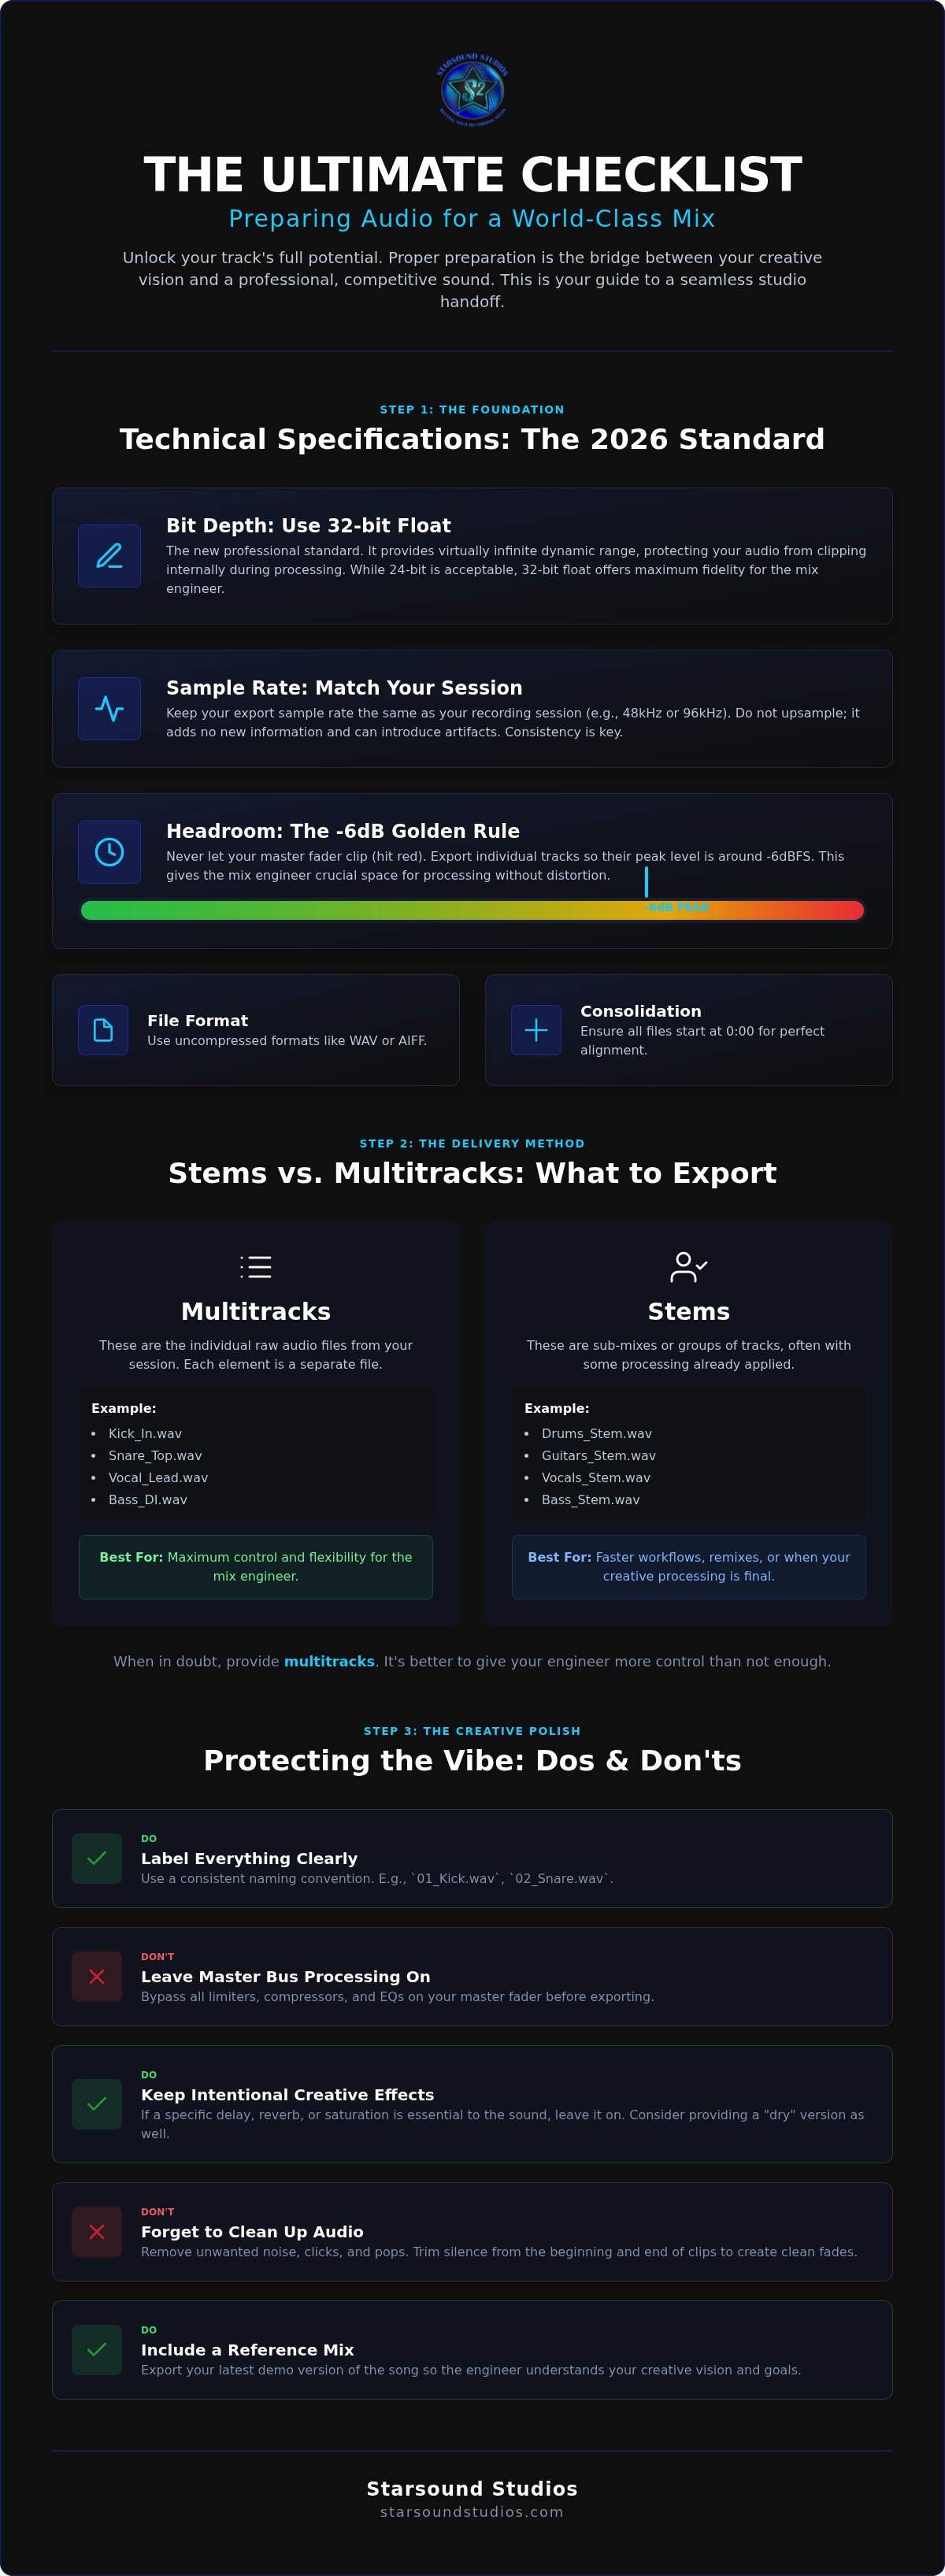
Bit depth and sample rates are your primary tools for protecting that resolution. While 24-bit has been the industry floor for years, 32-bit float has emerged as the 2026 standard for professional handoffs. This format offers virtually infinite dynamic range, protecting your audio from internal clipping. You must also match your session's native sample rate. Whether you recorded at 44.1kHz, 48kHz, or 96kHz, keep it consistent. Upsampling during export adds no new data; it only creates unnecessary file size and potential aliasing artifacts.
Industry standard formats like WAV remain universal, but many creators also utilize the audio format aiff for its metadata capabilities and high-fidelity performance. Both are uncompressed and perfect for a professional studio environment. If you're unsure which format suits your specific workflow, our team at Starsound Studios can guide you through the best settings for our professional stereo mixing services.
Headroom and Clipping: The Volume Myth
Headroom is your engineer's greatest gift. There is a common myth that louder exports lead to better mixes. The opposite is true. Your master fader must never hit "red" during the export process. Digital clipping is permanent; it destroys the harmonic richness that high-end analog gear and immersive processors provide. Aim for a peak level of -6dB. This "golden rule" provides the necessary space for a mixer to apply EQ, compression, and saturation without pushing the signal into a distorted, brittle state.
Dithering and Normalization: What to Turn Off
Turn off normalization. This feature automatically boosts the volume of your files to 0dB, stripping away the headroom we just discussed. It's a destructive process that complicates the mixing stage. You should also disable dithering. Dithering is a noise-shaping process used when reducing bit depth, which should only happen during the final mastering stage. Double-dithering introduces unwanted noise floor artifacts. Finally, ensure your master bus is clean. Export without "Auto-Gain" or limiters engaged. Let the raw energy of your tracks shine through so the engineer can shape the final dynamics with precision.
Stems vs. Multitracks: Which One Does Your Mixer Need?
Clarity is the ultimate catalyst for a great session. In the modern production landscape, the word "stems" has become a generic catch-all, but using it incorrectly can lead to significant delays. When you're learning how to prepare stems for mixing, the first step is identifying exactly what your engineer needs to achieve the best result. Most high-end stereo mixing projects actually require multitracks, not stems. Sending the wrong format can limit your mixer's ability to fix frequency masking or dynamic inconsistencies.
Multitracks are the raw, individual building blocks of your song. This means a separate file for the kick drum, another for the snare, and individual files for every vocal layer. Stems, by contrast, are stereo groupings. They are sub-mixes of related instruments, such as all the drum tracks summed into one file or all backing vocals combined into a single stereo track. While stems are perfect for live playback or quick remixes, they don't offer the granular control needed for a competitive, world-class mix.
The 'Stems' Confusion: A Comparison
Understanding the technical difference ensures you don't accidentally "lock in" a balance that needs to be changed later. Use the table below to determine which format matches your current project goals.
| Feature | Multitracks | Stems |
|---|---|---|
| Definition | Individual microphones and instruments | Grouped and processed instrument families |
| Flexibility | Maximum control over every element | Limited control; levels are pre-baked |
| Best For | Full Stereo Mixing and Atmos Prep | Live shows, remixes, and film cues |
The "Committing Rule" is your guide for creative effects. If a specific delay or distortion is essential to the identity of the sound, print it to the track. If the effect is just a general reverb or a corrective EQ, leave it off. This allows the mixer to use their high-end outboard gear to place that sound perfectly within the 3D soundstage.
Preparing for Dolby Atmos: Immersive Requirements
The transition to immersive audio requires even more separation. Dolby Atmos mixing relies on a combination of "beds" and "objects." While a stereo mix might combine several synth layers into a stem, an Atmos mix often benefits from having those layers separate. This allows the engineer to move individual "objects" around the listener in a 9.1.4 environment. When you master how to prepare stems for mixing in the immersive era, you give your project the best chance to translate across both traditional headphones and advanced spatial systems.
The Creative Prep Checklist: Cleaning and Communication
Mastering the technical export is vital, but the creative organization is what truly allows a mixer to excel. When you understand how to prepare stems for mixing, you're essentially setting the stage for a performance. A clean session isn't just about neatness; it's about removing the friction that stalls creative momentum. This phase involves a meticulous sweep of your audio to ensure every file is intentional. You should also follow the "Zeroing Rule." Remove all fader automation and panning unless it's a creative effect essential to the sound. This gives the mixer a neutral starting point to build a more dynamic and wide soundstage.
Consolidating for Perfect Sync
Every single track must start at Bar 1, Beat 1. If your lead vocal starts at the second chorus, don't export it as a floating region. Consolidate or "bounce in place" so that every file in the folder is the exact same length. This ensures that when we drop your files into our system in North Royalton, everything aligns perfectly without us having to guess where a bridge synth begins. Always verify your sync by re-importing your exported files into a blank session. If it sounds right there, it's ready for us. This step also involves cleaning the audio: removing clicks, pops, and "dead air" between phrases to ensure a pristine signal path.
Naming and Organizing for Speed
Vague file names like "Audio_01_Copy" are the enemy of a great mix. A professional standard uses numerical prefixes and instrument codes to keep things grouped logically. Use a format like "01_DRM_Kick_In" or "12_VOX_Lead_Dry." This allows the engineer to see the structure of your song at a glance. We also recommend creating a documentation folder that includes a simple text file with the song's BPM and key. This organization is especially critical for immersive projects, where we might be managing dozens of individual objects in a 9.1.4 space. Proper naming ensures that no time is wasted on technical identification.
The Communication Pack: References and Notes
Your engineer needs to hear your vision. Always include a "Rough Mix" that represents what you've been listening to during the production. Along with this, provide two or three professional reference tracks that share your desired sonic DNA. If you want the low-end of a specific modern pop hit but the vocal air of a classic record, tell us. A brief note for each section of the song can also be a game-changer. These details help us move beyond the "janitorial" work and straight into the artistic elevation of your music. If you're ready to see how this level of prep transforms your sound, explore our remote mixing and mastering services to start your project.
Next Steps: Bringing Your Tracks to Starsound Studios
Once you have mastered how to prepare stems for mixing, you have done more than just organized files. You have protected your artistic legacy. At Starsound Studios in North Royalton, we treat this technical handoff as a sacred transition. Steve "The Mix" brings over a decade of professional mastery to every session, ensuring that the precision you put into your prep translates into a world-class sonic experience. Whether you are walking into our Cleveland-area facility or utilizing our remote mixing services from across the globe, your project receives the same high-fidelity attention to detail.
The leap from stereo stems to an immersive soundstage is where the magic lives. As Ohio's first Dolby Atmos certified studio, we specialize in taking your meticulously prepared tracks and expanding them into a 9.1.4 environment. This process is about more than just adding speakers. It is about placing your audience inside the music. By following our professional guide on how to prepare stems for mixing, you provide the separation necessary for us to elevate your work into the Atmos immersive audio landscape with absolute clarity.
The Starsound Experience in Cleveland
Our studio is designed as a creative sanctuary. It is a place where technical science meets the spirit of creation. We bridge the gap between home production and world-class fidelity by leveraging equipment that captures every nuance of your performance. Our 9.1.4 Dolby Atmos suite offers a listening experience that is simply unattainable in a standard home setup. This environment allows you to hear your music with total transparency. It ensures that every creative decision is intentional, impactful, and ready to compete on a global scale.
Ready to Start? Your Handoff Guide
Starting your journey with us is a seamless process. Once your files are consolidated, named, and cleaned according to our professional checklist, you can upload them directly to our secure server. Steve will then conduct an initial consultation to discuss your vision, your reference tracks, and the emotional core of your project. We don't just "process" audio; we collaborate with you to reach your highest potential. Reliability and high standards are our foundation, but your unique identity is our priority.
Book your mixing session at Starsound Studios today and let's turn your vision into a polished, world-class reality.
Ready to Transform Your Production into a World-Class Record?
Your music deserves to be heard with absolute clarity and emotional impact. Mastering how to prepare stems for mixing is the bridge that carries your vision from a home demo to a professional masterpiece. By locking in high-fidelity technical specs and organizing your session with surgical precision, you empower your engineer to focus on the art of the mix rather than technical cleanup. Whether you're delivering multitracks for a punchy stereo record or preparing objects for an immersive soundstage, your preparation is the secret weapon that protects your unique vibe.
At Starsound Studios in North Royalton, we're ready to take those assets to the next level. Led by Steve "The Mix," our facility serves as a creative sanctuary where precision meets passion. As Ohio's only certified Dolby Atmos studio featuring a premier 9.1.4 immersive audio suite, we provide the high-end environment your artistry demands. Elevate your sound with professional mixing at Starsound Studios and experience the difference that world-class engineering makes. Your journey to a competitive, professional sound starts with a single clean export. We can't wait to hear what you've created.
Frequently Asked Questions
Should I leave my compressors and EQs on the tracks when exporting?
You should keep creative effects that define the sound but remove corrective processing. If a specific compressor pump or EQ curve is part of the instrument's identity, print it. However, leave off general utility plugins that a mixer can handle better with high-end gear. This balance is key when learning how to prepare stems for mixing because it preserves your artistic vision while leaving sonic room for Steve "The Mix" to work in our Cleveland facility.
Do I need to export my tracks in mono or stereo?
Export your tracks according to their original source. Kick drums, snares, and lead vocals are typically mono, while synth pads or overheads are usually stereo. Forcing a mono signal into a stereo file just doubles the file size without adding any fidelity. Keeping the original format helps our North Royalton team maintain a clean, organized session. It also ensures that your tracks translate perfectly when we move from stereo into an immersive 9.1.4 environment.
What is the best file format for sending stems to a mixer?
The industry standard for professional handoffs is high-resolution WAV or AIFF files. We recommend exporting at 24-bit or 32-bit float with a sample rate that matches your session's native settings. Avoid MP3s or other compressed formats at all costs, as they strip away the essential harmonic detail. Using uncompressed files ensures that your project maintains the highest possible audio quality during the transition to our specialized Dolby Atmos mixing suite here in Ohio.
How much headroom should I leave on my individual tracks?
Aim for peak levels around -6dB on every individual track. This provides the necessary breathing room for professional outboard gear and digital processors to function without distortion. If your tracks are already peaking at 0dB, the mixer has no space to add EQ or saturation. Providing healthy headroom is a critical part of how to prepare stems for mixing. It ensures that the final product sounds open, dynamic, and ready for competitive mastering.
Should I provide MIDI files along with my audio stems?
Providing MIDI files is not mandatory, but it can be incredibly helpful for certain tasks. If you include MIDI for your kick drum or snare, it allows us to easily layer samples if the original recording lacks punch. Similarly, MIDI for synth parts can help if we need to re-amp a sound or double a melody for extra thickness. Including these assets is a professional touch that gives your engineer more creative options during the production process.
What happens if I forget to consolidate my tracks from Bar 1?
If you forget to consolidate your files from Bar 1, your tracks will be misaligned when imported into a new session. This creates a massive technical hurdle that eats into your studio time. An engineer would have to manually guess where every vocal ad-lib or bridge synth belongs. To avoid this, always "bounce in place" from the very start of the timeline. This simple step ensures that your vision remains perfectly synchronized from the first beat to the last.
Can you mix my song if I only have a single stereo stem of the beat?
We can certainly mix your vocals over a single stereo beat, often called a 2-track mix. However, this limits our ability to make the vocals sit perfectly inside the music. We can't adjust the kick drum's impact or carve out space in the synths for your voice. For the best results, especially for a professional release in Cleveland, we recommend providing the full multitracks. This gives us the total control needed for a world-class sound.
How do reference tracks help the mixing engineer?
Reference tracks act as a sonic roadmap for your engineer. They tell us exactly where you want your low-end to sit and how much air you want on the vocals. By choosing 2-3 professional songs that you love, you eliminate the guesswork from the process. This communication helps Steve "The Mix" align his creative decisions with your expectations. It ensures the final result feels like a natural evolution of your project while meeting modern industry standards.


