
What if your music wasn't just a flat wall of sound, but a living, breathing environment where every instrument occupied its own physical coordinate? Transitioning from a traditional stereo mindset to an immersive 3D canvas is the most significant shift in audio production history. It's about more than just adding height; it's about movement, energy, and depth. You likely feel the pressure to get this right. The fear of "baking in" the wrong effects or sending messy files to a high-end facility can be paralyzing. Mastering how to prepare tracks for dolby atmos mixing is the essential bridge between your creative vision and a world-class 9.1.4 result.
We're here to turn that technical uncertainty into artistic enthusiasm. You've worked too hard on your sound to let it get lost in translation. This guide delivers a definitive, actionable checklist for track export. We'll clarify the confusion between stems and multitracks; we'll also nail down the critical 48kHz/24-bit sample rates and -18 LKFS loudness targets required for 2026 streaming standards. You'll learn how to maximize the three-dimensional soundstage without sacrificing the impact of your original vision. It's time to prep your session for the certified studio environment it deserves.
Key Takeaways
- Learn the technical precision required for 2026 delivery standards, including how to prepare tracks for dolby atmos mixing using 48kHz sample rates and 24-bit depth.
- Discover the critical difference between channel-based "Beds" and object-based "Objects" to unlock the full potential of a three-dimensional soundstage.
- Master the art of stem preparation by separating "Artistic" effects from "Spatial" ones, ensuring your reverbs and delays have room to breathe in the immersive field.
- Streamline your workflow with an essential organization checklist that covers track consolidation and clear naming conventions for a seamless transition to the mixing suite.
- Gain the confidence to deliver high-resolution files that are ready for a professional 9.1.4 Dolby-certified facility, whether you're working locally or remotely.
Understanding the Atmos Canvas: Why Preparation Differs from Stereo
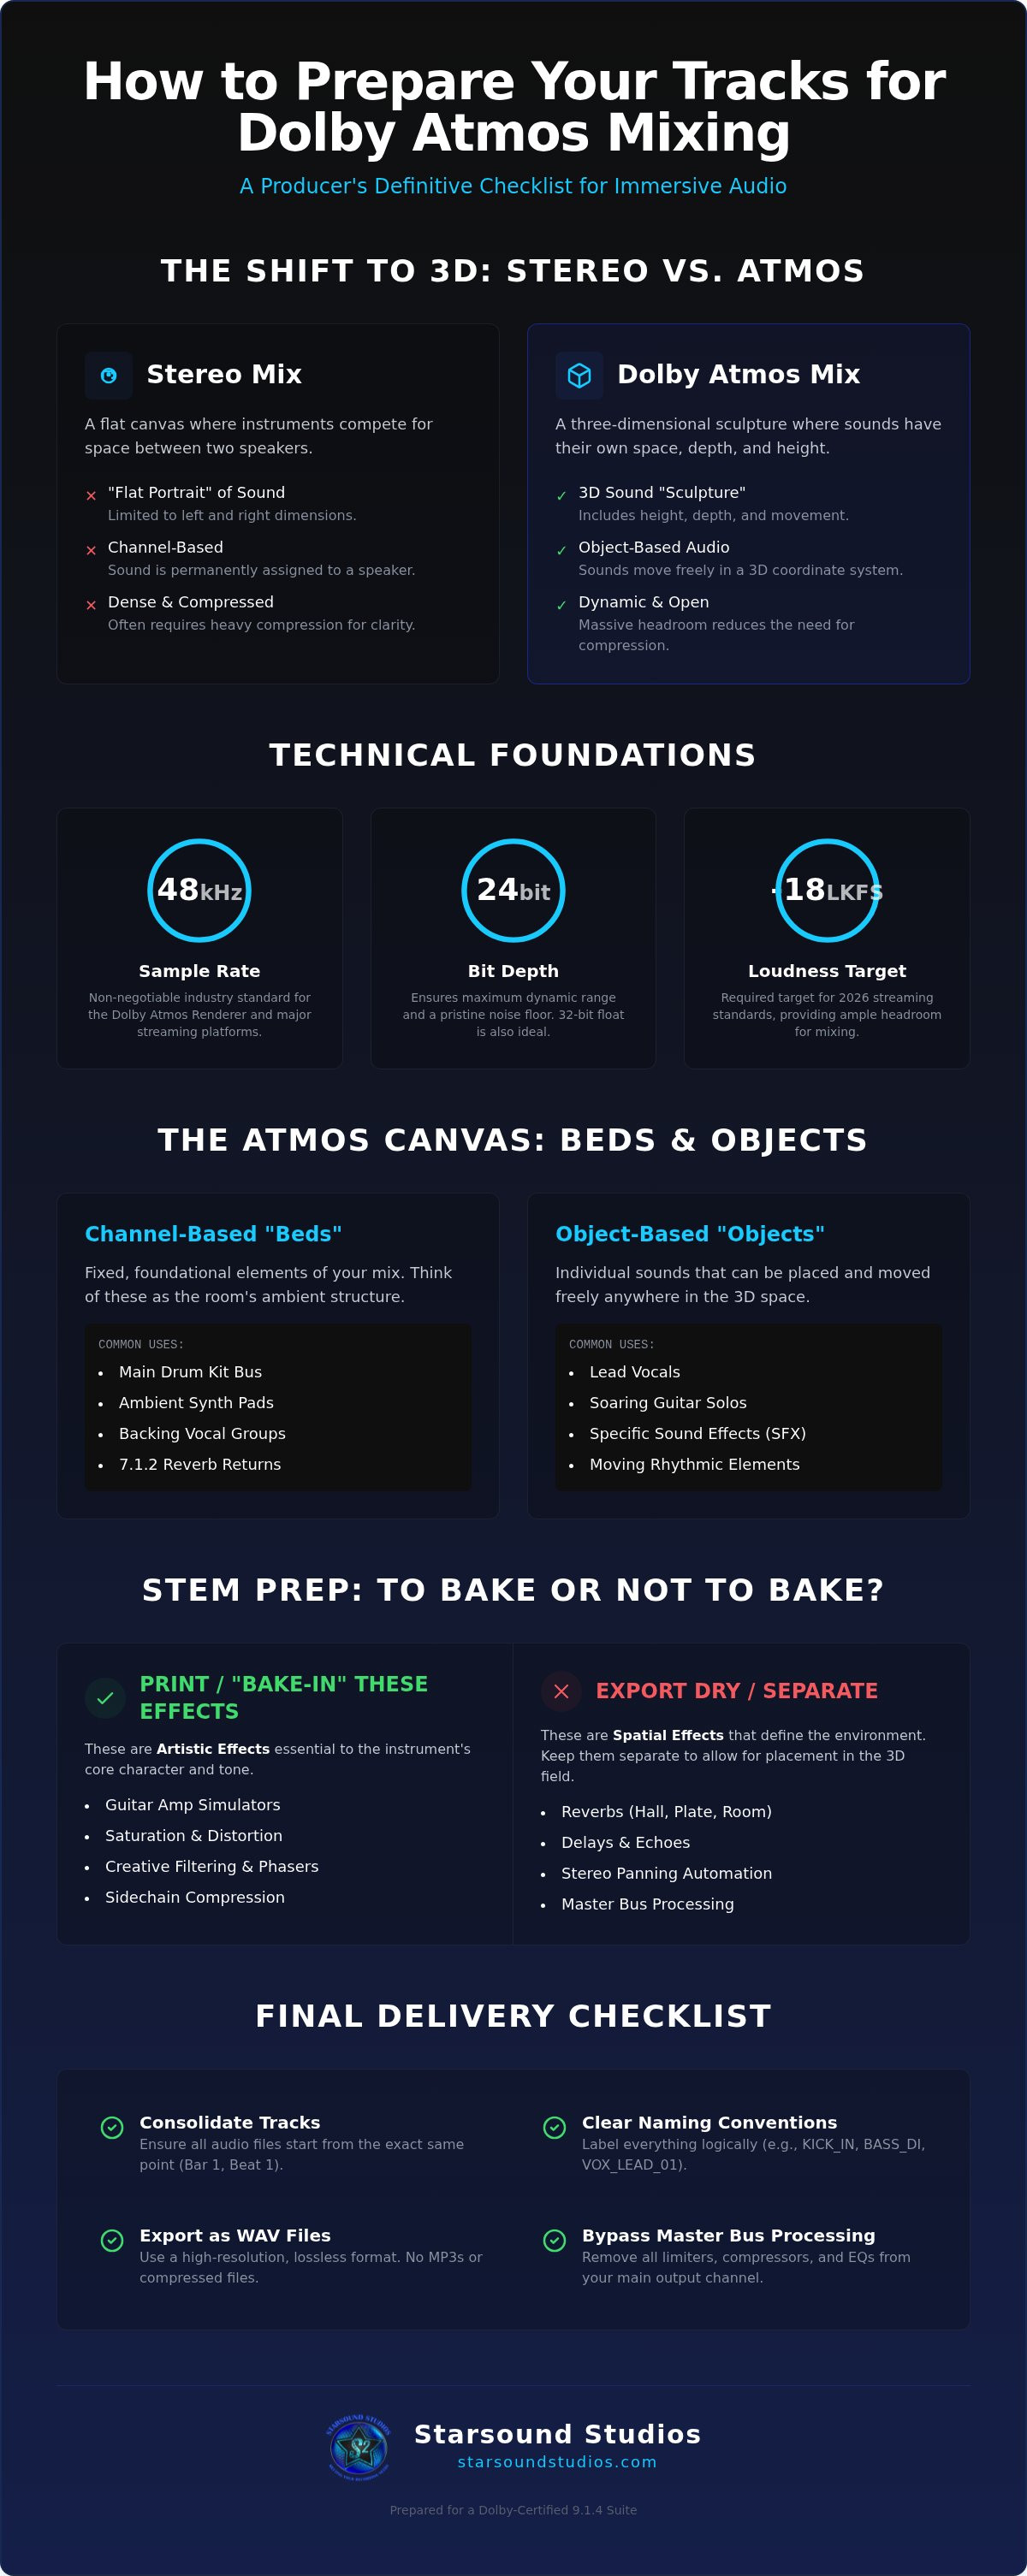
Stereo mixing is a flat portrait. Dolby Atmos is a sculpture. For decades, we've lived in a two-channel world where every instrument fights for a sliver of space between two speakers. Transitioning to an immersive format requires more than just extra speakers; it demands a total psychological shift. You're no longer mixing for "left" and "right." You're placing sound in a physical environment that includes depth, height, and movement. This is why a standard stereo bounce can't simply be "upmixed" into a professional result. The metadata simply isn't there.
The core of this evolution lies in the move from channel-based audio to object-based audio. In a traditional setup, sound is hard-coded to a specific speaker. However, Dolby Atmos technology utilizes "Objects" and "Beds." Beds are fixed channel configurations, often used for the foundational elements like your main drum kit or a 7.1.2 bus. Objects are individual sound elements that panned freely across a 3D coordinate system. When you're learning how to prepare tracks for dolby atmos mixing, you're essentially deciding which elements should stay grounded and which should fly through the room.
The 9.1.4 Monitoring Advantage
At Starsound Studios, our suite is built on a 9.1.4 architecture. This means nine ear-level speakers, one LFE channel for that deep cinematic impact, and four dedicated height speakers. This specific configuration provides a massive increase in headroom. Because the energy of your mix is distributed across 14 different sources, you don't need to push your tracks as hard to achieve clarity. Preparing for this environment requires "air." You want to give each track enough dynamic range to breathe in this larger acoustic sanctuary. If your tracks are squashed and limited before they reach us, they'll lose the very vitality that makes Atmos so exciting.
Thinking in Three Dimensions During Production
Your prep work begins long before the export button is pressed. During the recording phase, start visualizing the height dimension. Ask yourself: what elements belong above the listener? Shimmering synth pads, soaring vocal harmonies, or ambient room mics are perfect candidates for those overhead channels. It's also vital to avoid over-compressing individual tracks. In stereo, we often use heavy compression to make sounds "poke through" a dense mix. In an immersive 9.1.4 field, sounds have their own frequency pockets in physical space, so they don't need to be nearly as aggressive to be heard. Keep the transients intact; the 3D stage will do the heavy lifting for you.
The Technical Foundation: Sample Rates, Bit Depth, and File Formats
High-fidelity audio isn't just a preference; it's a requirement for immersive translation. When you're figuring out how to prepare tracks for dolby atmos mixing, the technical specs you choose act as the bedrock for the entire spatial experience. While stereo mixes might tolerate occasional technical shortcuts, the immersive field of Atmos is far less forgiving of low-resolution assets. Every file you export must be a perfect representation of your artistic intent, captured with enough resolution to withstand the complex processing of the Atmos renderer.
Bit Depth and Headroom
Standardizing your session to 32-bit float is the most effective way to protect your audio during the prep stage. This format provides virtually infinite headroom, allowing you to avoid digital "overs" and clipping even if your processing gets aggressive. In a 9.1.4 environment, the noise floor becomes a critical factor. If you pan a delicate element to a quiet corner of the room, a low bit depth can reveal unwanted quantization noise. Using 24-bit or 32-bit float ensures that even the quietest tails of your reverbs remain pristine and transparent.
Sample Rate Consistency
Consistency is your best friend when moving from a creative session to a professional mix. All assets in your session must match the target delivery rate to avoid conversion artifacts that can smear your stereo image. 48kHz is the non-negotiable industry baseline for Atmos because it's the native operating frequency for the Dolby Atmos Renderer and major streaming platforms. Don't be tempted to "up-sample" low-quality MP3s or old 44.1kHz assets; instead, ensure your original recordings meet the 48kHz standard from the start. For more technical depth on session standards, you can reference UMG's Dolby Atmos best practices.
Fidelity is preserved through the use of uncompressed formats like WAV or the audio format aiff. Beyond the file type, you must implement a "zero-start" policy for every track. This means every single file, from the lead vocal to the room mics, must start at the exact same timestamp (0:00). Without a common start point, your tracks won't align, and the rhythmic integrity of your song will collapse. If you're feeling overwhelmed by these technical requirements, you can always reach out for a session audit to ensure your files are ready for our 9.1.4 suite.
Stem Preparation: To Bake or Not to Bake Effects?
Deciding which effects to "bake" into your tracks is a pivotal moment in the creative bridge between your DAW and our 9.1.4 suite. It's the difference between a mix that feels trapped in a box and one that breathes with life. When you're learning how to prepare tracks for dolby atmos mixing, you must distinguish between your artistic identity and your spatial environment. Artistic effects define the character of a sound. Spatial effects define the room. At Starsound Studios, we want your character, but we need the flexibility to redefine your room in three dimensions.
The "Dry + Wet" delivery method is our preferred collaborative standard. By providing a bone-dry version of a lead vocal alongside a separate 100% wet reverb stem, you give us the best of both worlds. We can preserve the specific texture of the reverb you love while panned as an Object, or we can use it as a reference to recreate that vibe with Atmos-native processors. Additionally, you should generally disable side-chain compression on individual tracks. While side-chaining is a staple for creating "pump" in stereo, it can cause unnatural rhythmic artifacts when those elements are moved to the height or rear channels in an immersive field.
Handling Reverb and Delay in a 3D Space
Stereo reverbs often feel claustrophobic in an immersive environment. They're trapped in two dimensions. In a 9.1.4 room, we have the luxury of true height and depth. If you bake a stereo reverb into your guitar track, that guitar is forever stuck in a flat plane. Providing dry tracks allows us to place the instrument as a distinct Object, while the ambiance can be expanded to fill the entire 9.1.4 canopy. Only bake in an effect if the sound is inseparable from the performance, such as a heavily modulated synth or a signature wah-wah pedal.
Removing Master Bus Processing
Kill the master limiter. It's non-negotiable. That "glue" you love in your stereo mix often becomes a ceiling that prevents 3D expansion. Master bus compression and limiting squash the transients that Atmos needs to create a sense of physical distance. To ensure we stay true to your vision, always provide a reference stereo mix. This acts as our North Star. It tells us exactly how you want the energy, balance, and "vibe" to feel, allowing us to translate that spirit into the immersive world with absolute precision. We'll handle the final loudness and impact; you focus on delivering the raw, dynamic ingredients.
Organization Checklist: Naming, Consolidating, and Metadata
Precision in the digital domain is the quiet hero of every world-class production. When you're finalizing how to prepare tracks for dolby atmos mixing, your session organization becomes the collaborative bridge that allows us to focus entirely on the art of immersion. A messy session isn't just a technical hurdle; it's a drain on the creative momentum. By following a rigorous checklist, you ensure that every ounce of our energy in the 9.1.4 suite is spent on sculpting your soundstage rather than hunting for missing files or correcting alignment errors. We treat your work with absolute precision, and that process begins with the files you deliver.
Start by consolidating every single track to the same length. Every file must begin at the very first beat of the session (0:00). This "zero-start" rule is non-negotiable for maintaining rhythmic integrity across the immersive field. Additionally, implement a clear, numbered naming convention such as "01_Kick_In" or "12_Lead_Vox_Main." This simple step allows our engineers to populate the Atmos renderer with lightning speed. Strip out any unused tracks or "hidden" regions that bloat your file size. Finally, include a "ReadMe" file. This document should act as your creative surrogate, detailing the BPM, Key, and any specific movement or "Object" placement you envision for the 3D space.
The Consolidation Process
Whether you're working in Pro Tools, Logic Pro, or Ableton, use the "Commit" or "Freeze" functions to render your processing into new, continuous audio files. It's vital to ensure all fades and crossfades are permanently rendered into the new stems. A common mistake is leaving "live" fades that might not translate correctly between different DAW versions. Once exported, pull your new stems back into a blank session to verify they perfectly align with your stereo reference mix. If they don't line up in your DAW, they won't line up in our 9.1.4 environment.
Folder Structure for Studio Delivery
Organize your assets into logical instrument groups: Drums, Bass, Vocals, and Synths. This structure allows us to quickly navigate the sonic architecture of your song. Place your "Reference Mix" and "Tempo Map" in a dedicated "Global" folder. Before you hit send, verify the integrity of every file to ensure no corruption occurred during the export. High-quality organization is the final step in preparing for professional mixing and mastering services. If you want to ensure your session is ready for a world-class translation, book your session prep consultation with Starsound Studios today.
Finalizing Your Session for Starsound’s 9.1.4 Suite
Your files are consolidated. The effects are balanced. Now comes the most exciting part of the journey: the collaborative hand-off. Moving your project from a local DAW into a professional immersive environment is the final hurdle in mastering how to prepare tracks for dolby atmos mixing. Because Atmos sessions involve high track counts and massive amounts of metadata, we prioritize secure, high-speed upload methods to ensure your creative assets arrive with zero data loss. Whether you're sending files from across the globe or across town, we treat every byte of your session with the reverence it deserves.
Once your stems are ingested into our system, the first "pass" begins. This is where your stereo vision is translated into a three-dimensional sketch. We map your "Beds" and "Objects" to their physical coordinates in our 9.1.4 field, ensuring the energy and emotional core of your song remain intact while expanding the soundstage. The final result isn't just a collection of files; it's a certified ADM BWF master. This single multichannel file contains all your audio and spatial metadata, ready for delivery to Apple Music, Tidal, and Amazon Music at the industry-standard -18 LKFS integrated loudness.
The Ohio Advantage: Certified Local Expertise
Starsound Studios is Ohio's first and only Dolby-certified Atmos studio. This isn't just a title; it's a guarantee of technical excellence and acoustic accuracy. Working with a dolby atmos studio cleveland artists can actually visit provides a massive advantage over remote-only services. You can step into our North Royalton facility and hear your work through 14 calibrated speakers. Collaborating in person with Steve 'The Mix' allows for real-time refinements to your immersive vision. Headphones are a great reference, but they cannot replicate the physical impact and pin-point accuracy of a tuned 9.1.4 room.
Next Steps: Booking Your Atmos Session
Ready to hear your music in a new dimension? The process starts with a dedicated sound engineer consultation to discuss your creative goals and track count. We'll walk through your session one last time to ensure every technical detail is perfect. Before you send that final link, perform a final check: did you remove every single plugin from your master fader? Once that's confirmed, we're ready to take your sound to the next level. Your vision. Our 9.1.4 precision. Let's create something unforgettable.
Step Into the Future of Immersive Sound
The transition from two channels to a 9.1.4 environment is a transformative leap for any artist. You've now mastered the technical foundations. From ensuring 48kHz sample rates to organizing your session with surgical precision, you're ready. Understanding how to prepare tracks for dolby atmos mixing is the definitive first step in reclaiming the depth and energy your music deserves. Your vision deserves a canvas that breathes in three dimensions.
At Starsound Studios, we provide the grounded assurance that every detail is handled with world-class expertise. As Ohio's first Dolby-certified Atmos studio, our 9.1.4 immersive mixing environment is a creative sanctuary where your identity is the priority. With Steve 'The Mix' leading the engineering process, your project is in both capable and passionate hands. The technical prep is complete; now it's time for the art to take center stage. We're excited to help you reach your highest potential.
Ready to hear your music in 3D? Book your Dolby Atmos session at Starsound Studios today.
Frequently Asked Questions
What is the difference between multitracks and stems for Atmos?
Multitracks are your individual raw recordings, like a single kick drum microphone or a lead vocal. Stems are grouped sub-mixes of those tracks, such as a stereo drum bus. For a 9.1.4 mix, multitracks are preferred because they allow us to turn individual elements into "Objects" that move independently. Most Cleveland producers use a hybrid approach, sending raw tracks for lead elements and stems for complex background layers.
Do I need to mix my song in stereo before I prepare it for Dolby Atmos?
You don't need a finished stereo master, but a solid stereo reference mix is vital for our process. This reference acts as the "North Star" for the immersive version, showing us your intended balance and tonal character. When you're learning how to prepare tracks for dolby atmos mixing, remember that the Atmos version should feel like an expansion of your stereo vision rather than a completely different song.
Can I prepare Atmos tracks in a home studio without 9.1.4 speakers?
You can handle the technical prep and creative editing on headphones or a standard stereo setup. Many artists use binaural monitoring plugins to get a sense of the spatial movement during the tracking phase. However, the final translation must be verified in a calibrated environment. Starsound Studios offers a dedicated facility in North Royalton where you can hear your work on a true 9.1.4 system for total accuracy.
What sample rate should I use for Dolby Atmos music production?
48kHz at 24-bit or 32-bit float is the industry baseline for professional immersive delivery. While some high-resolution projects use 96kHz, the Dolby Atmos Renderer and major streaming platforms like Apple Music predominantly operate at 48kHz. Using this sample rate from the start of your session prevents conversion artifacts. It also ensures your metadata remains perfectly aligned during the final export of the required ADM BWF master file.
Should I include my vocal tuning and timing corrections in the exported tracks?
Yes, you should always "print" or "commit" your tuning and timing edits before exporting your files. We need to work with your final, perfected performance rather than active plugins. If you leave these as live processors, there's a high risk of software glitches or artifacts during the immersive rendering process. Delivering clean audio allows us to focus on the spatial placement and emotional impact of your vocals.
How many tracks can I include in a Dolby Atmos session?
A standard Dolby Atmos session supports up to 128 channels of audio simultaneously, including your fixed "Beds" and panned "Objects." While that sounds like a massive number, most professional music sessions typically range between 40 and 80 tracks. This provides plenty of room for creative movement without cluttering the 3D field. We help you manage this track count to maintain maximum clarity and power in your final 9.1.4 release.
What is an ADM BWF file and do I need to create one myself?
An ADM BWF (Audio Definition Model Broadcast Wave Format) is the master file required by streaming services to play immersive audio. It contains all the audio data plus the spatial metadata for every object. You don't need to create this yourself. As a certified studio in Cleveland, we handle the complex task of rendering your session into this specific format, ensuring it meets all loudness and peak requirements for distribution.
Is Dolby Atmos mixing only for high-budget major label artists?
Immersive audio is now accessible to every creator, from local Cleveland indie acts to major global stars. Streaming platforms prioritize Atmos content, often giving these tracks better visibility in their curated playlists. Because we offer remote mixing and mastering, artists everywhere can leverage our certified 9.1.4 suite to compete on a world-class level. It's an investment in the longevity of your music as the industry moves toward object-based audio.


