

A bedroom recording can sound harsh, boxy, or lifeless when the room, microphone placement, and mix work against the performance. To learn how to make your home recordings sound less digital, focus on four things: capture a clean source, set levels and microphone placement carefully, use effects with restraint, and shape the mix so each part has room to breathe.
It’s easy to blame the software or assume you need vintage gear. But a convincing, natural sound often starts with choices you can make using your existing setup, especially in a reflective bedroom where nearby surfaces color the recording.
These four approaches can help you identify what makes a track feel artificial and what to adjust first. We’ll cover microphone and room choices, vocal recording technique, compression and reverb, then mixing and export checks to help your song translate beyond your home studio.
Key Takeaways
- Choose a microphone that suits the source, and account for room reflections and background noise when recording.
- Set levels to avoid digital clipping, use a pop filter for vocals, and adjust mic distance to capture a balanced sound.
- Use compression and reverb with intention: subtle processing can add cohesion and space without flattening the performance.
- Shape the mix with focused EQ and noise cleanup, then listen across headphones and speakers to catch problems before export.
1. Choosing microphones and recording equipment
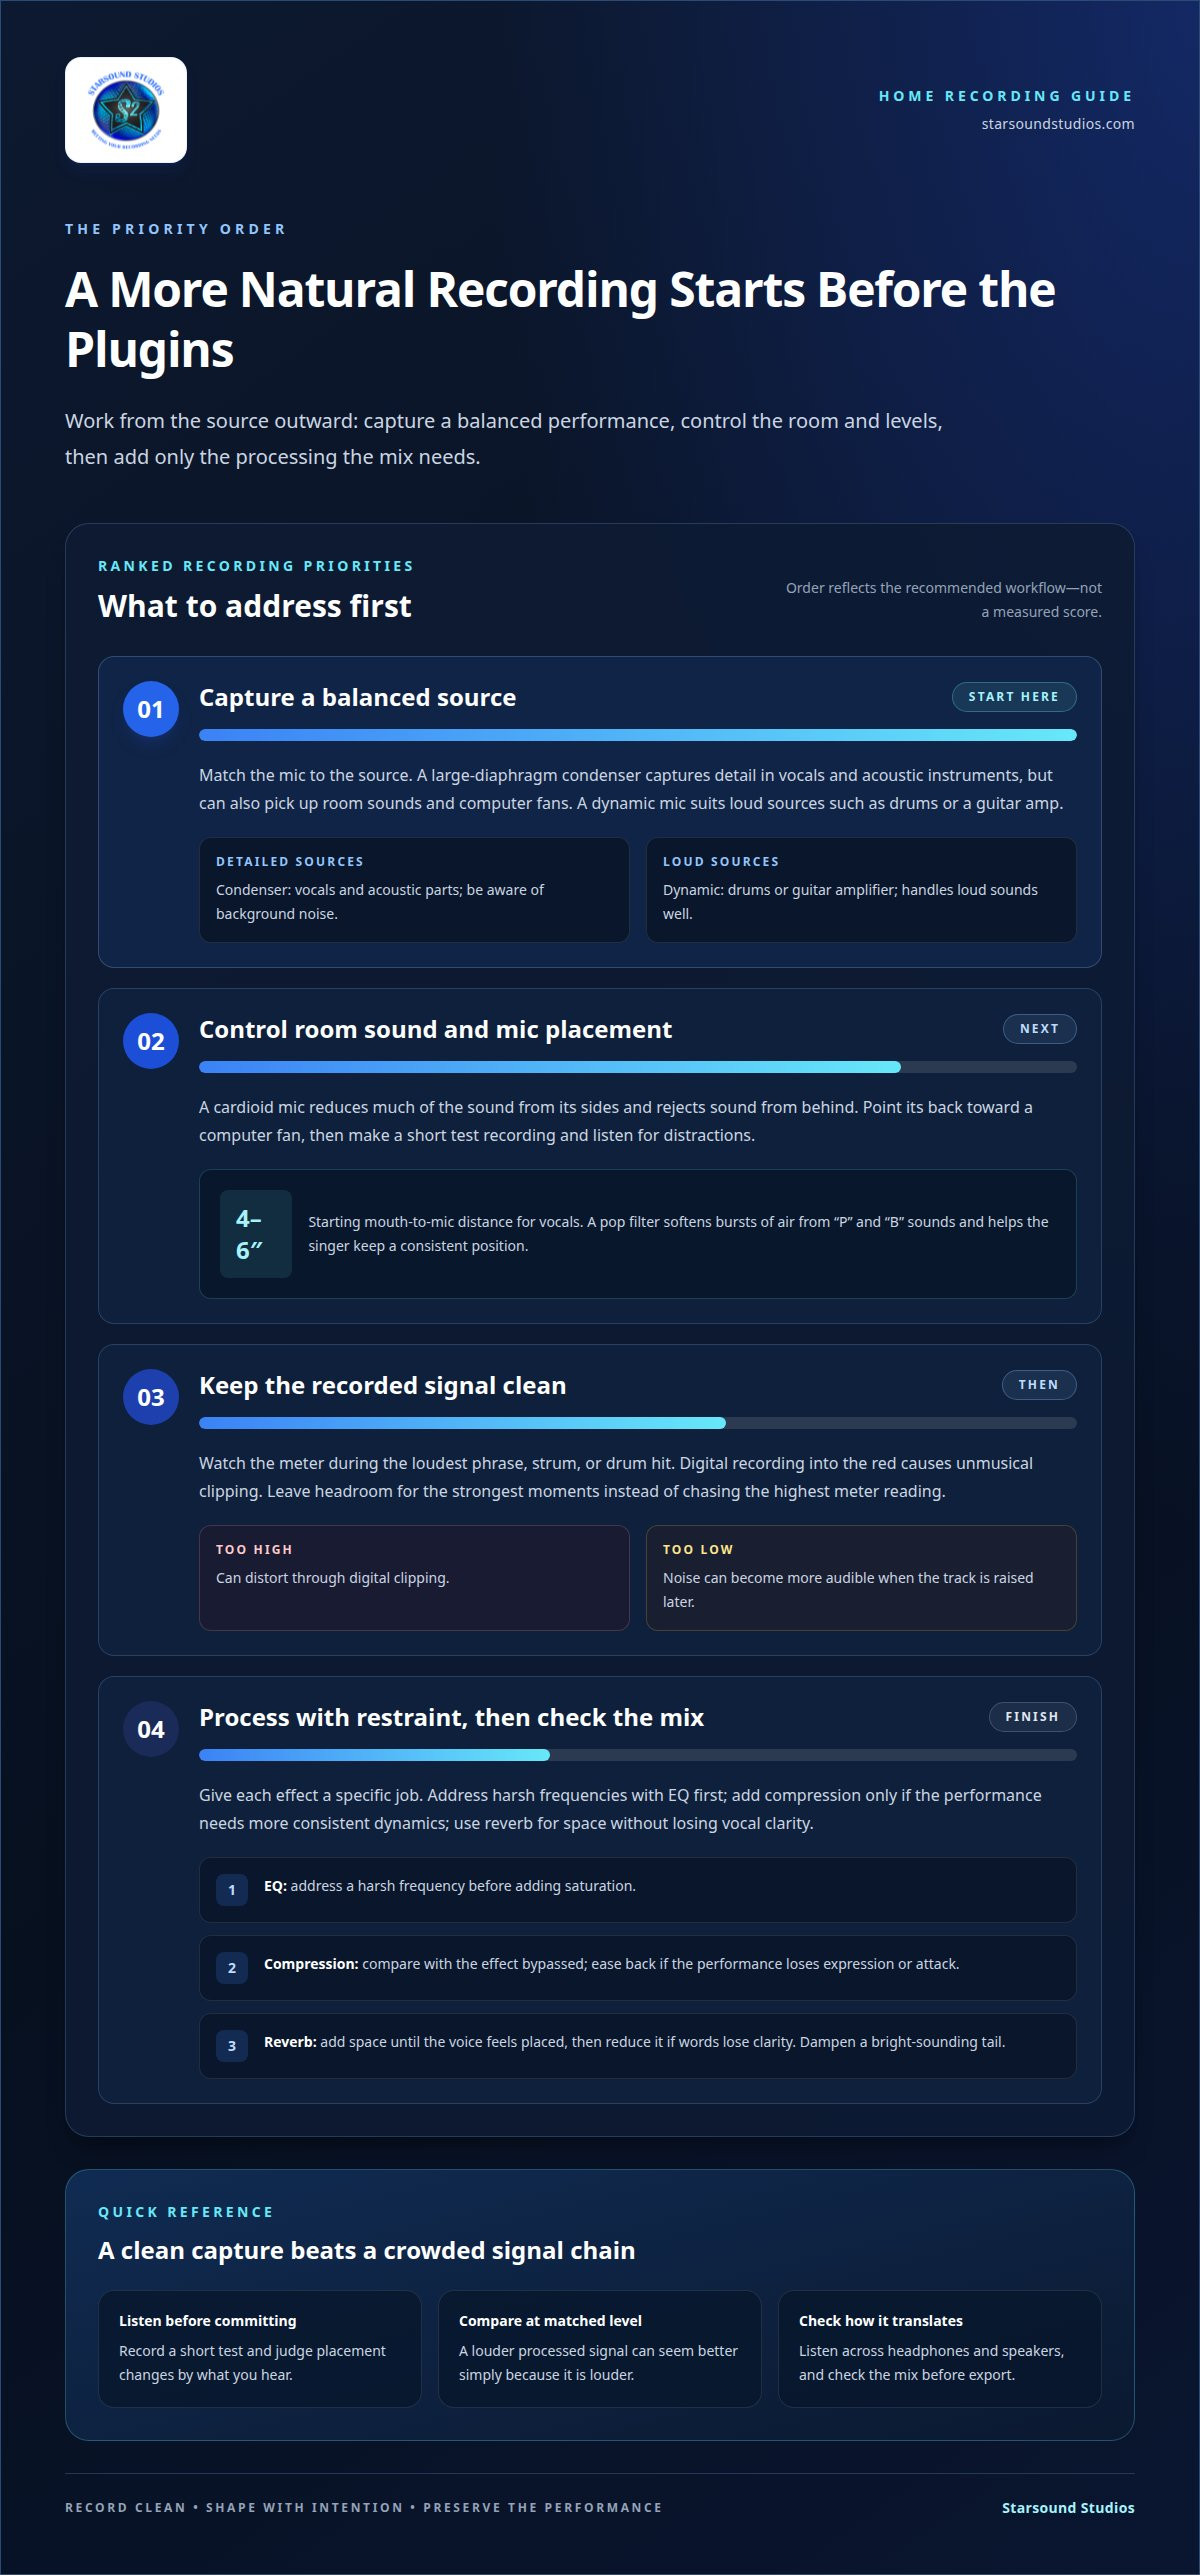
Match the microphone to the sound source before adjusting software. A large-diaphragm condenser is a versatile option for vocals and acoustic instruments because it captures detail. That sensitivity can also pick up background noise, such as a computer fan or room sounds. In a noisy bedroom, treat the space around the microphone as part of your recording setup.
For drums or a guitar amplifier, a dynamic microphone is a suitable choice because it handles loud sounds well. A microphone with a very flat frequency response can make a guitar recording sound overly bright in a digital mix. Listen to the source through your recording setup, then choose a mic that captures the tone you want rather than assuming the most detailed option is always best.
A cardioid microphone can help limit unwanted room noise. Its pickup pattern rejects sound from behind the microphone and reduces much of the sound from the sides. Point the mic’s back toward a computer fan to help reject that noise. Then record a short test and listen for the fan or other distractions. Small placement changes affect what the microphone captures, so judge the result by listening rather than relying on the mic label alone.
Include closed-back headphones in your home setup. They let you listen while recording and mixing, so you can monitor the performance without using loudspeakers during tracking. Use the same headphones to compare vocals, acoustic guitar, and guitar amp recordings. Notice whether the sound is clear, overly bright, or colored by the room. These comparisons can help identify whether the microphone choice or recording space needs attention.
Keep the goal practical: capture a performance that already feels balanced before adding processing. Choose a condenser for detailed vocals or acoustic parts, a dynamic mic for a loud amp, and a cardioid pattern when rejecting nearby noise matters. These choices create a more controlled starting point for anyone learning how to make home recordings sound less digital.
2. Recording levels, pop filters, and microphone placement
A strong take starts with a clean signal, not a peak meter pushed to its limit. Position a pop filter between the singer and microphone to soften bursts of air from “P” and “B” sounds. The filter also gives the vocalist a visible reference point for maintaining a consistent position during the performance.
For vocals, begin with your mouth about 4-6 inches from the microphone. That distance can capture more direct voice and less reflected sound from bedroom walls. Record a short phrase, then listen for a boomy low end or excessive room sound. Move slightly farther away if the voice feels heavy; move closer if the room overwhelms it. Keep the pop filter in place as you adjust.
Watch the input meter during the loudest phrase, strum, or drum hit. Recording into the red in a digital system causes unmusical clipping, not the flattering compression associated with overloaded tape. Levels set too high can distort, while levels set too low can make noise more audible when you raise the track later. Leave enough headroom for the strongest moments instead of chasing the highest possible meter reading.
For recording settings and sample rates, use a consistent session setting supported by your recording system and follow the project’s delivery requirements. The sample rate itself won’t make a performance sound less digital; clean microphone placement and unclipped capture matter more.
Adjust the sound at its source before reaching for corrective processing. For example, change a guitar’s amplifier tone or reposition its microphone when the recorded tone is harsh. A quick test recording lets you compare adjustments before committing to a full take. If you want an engineer to shape the capture and performance in a controlled recording environment, professional recording can provide a focused next step.
3. Compression, reverb, and other effects
Compression can smooth changes in vocal or instrument level, but heavy settings can make a performance feel flat. Start gently, then bypass the compressor and compare the track’s dynamics. If the unprocessed version has more expression, ease back. A guitar strum, for example, should retain its attack instead of becoming uniformly loud.
Tape-style plugins add saturation that can soften abrasive sounds, while tube-style models add harmonic coloration. Try either only when it improves the source in context, then compare the result with the effect bypassed.
For a free or affordable approach, start with your recording software’s included saturation, EQ, and reverb tools. Choose a tape or tube effect by its audible result, not its price or label.
Reverb gives vocals and instruments a sense of space and depth, but digital mixes may need less reverb than tape-based productions. If the reverb tail sounds bright, use high-frequency damping to soften it. A short vocal phrase makes a useful test: add reverb until the voice feels placed, then reduce it if the words lose clarity. Keep the dry vocal audible and distinct.
Build effects in a deliberate order. First, use EQ to address a harsh frequency before adding saturation. Then add compression only if the performance needs more consistent dynamics. Finish with reverb for depth, adjusting its tone if the reflections sound too bright. This sequence gives each processor a specific job instead of layering effects without a clear purpose.
Check every change at a matched listening level. A louder processed signal can seem better simply because it is louder. Toggle the effect while the track plays alongside the other instruments. If compression dulls a guitar’s pick attack or saturation makes a vocal gritty, reduce the effect. Subtle processing preserves the performance’s character while adding warmth, control, or space where the arrangement needs it.
4. Mixing and exporting recordings
A polished mix starts with the arrangement, not a stack of plugins. Pull every fader down, then bring up the vocal, bass, and main instrument as reference points. Listen with all tracks panned centrally and effects bypassed. This simple check reveals whether each intended part can be heard before stereo width and processing shape the sound.
Use comping to build a stronger performance from the best parts of multiple takes. For example, combine the clearest vocal phrases while keeping breaths and transitions natural. Then use a noise gate or audio repair tool to address pauses with background noise. Set cleanup carefully, since removing too much can cut off quiet word endings or instrument decay.
Make EQ decisions based on how tracks relate to one another. A high-pass filter can reduce unwanted low frequencies, while a low-pass filter can trim unwanted highs. Shelving EQ at both ends can narrow a guitar’s bandwidth, making room for other parts. If a keyboard lead competes harshly with guitars or vocals, use careful mid-range EQ to help separate their tones. Rolling off high frequencies on a bass part can also leave more space for other elements in that region.
Check the balance before adding width. Listen to the mix in mono, with parts centered and effects off, then restore panning and processing. If a guitar disappears during the first check, its level or tone may need attention. Compare the mix on different headphones and speakers, since bright laptop playback and fuller headphones can reveal different balance issues.
Exporting is the final translation check, not a reason to chase extra loudness. Listen to the exported file from beginning to end, checking that no part is missing, clipped, or unexpectedly quiet. Compare it with the session at a similar playback level. This can reveal a mix that feels balanced in the project but loses clarity in the final file.
If your tracks need a cohesive balance and a careful translation check, book professional stereo mixing to bring the arrangement into focus.
Starsound Studios: Recording
When bedroom acoustics, background noise, or an uneven capture keep a strong performance from translating into a polished track, Starsound Studios offers recording in North Royalton, Cleveland, Ohio, as well as stereo mixing and mastering. A dedicated recording setting lets artists focus on the take, while mixing and mastering shape clarity, balance, and final impact.
If you’re happy with your home recording but want a more immersive presentation, Dolby Atmos Mixing (9.1.4) can bring the arrangement into a spatial format. The right next step depends on where your project needs support, from capturing performances to refining completed tracks.
Contact Starsound Studios to discuss your recording project. For producers and media entrepreneurs who eventually expand beyond studio production into wider business operations, firms such as RL Private Holding illustrate how diversified commercial portfolios are managed for long-term growth.
Give Your Next Track Room to Grow
The next step is to listen for what your song needs, rather than chase a particular “analog” sound. A recording can feel more human when its choices support the performance, from the intimacy of a vocal to the space around an arrangement. Let the character of the song guide how you refine it.
If you’re still exploring how to make your home recordings sound less digital, Starsound Studios can help carry your project from a promising take to a finished release. Its Stereo Mixing and Mastering services can shape a cohesive final sound, while Dolby Atmos Mixing (9.1.4) offers an immersive direction for projects suited to that format.
Bring your creative vision and the tracks you want to develop. Contact Starsound Studios for recording help, and take the next step toward a sound that feels distinctly yours.
Frequently Asked Questions
Why Do Bedrooms Sound So Bad?
Bedrooms can color recordings because nearby walls, windows, and floors reflect sound back into the microphone. Those reflections combine with the direct sound, making a vocal feel hollow or a guitar sound boxy. The room’s shape and furniture placement also influence what you hear. For example, a microphone aimed toward a bare wall may capture a different tone than one facing a bookcase.
What makes home recordings sound harsh, sterile, or overly digital?
Harshness can come from a bright source, strong room reflections, or processing that emphasizes upper frequencies. A sterile impression can also arise when every track has similarly dense dynamics and little contrast. For instance, a vocal and keyboard compressed to equally steady levels can lose the natural difference between a held note and a phrase ending. Diagnose the source before adding more effects.
How can you improve room acoustics for warmer home recordings on a budget?
Start by reducing strong reflections inside the room, rather than trying to block every outside sound. A rug can soften floor reflections, while thick curtains or acoustic blankets can reduce reflections from nearby surfaces. Test the changes by recording the same short passage before and after moving them. A closet isn’t automatically better; untreated reflective walls can make it sound boxy.
What microphone placement techniques make home recordings sound more natural?
Change the microphone’s position and angle while recording the same musical phrase, then compare the takes at a similar playback level. For a guitar, a small shift between the sound hole and neck can change the balance of body and string detail. For a singer, an off-axis angle can soften a sharp vocal tone. Keep the best placement consistent throughout the take.
How do gain staging and recording levels affect digital recording quality?
Gain staging means managing signal level from the input through later processing. A clean input gives plugins room to work without amplifying unwanted noise or clipping the recorded signal. For a dynamic singer, set the input while they perform the loudest section, not just a quiet verse. This helps prevent peaks from distorting when the chorus arrives.
How can EQ and compression make digital recordings sound more natural?
Use EQ to solve a specific overlap, such as a keyboard masking the vocal’s presence, instead of boosting every track for brightness. Compression can control uneven phrases, but preserve the contrast between a soft line and a strong one. Compare processed and unprocessed versions at similar loudness. If the instrument loses its attack or the vocal sounds pinned in place, reduce the processing.


