

What if the most important step after mastering isn’t another tweak, but a confident final review? If you’re asking, “after mastering what is the next step,” you’re in the right place. Give the finished audio one last careful listen, then check for specific playback issues, confirm your files and release details, and move forward when everything is in place.
The final stretch can feel surprisingly uncertain. Is the master ready for distribution? Which audio format should you upload? Have you checked the metadata, artwork, and release timing? A clear checklist turns those questions into manageable steps, helping you catch practical errors without second-guessing a master that already sounds right.
This guide covers how to review and approve your delivered master, prepare distribution-ready audio files and release information, and organize the final details before submission. You’ll also learn when a revision is warranted: when you’ve identified a real playback or translation issue, not simply because release day is approaching. Finish with a plan, protect the sound you’ve worked hard to create, and move your music toward release with confidence.
Key Takeaways
- Start with a focused review of the delivered master: check the files, listen critically, note specific concerns, then approve or request feedback.
- When deciding after mastering what is the next step, separate the approved distribution master from alternate versions and working references.
- Treat differences in bass, loudness, or stereo width as observations, not automatic reasons for revision. Respond to clear, repeatable issues.
- Prepare metadata and artwork, then follow your distributor’s audio and submission requirements instead of assuming every platform uses the same specifications.
- Seek engineering support when a specific mix or playback problem remains audible. If the master translates as intended, move ahead with release preparation.
After mastering, what should you do first? Review and approve the final master
Mastering is complete, but you don’t need to jump straight into promotion. First, make sure the delivered master reflects the song you intend to release. If you’re asking, “after mastering what is the next step,” begin with a calm, focused review, then approve the file or share clear feedback. This is quality control, not an invitation to reopen every creative decision.
Mastering prepares a final mix for distribution and helps it translate across playback systems. For more context on the process, read this overview of Mastering (audio) and our professional audio mastering guide.
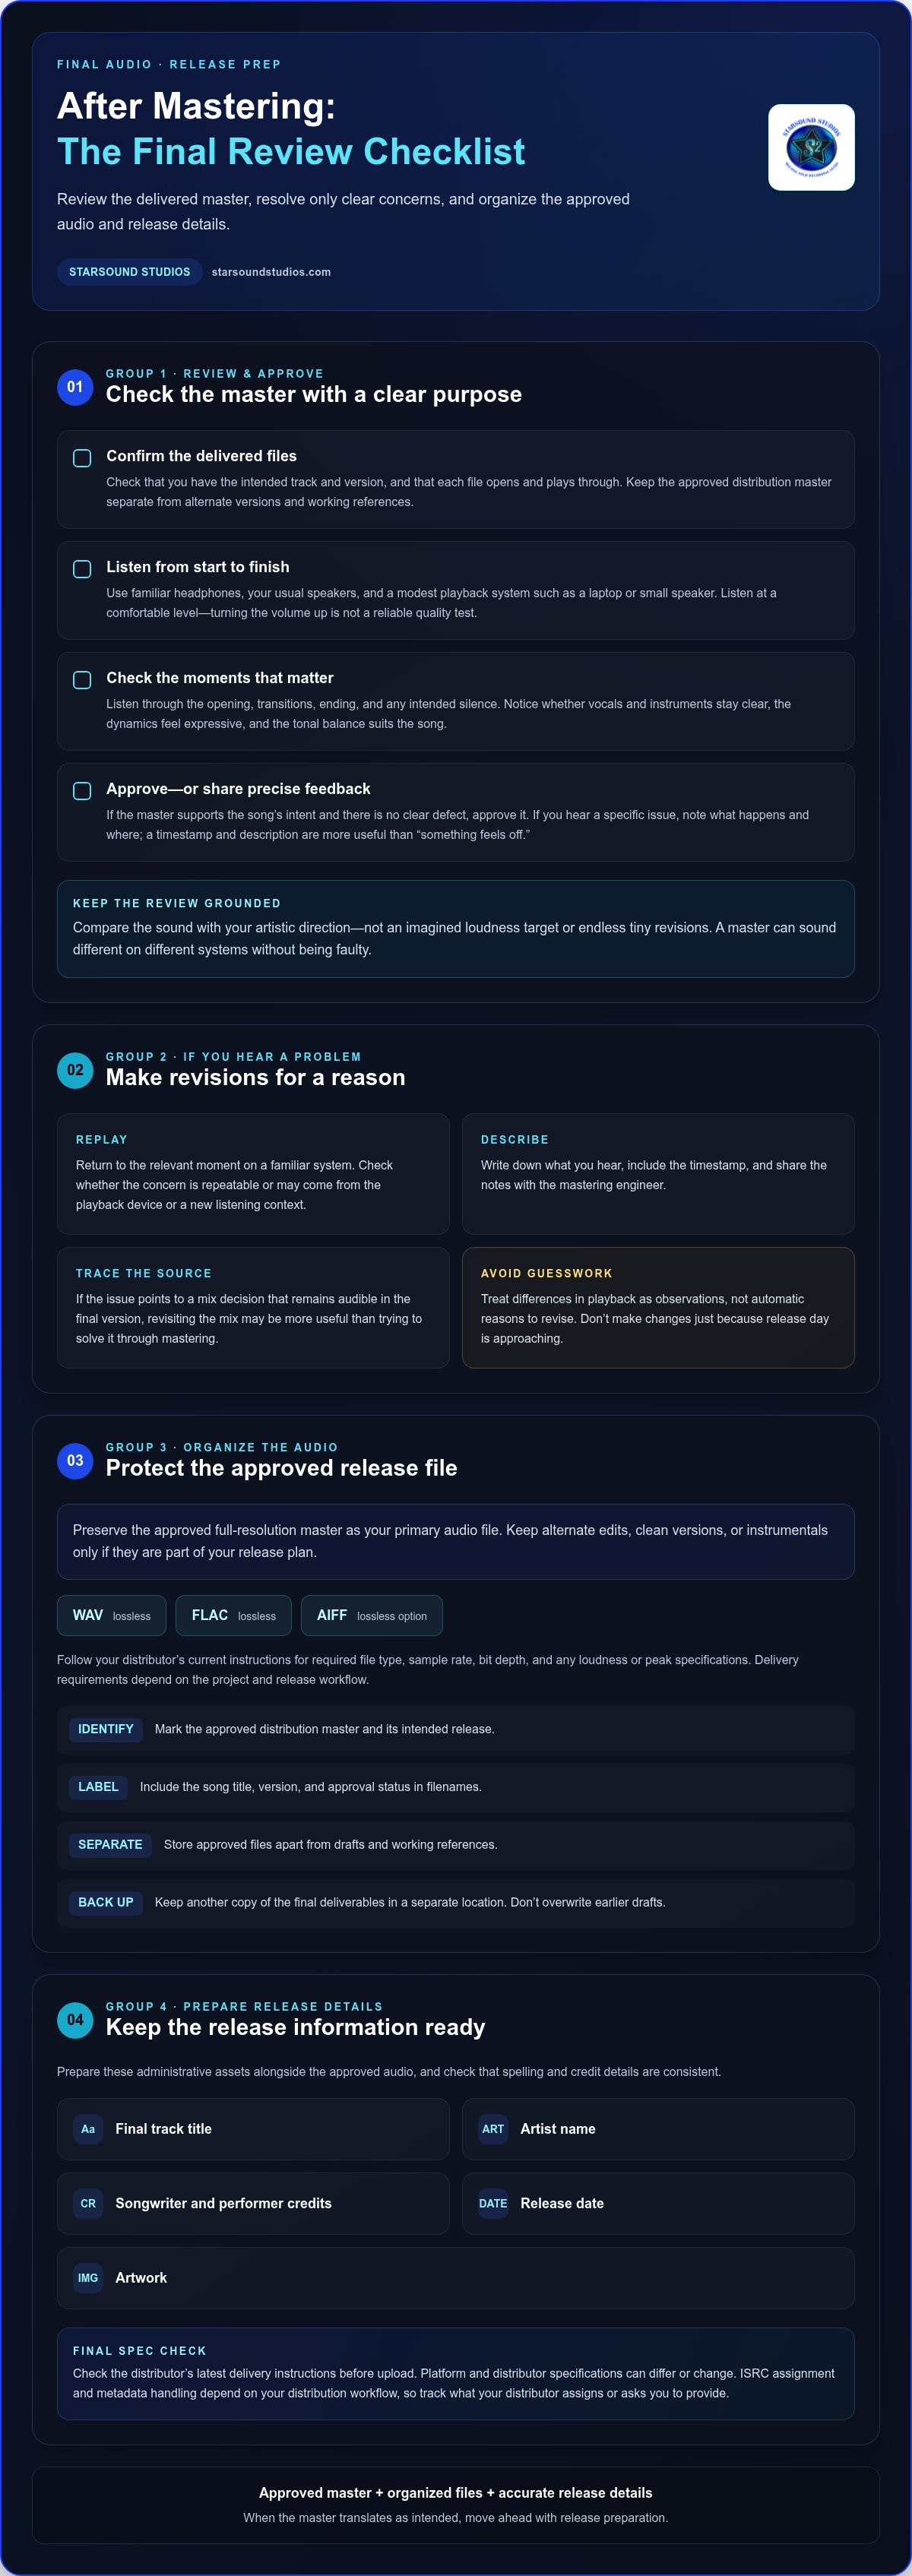
- 1. Check the delivered files. Confirm you have the intended track and version, and that each file opens and plays through. Keep the approved distribution master separate from alternate versions and working references.
- 2. Listen from start to finish. Use familiar headphones, your usual speakers, and a modest playback system, such as a laptop or small speaker. Listen at a comfortable level. Turning the volume up isn’t a reliable test of quality.
- 3. Note specific concerns. If something distracts you, write down what you hear and where it happens. A timestamp and description are more useful than “something feels off.”
- 4. Approve or request feedback. If the master supports the song’s intent and you don’t hear a clear defect, approve it. If you do hear one, share your notes with the mastering engineer before deciding whether a revision is needed.
How do you know whether the master is ready to approve?
Listen through the opening, transitions, ending, and any intended silence. Check whether the vocals and instruments remain clear, the dynamics still feel expressive, and the tonal balance suits the song. Compare what you hear with your artistic direction, not an imagined loudness target or an endless series of tiny revisions. A master can sound different on different systems without being faulty.
What should you do if you hear a problem?
Pause and replay the relevant moment on a familiar system. Ask whether the concern is repeatable or whether it may come from the playback device or from hearing the finished version in a new context. Then describe the issue precisely, include the timestamp, and share it with the mastering engineer. If the concern points to a mix decision that remains audible in the final version, revisiting the mix may be more useful than trying to solve it through mastering. Make changes for an identified reason, not release-day nerves.
Once you’re comfortable with the sound and have approved the correct file, move on to preparing the rest of the release.
What files and details should you receive after mastering?
If you’re asking “after mastering what is the next step,” organize your approved audio and release information before uploading anything. Deliverables depend on the agreed project and how you plan to release the music, so there isn’t one export package every artist should expect. Clearly identify the distribution master, and don’t mistake alternate versions or working references for the approved release file.
Which master files should you keep organized?
For the intended release, preserve the approved full-resolution master as your primary audio file. Keep alternate edits, clean versions, or instrumentals only if they’re part of your release plan. Lossless formats such as WAV and FLAC are commonly used for distribution, and AIFF is another lossless option. Read this AIFF audio format guide to understand the format. Follow your distributor’s current instructions for the required file type, sample rate, bit depth, and any loudness or peak specifications.
A simple folder structure can prevent an upload mistake. Keep final files separate from drafts, and back them up in a second secure location. Use filenames that make each version unmistakable, such as “SongTitle_MainMaster_Approved,” rather than “final-final2.” Don’t overwrite earlier drafts. If you receive more than one approved file, label each by its intended use.
- Identify: Mark the approved distribution master and its intended release.
- Label: Include the song title, version, and approval status in filenames.
- Separate: Store approved files apart from drafts and working references.
- Back up: Keep another copy of the final deliverables in a separate location.
What release information belongs alongside the audio?
Prepare the final track title, artist name, songwriter and performer credits, release date, and artwork as separate administrative assets. Check that spelling and credit details are consistent. Spotify for Artists explains why preparing your metadata accurately matters to a release. ISRC assignment and metadata handling depend on your distribution workflow, so keep track of what your distributor assigns or asks you to provide.
Before upload, check the distributor’s latest delivery instructions. Platform and distributor specifications can differ or change, so don’t rely on export settings from an old project. If a specific playback or translation issue remains, remote mastering support can help address the audio concern before release.
How can you quality-check a master without overthinking it?
If you’re wondering “after mastering what is the next step,” make your next listen purposeful, not endless. Check that you have the correct version and listen for concrete faults such as clicks, unexpected distortion, missing sections, or an abrupt cutoff. Then compare how the sound translates across familiar systems. Differences in bass, loudness, or stereo width aren’t automatically defects.
Keep playback levels comfortable and reasonably matched. A louder version can seem more exciting simply because it’s louder, while speakers, headphones, room acoustics, and volume can all shift how you perceive tone and space. Listen, take a short break, then return to the specific moment you noted. Repeating full-volume sessions from start to finish can make small differences feel bigger without clarifying what needs attention.
Is a playback difference a mastering problem or a system difference?
Use familiar headphones, your usual speakers, and one modest playback system. Ask whether the concern is consistent and repeatable across them. A bass change heard only on one small speaker may reflect its limited low-frequency response, while a persistent click at the same timestamp deserves a closer look. Focus on clear evidence, not one isolated impression.
| Observation | Likely explanation | Sensible next action |
|---|---|---|
| Bass feels lighter on a small speaker | The system may reproduce low frequencies differently | Compare on familiar headphones or speakers before requesting a change |
| The master seems louder than a reference | Playback levels may not be matched | Lower the louder track and compare at a comfortable, similar level |
| Stereo image feels narrower on one device | Speaker placement or playback may affect width perception | Check another familiar system and note whether the difference persists |
| A click, clipping, missing section, or wrong version is audible | There may be a file or audio issue | Replay the exact moment, confirm the file, and record a timestamp |
When should you request a revision or revisit the mix?
Request feedback or a revision when you can describe a specific audible concern, where it happens, and what you hear. For example, note distortion at a particular moment rather than saying the whole track feels wrong. If the issue involves the balance of a vocal and instrument, an arrangement choice, or a source element that remains prominent in the finished version, revisiting the mix may be more appropriate. That doesn’t mean every concern requires a new mix or guarantees a preferred result. Make the next move based on a repeatable issue, then let the song rest when your checks reveal no clear problem.
What should you prepare before uploading your mastered song?
If you’re asking “after mastering what is the next step,” turn your approved audio into a complete, carefully checked submission. Keep distribution tasks separate from promotion planning: first confirm the files and release information, then build announcements and other campaign materials around the planned date.
Follow this order before you upload:
- Confirm the master. Select the approved file that matches the intended release, track order, and version. Don’t assume a similarly named draft is the right one.
- Gather and proofread metadata. Check track titles, artist name, songwriter and performer credits, explicit-content selections, and other required fields. Correct details support accurate presentation and crediting.
- Prepare the artwork. Use the image intended for this release, then review it against the distributor’s current artwork instructions.
- Check delivery requirements. Follow the selected distributor’s specifications for audio format, sample rate, bit depth, artwork, and any additional fields. Requirements can vary between distributors and platforms, so don’t rely on settings from an older release.
- Review before submission. Check the release date, track order, uploaded files, credits, and selections once more. Save copies of the submitted assets and note exactly which master version you uploaded.
What should you check before submitting to a distributor?
Use a final review as the handoff between studio work and distribution. Confirm that the selected master matches the correct release version, and that the metadata and artwork belong to that same release. Proofread artist credits and titles character by character. A small typo or incorrect explicit-content selection can undermine an otherwise polished submission. Keep a record of the submitted files so you can quickly identify what went to the distributor if a correction is needed.
How do you plan a release after the audio is approved?
Choose a release date that gives you room to complete and review the submission, while allowing for distributor processing times to vary. Then coordinate announcements, artist profiles, and promotional materials around that date. Treat this as a planning window, not a promise of a specific delivery time. Your release calendar should make space for both administrative checks and creative promotion, without letting one blur into the other.
If a specific mix concern is still holding up approval, revisit the audio issue before upload. This mixing and mastering services guide offers context on how mixing and mastering support can address technical needs. For a focused review of a remaining audio concern, explore professional mixing and mastering support.
When is professional mixing or mastering support the right next step?
Not every doubt calls for another studio pass. If your approved master plays as intended, the release files are correct, and you can’t identify a repeatable technical issue, you may be ready to distribute. But if a specific problem persists, focused input from an engineer can help you decide whether it belongs in the mix, the master, or the playback system. That’s the practical answer to “after mastering what is the next step”: act on evidence, not release-day nerves.
Do you need another mix or mastering pass after approval?
Consider further work when you can point to a concrete issue or when the creative brief has changed. Mastering refines a finished mix. It can’t replace a mix adjustment if a vocal is consistently buried, an instrument balance feels wrong, or an arrangement element needs to change. A new mix may give the engineer more control over those source elements.
Separate technical faults from intentional choices before requesting changes. A distorted texture, wide effect, or unusually quiet passage may be part of the song’s character. Describe what you hear, where it occurs, and why it conflicts with your intent. The clearer the concern, the more useful the conversation with an engineer.
How can Cleveland-area and remote artists get post-production help?
Starsound Studios is based in North Royalton, Ohio, and serves Greater Cleveland artists as well as remote clients worldwide. Stereo mixing and mastering provide focused post-production support when a specific issue remains, whether it’s a mix balance concern or a question about how the finished track translates across playback systems. Share the notes you’ve gathered and the sound you’re aiming for to give the collaboration a clear starting point.
- Release the track if the approved master matches your artistic intent and your checks reveal no concrete problem.
- Request mastering feedback if you can identify a specific concern in the final audio.
- Revisit the mix if the issue involves arrangement or source balance that mastering can’t resolve on its own.
You’ve done the important work: the next move is tied to a real need, not a vague feeling that something might be wrong. If focused mixing or mastering support would help you move forward, explore professional mixing and mastering at Starsound Studios.
Move from approved master to release with confidence
If the question “after mastering what is the next step” is still on your mind, keep the answer practical: approve the master when it reflects your artistic intent, and act on specific, repeatable issues rather than vague doubts. Then organize the approved audio, metadata, and artwork, and follow your distributor’s current submission requirements.
A thoughtful final review can protect your sound and keep release preparation on track. Once the audio is approved, shift your attention to the release details and plan promotion around your chosen date. If a clear mix or mastering concern remains, targeted engineering support can help you decide what deserves attention before distribution.
Starsound Studios is based in North Royalton, Ohio, serving Greater Cleveland and artists worldwide through remote mixing and mastering. If you’d value a collaborative perspective on a specific audio issue, explore professional mixing and mastering at Starsound Studios.
Your music is ready for its next chapter. Trust the work you’ve done, take the next step with care, and release it with confidence.
Frequently Asked Questions
After mastering, what is the next step before releasing a song?
Review and approve the delivered master, then prepare the files and release information for your distributor. If you’re asking “after mastering what is the next step,” listen for clear issues, confirm you have the correct version, and make the approved file easy to identify. Next, gather your metadata and artwork, check your distributor’s current requirements, and proofread the complete submission before sending it.
Should I listen to my master on different speakers before approving it?
Yes. Listen on familiar headphones, your usual speakers, and a modest playback system at a comfortable level. Each system and room can affect perceived bass, loudness, and stereo width, so a difference on one device isn’t automatically a mastering fault. Pay closer attention to concerns that are clear and repeatable across systems, and note the specific moment rather than relying on a general feeling that something sounds wrong.
What format should a mastered song be for distribution?
Use the lossless audio format specified by your distributor. WAV and FLAC are commonly accepted options, while MP3 files generally aren’t accepted for distribution uploads. Sample rate and bit depth requirements can differ, so check the distributor’s current delivery instructions before exporting or uploading. Keep the approved full-resolution master, and don’t convert it to a different format unless your distributor’s specifications call for that format.
Do I need to change my mix if I hear something wrong after mastering?
Not necessarily. First rule out a playback-system difference and identify the concern precisely. A mastering adjustment may address some issues in the finished file, but a persistent problem with vocal balance, instrument levels, or arrangement may need attention in the mix. Starsound Studios offers stereo mixing and mastering in North Royalton, serving Greater Cleveland artists. The right next step depends on the source of the specific issue.
What metadata do I need after mastering?
Prepare accurate track titles, artist names, songwriter and performer credits, release date, and any other details your distributor requests. You’ll also need the release artwork and may need to provide or track an ISRC, depending on your distribution workflow. Proofread names and credits carefully before submission. Accurate metadata helps ensure your release is presented consistently and the relevant contributors are identified correctly.
Can a mastered song still be revised?
Yes. A master can be revised when there’s a specific, audible issue or the creative requirements have changed. Share a clear description and timestamp with the mastering engineer. If the concern comes from source balance or arrangement, revisiting the mix may be more appropriate than another mastering adjustment. Avoid requesting changes only because you’re uncertain. First distinguish a technical fault from an intentional sound or a difference between playback systems.
Should I promote my song before uploading the final master?
You can plan promotion while preparing your release, but base public announcements and campaign materials on the approved audio and a realistic release date. First complete the distributor submission and review the files, credits, artwork, and timing. Processing times can vary, so don’t assume an upload will appear immediately. Separating promotion planning from audio approval helps prevent a last-minute change to the master from disrupting your release plans.


