

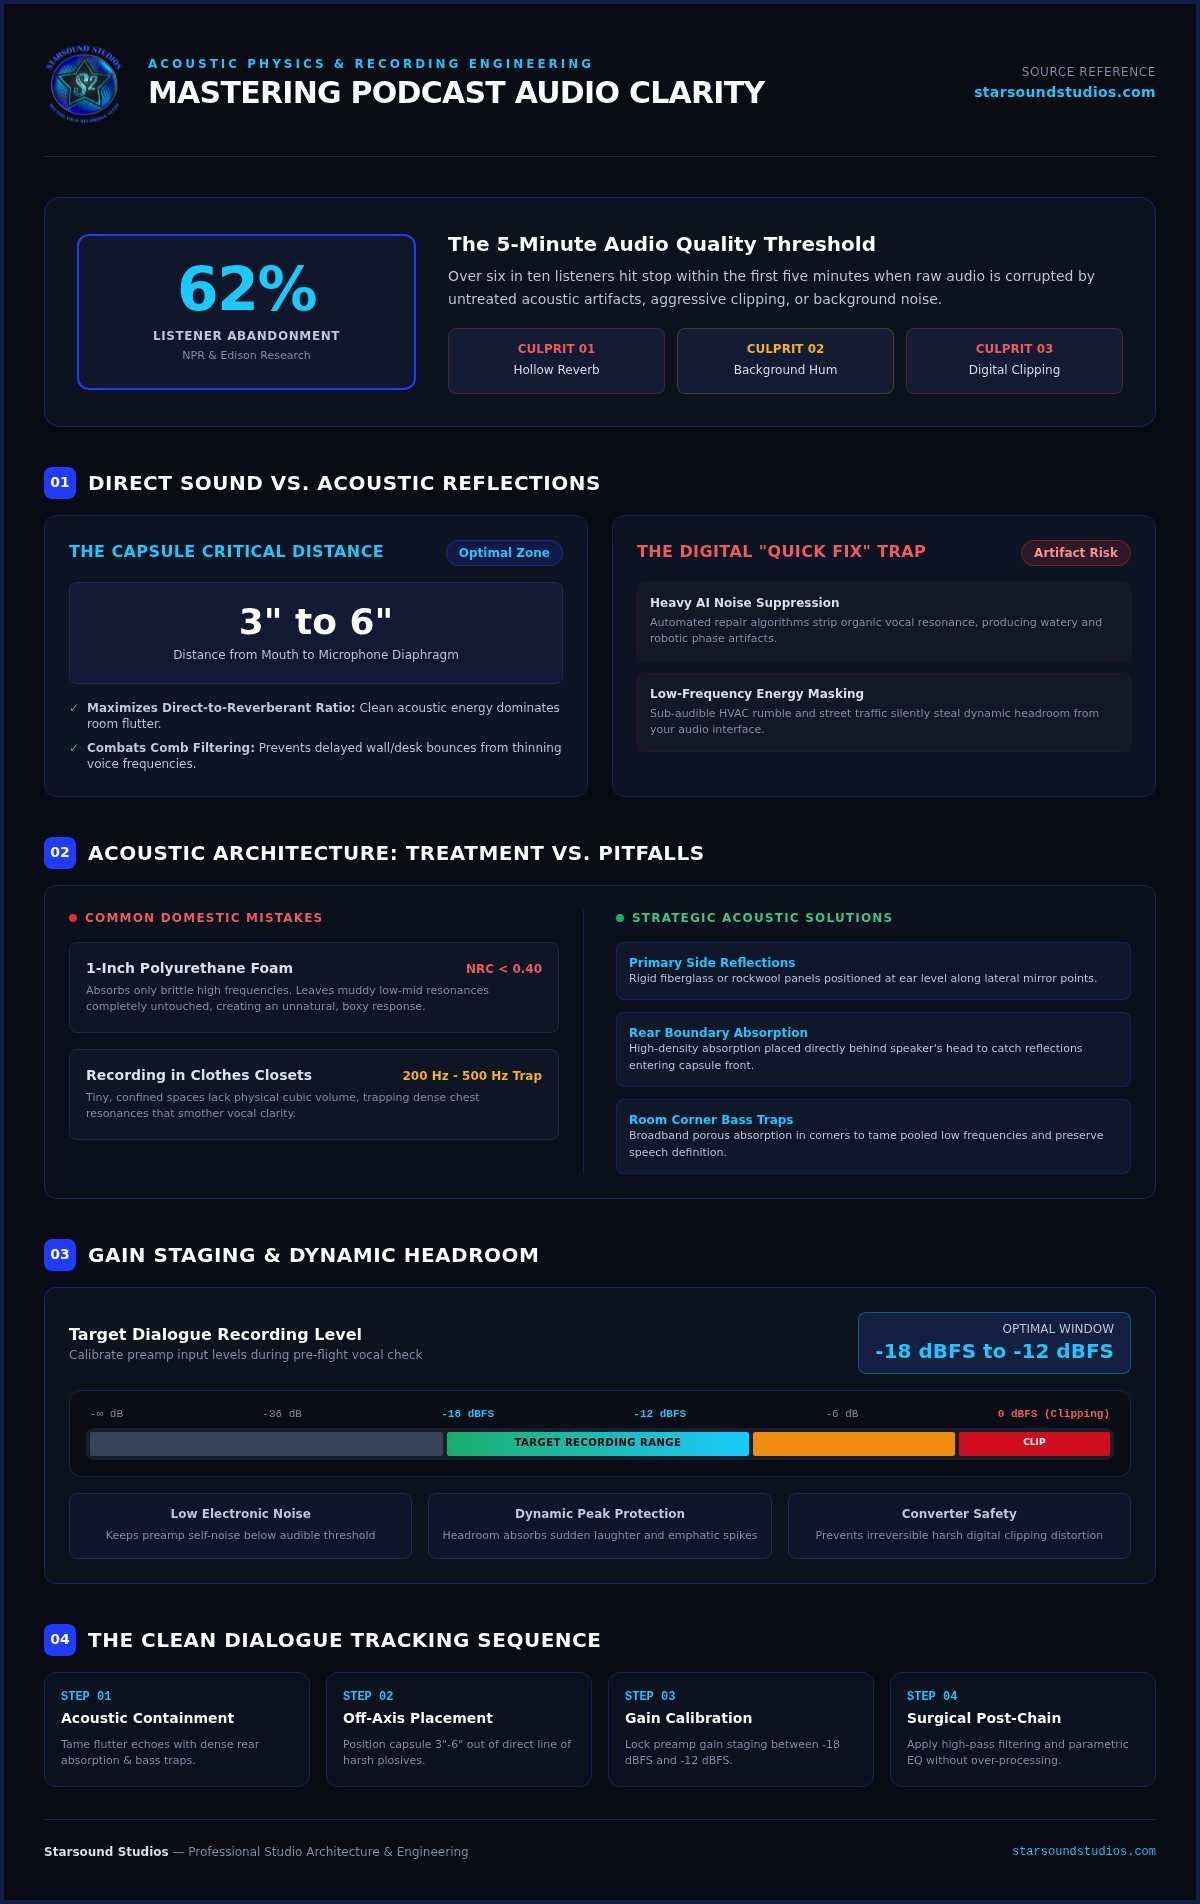
According to audience research from NPR and Edison Research, 62% of listeners abandon a podcast within the first five minutes if the sound quality is plagued by hollow reverb, distracting background hum, or harsh digital clipping. Learning how to get a clear podcast recording is not an afterthought; it is the deciding factor in whether your audience stays immersed or hits pause forever.
You already know the frustration of pouring your energy into an incredible conversation, only to play back the tape and hear a distant, tinny voice echoing off bare drywall. Wrestling with harsh plosives, erratic volume spikes, and mouth clicks can make home recording feel like an uphill battle. Software plugins and aggressive AI repair tools often promise a quick fix, but heavy post-processing leaves speech sounding robotic, phasey, and unnatural. True clarity begins at the source.
Mastering professional capture techniques, acoustic management, and disciplined gain staging will help you record broadcast-ready, intimate vocal tracks in any room. We will break down practical acoustic adjustments, optimal microphone positioning, and an essential pre-flight checklist to ensure every episode you produce sounds crisp, authoritative, and effortlessly clean.
Key Takeaways
- Discover how to get a clear podcast recording by mastering the direct-to-reverberant sound ratio right at your microphone capsule.
- Eliminate hollow room flutter and boxy resonances using targeted, high-density DIY absorption without expensive commercial soundproofing.
- Select the ideal microphone architecture and dialing-in off-axis placement to naturally reject room noise and harsh vocal plosives.
- Calibrate your preamp gain staging between -18 and -12 dBFS to capture clean, distortion-free dialogue with ample headroom.
- Implement a sequential post-production chain featuring high-pass filtering and surgical parametric EQ to achieve polished, broadcast-ready clarity.
Diagnosing the Audio Culprits: Why Your Podcast Recordings Sound Hollow or Muddy
Great podcasting demands sonic presence. Yet, countless creators struggle with boxed-in vocal tracks that sound like they were captured inside a subterranean tile bathroom. Understanding how to get a clear podcast recording starts with acoustic physics, not an expensive shopping spree for flashy gear.
When you speak, sound waves radiate outward in spherical patterns. In an untreated space, that energy strikes parallel drywall and reflective flooring, bouncing straight back into your microphone capsule milliseconds behind the original signal. This flutter echo collapses your direct-to-reverberant ratio, instantly blurring consonant articulation. Meanwhile, sub-audible low-frequency rumble from street traffic or HVAC handlers robs your signal of dynamic headroom. Leaning on aggressive digital noise suppression to patch these flaws backfires; heavy automated algorithms strip away organic vocal resonance and introduce watery, robotic phase artifacts.
Direct Sound vs. Room Reflections
Reflections are the primary thief of vocal intimacy. When direct speech collides with secondary reflections bouncing off bare desktop surfaces or computer displays, the resulting phase cancellation causes comb filtering. Your voice turns hollow, thin, and metallic. Overcoming this requires managing the critical distance to your capsule. Positioning your mouth three to six inches from the diaphragm maximizes the direct vocal signal, letting clean acoustic energy dominate the room reflections that smear speech clarity.
Ambient Noise Floor vs. Signal Distortion
A seemingly quiet room can still harbor disastrous signal issues. Steady air conditioning hum establishes an elevated ambient noise floor, while passing delivery trucks inject jarring low-end vibrations. Pushing budget audio interface preamps to drive insensitive dynamic microphones also introduces audible electronic self-noise. Then, when a guest laughs or delivers an emphatic point, the converter runs out of headroom, producing harsh digital clipping distortion that ruins raw dialogue forever.
Acoustic Environment Control: Eliminating Echo Without a Commercial Booth
Soundproofing stops outside noise from entering a physical space. Acoustic treatment controls the audio bouncing around inside it. You do not need to pour concrete or build a double-wall isolation bunker to figure out how to get a clear podcast recording. You simply need to tame the kinetic sound energy ricocheting across your room.
Untreated domestic rooms suffer from standing waves and flutter echo. Dense furniture, asymmetric bookshelves, and plush area rugs immediately interrupt these parallel reflections. In room corners, low frequencies pool together and bloat your voice. Installing broadband porous absorption bass traps in these corners reigns in uncontrolled low-end energy, preserving vocal definition. When you need pristine tracking environments calibrated by experienced ears, partnering with professional facilities like Starsound Studios shows just how powerful proper acoustic architecture really is.
Strategic Absorption and Diffusion Placement
Most creators treat the wrong surfaces first. They hang cheap, one-inch polyurethane foam tiles across front walls, only to find their recordings sound muffled yet strangely hollow. Thin foam carries a Noise Reduction Coefficient below 0.40, absorbing only brittle high frequencies while leaving muddy low-mid resonances untouched. Instead, focus dense treatment directly behind the speaker's head:
- Primary side reflections: Mount rigid fiberglass or rockwool panels at ear level along lateral mirror points.
- Rear boundary absorption: Place high-density panels behind your seating position to catch reflections heading straight into your capsule.
- Quick temporary baffling: Hang heavy multi-layer moving blankets or thick velvet drapes across bare drywall to kill flutter echo on demand.
Solving the Bedroom and Closet Pitfalls
Hiding inside a tiny wardrobe stuffed with coats sounds clever, but it creates unexpected acoustic problems. Tiny spaces lack physical volume, trapping boxy chest resonances between 200 Hz and 500 Hz that smother vocal clarity. If you record in a standard bedroom, set up in the center rather than tucking into a confined closet. Point the back of your cardioid microphone toward reflective window glass and computer displays. The microphone's natural null point rejects sound arriving from the rear, protecting your dialogue. Finally, decouple the capsule from desktop resonant vibrations by mounting your hardware on an articulated suspension boom arm equipped with an elastic shock mount.
The Hardware Chain: Selecting and Positioning Your Podcast Microphone
Microphones do not hear sound the way human ears do. While our brains naturally filter out extraneous room chatter, a recording capsule captures every stray frequency indiscriminately. Selecting the right transducer type and understanding its physical properties is the cornerstone of how to get a clear podcast recording in non-commercial spaces.
Your transducer choices directly dictate how much environmental spill reaches your tracking software. While entry-level USB microphones provide convenient connectivity, a dedicated XLR setup routes low-voltage analog signals through isolated analog-to-digital converters and discrete preamp circuits. This separation yields superior dynamic range, lower electronic noise, and transparent conversion fidelity that keeps spoken dialogue articulate and punchy.
Dynamic vs. Condenser Microphones for Voice
Large-diaphragm studio condensers feature ultra-light, electrically charged gold-sputtered membranes. They excel at registering transient detail and airy top-end shimmer. However, this hyper-sensitivity also catches the hum of computer cooling fans, clothes rustling, and subtle room slapback. For unoptimized spaces, dynamic broadcast microphones are the superior tool:
- Moving-coil physics: Heavier diaphragms require stronger acoustic energy to move, naturally ignoring distant low-level ambient spill.
- Cardioid directivity: The cardioid polar pattern establishes a wide capture zone directly on-axis while delivering maximum sound rejection at the rear 180-degree null angle.
- Preamplification demands: Passive broadcast dynamics possess low output sensitivity (often around -59 dBV). They demand clean, high-gain preamps or active in-line gain boosters providing +18 dB to +28 dB of transparent lift to prevent preamp hiss.
Mastering Microphone Distance and Angle
Positioning your microphone properly prevents vocal distortion before audio enters your DAW. Getting too far away forces you to crank preamp gain, pulling the room's noise floor straight into your recording. Conversely, crowding the capsule triggers the proximity effect, producing an unnatural low-frequency boom that obscures vocal articulation.
Maintain a strict four-to-six-inch gap between your lips and the grille. Never speak directly into the capsule head-on. Angle the microphone roughly thirty to forty-five degrees off-axis, aiming across your mouth toward the corner of your lips rather than straight down your throat. This directs explosive bursts of air away from the diaphragm, protecting your track from harsh "P" and "B" plosives. Combine this angling with a sturdy metal or dual-layer nylon pop filter positioned two inches away, and you establish an impenetrable physical barrier against plosive pops and mouth clicks.
The 5-Step Pre-Session Calibration Routine for Crystal-Clear Audio
Broadcast consistency isn't an accident. It is the direct outcome of disciplined operational prep before anyone speaks. If you want to know how to get a clear podcast recording every single episode, you must replace guesswork with a repeatable technical routine.
Bypassing standard calibration guarantees painful post-production headaches. Automated software leveling algorithms often pump the ambient room noise during silent conversational pauses, destroying intimate dialogue. Taking five methodical minutes to establish clean signal flow protects your master tracks from unrecoverable clipping, phase smearing, and background rumble.
Step 1 & 2: Room Silence Baseline and Mechanical Decoupling
Start your tracking session by capturing thirty seconds of pure room silence. This baseline gives your downstream restorative tools an uncorrupted noise profile to target without guessing. Next, isolate your physical signal path:
- Decouple mechanical mounts: Confirm your elastic suspension bands aren't bottoming out against the metal frame.
- Dress loose cabling: Secure slack XLR cables along the boom arm spine to stop microphonic rubbing noises against your desk.
- Check cooling airflow: Ensure computer chassis fans blow away from dynamic capsule null zones.
Step 3, 4 & 5: Precise Gain Staging and Monitoring Discipline
Gain staging makes or breaks voice fidelity. Deliver your loudest conversational laugh or emphasis while dialing in your interface preamp. Calibrate your target peaks to hover firmly between -18 dBFS and -12 dBFS on digital meters. Spoken dialogue tracked in this window leaves roughly 12 dB of pristine headroom, preventing the harsh square-wave digital distortion that ruins emphatic dialogue.
Never record while wearing open-back audiophile headphones. Open-back earcups spray high-frequency click bleed straight into sensitive capsules, introducing stubborn comb filtering when you edit. Instead, wear tightly sealing, closed-back circumaural headphones. Lock your posture, verify boom tension screws so your capsule won't sag off-axis, and run a mandatory two-minute test conversation. Play it back immediately with your eyes closed. If you want to master gain staging, critical listening, and tracking discipline under veteran studio mentorship, explore hands-on audio engineering classes to elevate your audio craft permanently.
Beyond Tracking: Elevating Raw Dialogue with Professional Audio Engineering
Capturing clean source audio provides the raw clay. Refining that material into an intimate, broadcast-ready listening experience requires the deliberate touch of audio engineering. Knowing how to get a clear podcast recording inside your room is half the journey; shaping that capture with surgical corrective balance completes the transformation.
Raw spoken dialogue always carries natural acoustic baggage. Even in treated spaces, sub-audible physical rumbles from air currents or floor vibrations rob dynamic headroom. Activating an 18 dB-per-octave high-pass filter at 80 Hz clears out this subsonic mud without thinning masculine or feminine vocal timbre. From there, deploy a surgical parametric equalizer with a narrow Q band to sweep across the vocal spectrum, identifying and notching out harsh room resonances or nasal peaks before adding gentle dynamic control.
Foundational EQ and Dynamic Control for Spoken Word
Precision dynamics require a disciplined signal chain. Slapping a generic compressor onto uncorrected speech simply emphasizes unwanted frequencies. Work methodically through these three post-capture stages:
- Subtractive body sculpting: Apply a broad cut between 200 Hz and 400 Hz to carve away lingering proximity buildup and restore conversational clarity.
- Sibilance management: Place a dedicated split-band de-esser targeted between 5 kHz and 8 kHz to smooth harsh "S" and "T" transients before the compression stage.
- Dynamic leveling: Deploy a transparent optical or VCA compressor at a gentle 2:1 to 3:1 ratio with slow attack and musical release times to smooth speech dynamics without audible pumping.
When to Leverage Professional Studio Post-Production
Home workflows carry clear acoustic ceilings. When launching a signature enterprise show or flagship narrative series, booking time in dedicated recording studios ensures your foundational speech is captured through world-class analog signal chains inside purpose-built acoustic rooms.
Balancing dynamic interplay between remote callers, diverse tonal balances, and ambient stems requires seasoned ears. Investing in professional mixing and mastering services lifts your dialogue to commercial clarity, matching individual host timbres into a coherent soundstage. Collaborating with an experienced sound engineer takes the guesswork out of hitting strict delivery targets like -16 LUFS integrated with true-peak safety ceilings. Founded in 2014, Starsound Studios pairs acoustically tuned tracking environments with veteran production guidance led by Steve 'The Mix', transforming raw vocal takes into broadcast-caliber productions that command attention.
Transform Your Spoken Dialogue Into Broadcast Gold
Achieving pristine podcast audio comes down to respecting the laws of physics at the source. Once you tame early reflections with targeted absorption, position dynamic capsules off-axis, and lock down disciplined gain staging, you possess the definitive formula for how to get a clear podcast recording. Great audio isn't reserved for lucky creators; it belongs to those who treat their acoustic environment with intentional care.
When your creative vision outgrows the limits of home acoustics and demands elite fidelity, partner with trusted engineering authorities. Operating state-of-the-art acoustic tracking and mastering control rooms in North Royalton, Starsound Studios stands proud as Ohio's first and only certified Dolby Atmos 9.1.4 mixing facility. Under expert engineering and production directed by Steve 'The Mix', our rooms and analog signal chains breathe depth, warmth, and transparent balance into every vocal track. Refine your podcast sound with professional mixing and mastering at Starsound Studios, and share your stories with the power, authority, and brilliance they deserve.
Frequently Asked Questions
Why does my podcast voice recording sound distant and boxy?
Your voice sounds distant when the microphone captures more reflected room sound than direct acoustic energy from your mouth. Hard surfaces like bare drywall, glass windows, and uncarpeted floors reflect speech back into the capsule fractions of a second later. This creates phase comb filtering and traps low-mid acoustic resonances between 200 Hz and 500 Hz. Adding dense broadband absorption materials directly behind you cleans up this boxed-in effect instantly.
What is the ideal microphone distance for recording clear speech?
Keep your mouth roughly four to six inches from the microphone grille. This working distance provides the sweet spot for natural vocal warmth while avoiding unwanted bass buildup from the proximity effect. Positioning yourself farther away forces your preamp gain higher, which magnifies background room noise. If you want to know how to get a clear podcast recording, maintain this consistent distance and turn your capsule thirty degrees off-axis to avoid direct breath bursts.
Can AI noise removal software fix bad room acoustics?
No, automated AI restoration tools cannot fix room reflections without damaging your voice. While neural algorithms suppress steady background fans effectively, aggressive de-reverb processing strips away essential vocal harmonics. This processing leaves speech sounding hollow, phasey, and robotic. Software should only perform gentle cleanup on clean takes. Real sonic presence always starts at the source with physical absorption, smart microphone choice, and proper acoustic environment control in your recording space.
Should I use a dynamic or condenser microphone for podcasting at home?
A dynamic cardioid microphone is the superior choice for standard residential spaces. Dynamic capsules have heavier moving diaphragms that naturally reject quiet background chatter, street rumble, and room reflections outside their pickup axis. Large-diaphragm condensers offer sparkling sensitivity, but they capture every room flutter and computer fan in untreated environments. For podcasters working outside tuned acoustic tracking rooms, dynamic models deliver tighter, punchier speech isolation straight out of the box.
What target level should my audio meters hit during podcast recording?
Calibrate your audio interface preamps so speech peaks land consistently between -18 dBFS and -12 dBFS on your digital meters. Tracking in this target zone leaves roughly 12 dB of dynamic headroom above your loudest emphasis. This buffer prevents unexpected laughs or shouts from causing harsh digital clipping. It also maintains a healthy distance above the interface noise floor, providing clean, distortion-free dialogue ready for subsequent dynamic compression and loudness normalization.
How do I prevent loud popping sounds on P and B words?
Plosive popping occurs when explosive bursts of air from "P" and "B" consonants violently hit the microphone diaphragm. To prevent this, never talk straight into the capsule. Angle the microphone thirty to forty-five degrees across your mouth so air blasts fly past the grille. Pairing this technique with a metal mesh or dual-layer nylon pop filter placed two inches away completely diffuses plosive wind energy before it strikes the capsule.
Why do my podcast episodes sound much quieter than professional shows on Spotify?
Professional shows sound louder and clearer because they undergo dedicated speech leveling, dynamic limiting, and loudness normalization. Streaming platforms like Spotify and Apple Podcasts target an integrated loudness standard of -16 LUFS for stereo spoken word with a true-peak ceiling of -1.0 dBTP. For Cleveland podcasters who want broadcast-ready loudness without digital distortion, partnering with local facilities like Starsound Studios in North Royalton delivers calibrated mastering that hits exact distribution loudness targets.


