

The final stage of your creative journey shouldn't feel like a high-stakes gamble. You have poured your heart into every frequency, yet the transition from a finished mix to a polished master often feels like stepping into a technical fog. Understanding how to prepare a song for mastering is the critical bridge between a bedroom demo and a professional production that commands the room. Your mastering engineer is a collaborative partner, but they can only unlock the sonic energy that you have properly preserved in your session.
We understand the anxiety that comes with the hand-off. You want to ensure your creative vision remains intact without falling into the trap of a quiet or squashed final product. This guide provides the technical and artistic roadmap you need to deliver a pristine mix that allows for absolute excellence. We will walk through the essential 2026 checklist, covering everything from sample rate precision to the critical debate over master bus effects. You will gain the clarity needed to hand over your work with confidence, knowing your music is ready for a world-class finish in any environment, from stereo to immersive Dolby Atmos.
Key Takeaways
- Learn why technical hygiene, like removing zero-crossing clicks and background hum, is vital before the mastering process amplifies every detail.
- Discover how to prepare a song for mastering by removing master bus limiters to preserve the essential dynamic range your engineer needs.
- Ensure high-fidelity delivery by matching your export settings to your session's native sample rate and bit depth using WAV or AIFF formats.
- Calibrate your engineer's ears to your specific creative vision through the strategic use of reference tracks and accurate metadata.
- Understand the competitive advantage of mastering in a professionally tuned 9.1.4 room over unpredictable home monitoring or generic AI algorithms.
Technical Hygiene: Cleaning Your Mix for Sonic Clarity
Mastering acts as a sonic magnifying glass. While a subtle click or a faint background hum might vanish in your home monitors, these imperfections become glaring distractions once they pass through a high-end signal chain. When you learn how to prepare a song for mastering, your first priority is a deep cleaning of the session. You aren't just sending a song; you are handing over a technical foundation that must be sturdy enough to withstand professional amplification and precision processing.
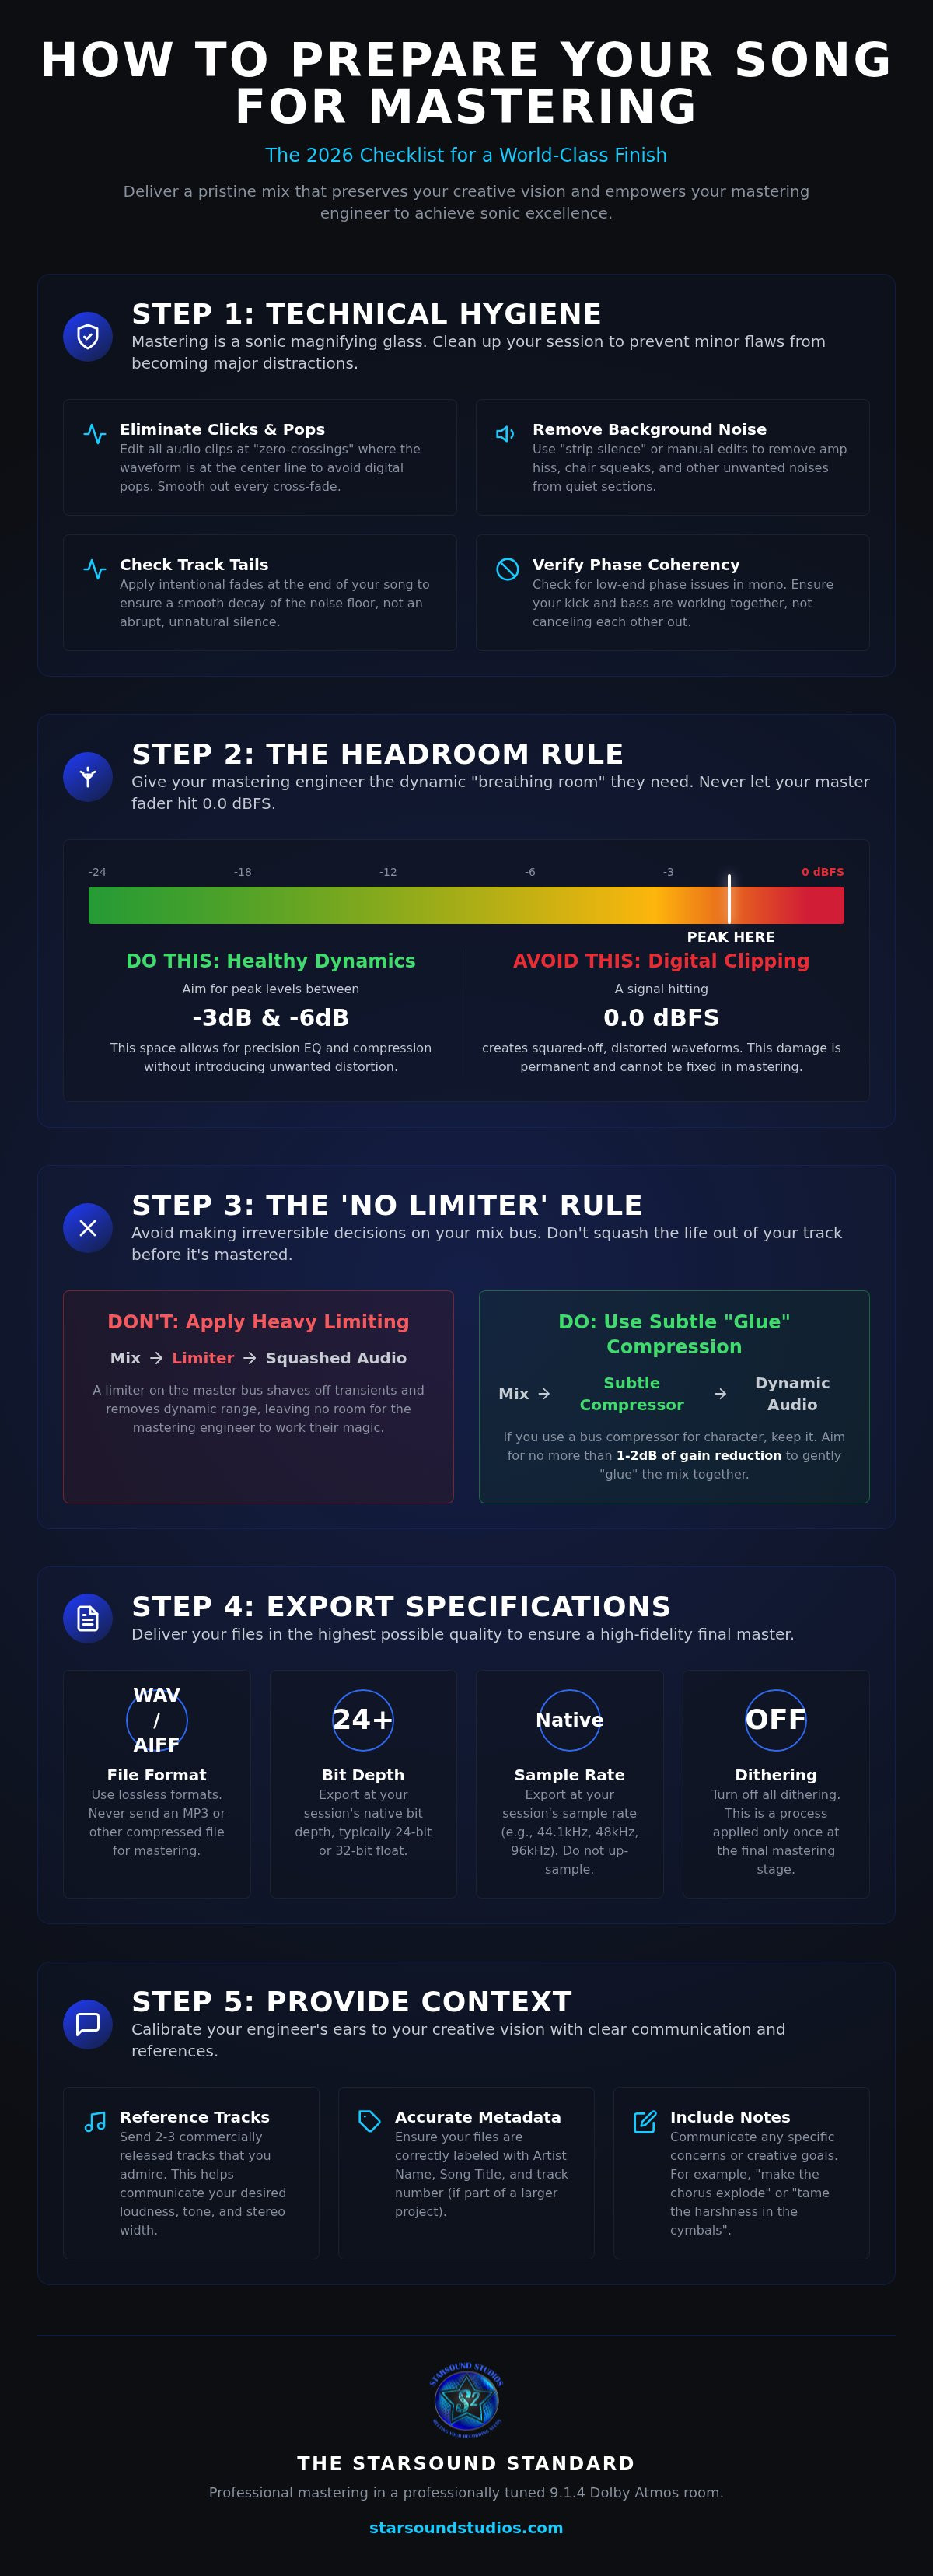
Start by zooming into your edit points. Every cut in your audio should occur at a "zero-crossing," which is the exact point where the waveform meets the center line. If a clip starts or ends mid-wave, it creates a digital pop. These artifacts are rhythmic killers. Similarly, check the "tails" of your tracks. A professional silence at the end of a song requires intentional fades to ensure the noise floor doesn't abruptly drop out. This keeps the listener immersed in the atmosphere rather than being distracted by a sudden technical silence.
Eliminating Clicks, Pops, and Digital Artifacts
Use manual edits or "strip silence" functions to remove background noise from tracks when the instrument isn't playing. This includes chair squeaks, amp hiss, or distant traffic. Pay close attention to vocal tracks. Mastering compression will accentuate sibilance and breaths. While some breath adds life, excessive "ess" sounds can become piercing. Smooth out every cross-fade to prevent "thumps" that disrupt the flow. This level of detail ensures your creative vision isn't obscured by technical debris. It allows the engineer to focus on the art rather than the repair.
Managing Headroom and Avoiding Clipping
Your master fader is the most important meter in your DAW. It must never hit 0.0 dBFS. Digital clipping is permanent; it's a form of distortion that cannot be "undone" or "fixed" during the mastering stage. To understand how to prepare a song for mastering effectively, you must embrace the golden rule: leave between -3dB and -6dB of peak headroom.
- Peak Levels: Aim for your loudest peaks to hit -3dB or -6dB.
- Dynamic Range: This space gives the mastering engineer the "breathing room" needed to apply EQ and compression without hitting a digital ceiling.
- The Myth: Never assume a mastering engineer can repair a squared-off, clipped waveform. If the data is gone, it's gone.
Checking for phase issues in the low end is your final hygiene step. Ensure your kick and bass aren't canceling each other out in mono. A solid, phase-coherent low end allows the final master to feel heavy and impactful. This preparation ensures your track sounds just as massive in a club as it does in your studio.
Managing the Mix Bus: The 'No Limiter' Rule
The mix bus is where your creative vision solidifies. It is the final point of control before your music leaves your hands. A common mistake when learning how to prepare a song for mastering is over-processing this critical path. You want your mix to sound "finished," but applying heavy-handed limiting at this stage is often counterproductive. It bakes in decisions that cannot be reversed. You are essentially locking the door before the guest has arrived.
The Role of Master Bus Compression
Compression on the master bus is often about "glue." It is that elusive quality that makes a collection of tracks feel like a cohesive, breathing song. If you have a compressor providing a specific character or rhythmic movement, keep it. This is "artistic compression." However, keep the gain reduction subtle. Aim for no more than 1 to 2dB of reduction. If the compressor reacts too aggressively to the kick drum, it can cause the entire mix to "dip" in a way that feels amateur. Your snare needs "snap" and your kick needs "thump." Professional remote mastering relies on these preserved transients to create a sense of three-dimensional depth and impact.
Bypassing Limiters and Maximizers
Limiters are the primary enemy of a world-class master. A limiter's job is to stop peaks from crossing a threshold, which effectively shaves off the tops of your waveforms. This creates a hard digital "ceiling" that prevents an engineer from using high-end analog outboard gear effectively. If you have already squashed the life out of the track to reach a target loudness, the engineer has no room to apply surgical EQ or harmonic enhancement. Trust the Professional Audio Mastering in Cleveland: The Ultimate Guide (2026) to handle the final gain staging. They have the tuned environment and high-fidelity tools to achieve competitive levels without sacrificing clarity.
Check your bus processing by toggling it on and off at matched volumes. If the mix only sounds better because it is louder, but the drums feel "small" or the vocals feel "recessed," you have pushed too hard. When you are uncertain about how to prepare a song for mastering, provide two versions: one with your bus processing and one "dry." This collaborative hand-off allows the engineer to hear your artistic intent while retaining the technical flexibility to deliver a pristine result. It is the hallmark of a seasoned artist who prioritizes the final sonic outcome over a temporary demo feel.
Export Specifications: Delivering High-Fidelity Files
The final bounce is the moment your artistic vision transforms into a digital asset. This technical hand-off is the last bridge between your creative process and the mastering suite. Getting the technical specs right is just as important as the mix itself when considering how to prepare a song for mastering. If the file delivery is flawed, even the most expensive analog gear cannot recover the lost resolution. Precision at this stage ensures your music arrives with its harmonic integrity fully intact.
WAV vs. AIFF: Choosing Your Container
WAV remains the most universal language in professional audio. It is a lossless, uncompressed format that guarantees every bit of your mix reaches the engineer. AIFF is a robust alternative, often preferred in Apple-centric ecosystems for its ability to handle metadata slightly differently. For a deeper dive into these technical nuances, check out our complete guide to the AIFF audio format. Regardless of the container, avoid lossy formats like MP3 or AAC. These formats utilize data compression to shrink file sizes by permanently discarding audio information. Once that data is gone, it's gone. Sending an MP3 for mastering is like trying to enlarge a blurry thumbnail into a high-definition poster.
Sample rates and bit depth are the pillars of digital fidelity. Always match your export sample rate to your session's native rate. If you recorded at 44.1kHz, export at 44.1kHz. Upsampling during the bounce adds no quality; it only creates unnecessary data. However, 32-bit float is the gold standard for your bit depth. It provides near-infinite virtual headroom, meaning that even if your peaks accidentally cross the 0dB threshold, the audio won't actually clip. This preserves the mathematical integrity of your transients. Finally, leave the dithering to the mastering engineer. Dithering is a one-time process used when reducing bit depth for final distribution. Applying it twice can lead to an audible accumulation of noise.
Preparing for Dolby Atmos Mastering
The shift toward immersive audio has changed the checklist for the modern artist. Preparing for this requires a higher technical floor than traditional stereo. Most spatial delivery platforms require a minimum of 48kHz / 24-bit files. Our Dolby Atmos studio in Cleveland utilizes these high-resolution files to map your sound into a three-dimensional 9.1.4 environment. Unlike stereo mastering, which usually requires a single print, Atmos preparation often involves providing stems. Grouping your instruments into logical "objects" like drums, bass, and vocals allows the engineer to place them within the immersive soundstage with surgical precision. This is where the science of the medium truly meets the art of creation.
Communication and Context: Reference Tracks & Metadata
Mastering isn't a solitary act; it's a collaborative relay race. While the previous sections focused on the technical foundations of your audio, this stage is about aligning your creative spirit with the engineer's expertise. Understanding how to prepare a song for mastering requires more than just a clean export. It demands a clear articulation of your vision. Without context, even the most skilled engineer is flying blind through your sonic landscape. You are the architect; the engineer is the master builder who ensures the structure stands tall in any environment.
The "Artistic Brief" is your opportunity to define the emotional weight of your work. Are you aiming for a "warm and vintage" aesthetic that feels like a classic 70s record, or a "bright and modern" sound tailored for contemporary pop? Specifying your target platforms is equally vital. A master optimized for the club requires a different low-end treatment than one destined for a high-fidelity vinyl press or a normalized Spotify stream. Each destination has its own technical requirements and listener expectations. Communicating these goals early prevents the need for costly revisions later.
Selecting the Right Reference Tracks
Reference tracks are the compass for the mastering process. Choose two or three songs that represent the tonal balance and energy you want to achieve. Don't just send a link. Explain what specifically resonates with you. Perhaps you admire the vocal clarity of one track or the sub-bass weight of another. Ensure these references are in the same genre as your project to give the engineer a realistic benchmark for calibration. This isn't about copying another artist; it's about establishing a common language for your sonic goals. It allows the engineer to hear through your ears.
The Technical Notes Document
A structured notes document bridges the gap between your DAW and the mastering suite. This is the place to list any "problem areas" you struggled with during the mix, such as a vocal that felt slightly buried or a snare that was difficult to tame. It's also crucial to note intentional distortions or lo-fi elements. You don't want the engineer to "fix" a gritty texture that is central to your artistic identity. Precision here saves time and preserves your creative intent.
Be precise with your administrative details. Your document should include:
- Artist Name and Song Title: Exactly as they should appear on streaming platforms.
- ISRC Codes: Essential for tracking royalties and digital distribution.
- Album Sequence: The specific order of tracks if you are mastering an EP or LP.
- Timestamps: Clear instructions on the exact start and end points to ensure no intros or outros are clipped.
This level of organization transforms a simple service into a high-attention experience where your unique identity is the priority. If you're ready to bring your vision to life, our team at Starsound Studios offers professional mastering services designed to preserve your artistic soul while achieving world-class polish. Providing this context ensures the final master isn't just loud; it's exactly what you imagined when you first hit record.
The Starsound Standard: Professional Mastering in Cleveland
You have mastered the technical hurdles of how to prepare a song for mastering. Now, your work needs a space that matches your ambition. Many artists struggle with the limitations of home monitoring. Even the best headphones or treated rooms cannot replicate the physical energy and accuracy of a professionally tuned 9.1.4 immersive audio suite. At Starsound Studios, we provide a creative sanctuary where technical precision meets artistic spirit. Located in North Royalton, we are Ohio's only Dolby-certified Atmos studio. This isn't just about high-end gear; it's about an environment that allows us to hear every detail with absolute certainty.
Our mixing and mastering services bridge the gap for independent creators. We believe in preserving your unique identity while achieving the world-class polish your music deserves. We don't rely on generic AI algorithms that strip away the soul of a performance. Instead, we utilize decades of engineering authority to unlock the sonic potential of every project. When you know how to prepare a song for mastering, you provide the raw materials. We provide the refinement that turns a great mix into a radio-ready masterpiece.
Stereo and Immersive Mastering Excellence
Steve 'The Mix' brings a seasoned ear and a collaborative mentor's heart to every session. Whether you are delivering a standard stereo print or complex stems for an immersive 9.1.4 master, our high-end signal flow ensures maximum fidelity. Distance isn't a barrier. Our remote mastering workflow is seamless, serving artists globally from our Cleveland-based facility. We center you as the primary focus. Every technical decision is made to amplify your creative voice, ensuring your music feels as powerful as you intended.
Final Steps: Booking Your Session
Ready to finish your record? The process is simple and designed for the modern artist. Upload your files to our secure server for a professional review. We prioritize a collaborative feedback loop, moving logically from your vision to the final, polished result. You'll receive a master that reflects your vision, with a revision process that ensures total satisfaction. Don't let your hard work stop at the mix. Contact Starsound Studios today to take the final step toward sonic excellence and see why the heart of Ohio is the new home for world-class sound.
Bring Your Sonic Vision to Life
Your music deserves to be heard in its most powerful, polished form. By mastering how to prepare a song for mastering, you ensure that every technical decision serves your artistic vision rather than hindering it. From the surgical precision of zero-crossing edits to the essential preservation of dynamic range on your mix bus, these steps are the foundation of a world-class release. You have done the hard work of creation; now it's time to ensure that effort translates across every playback system.
Don't leave your final sound to chance or a generic algorithm. At Starsound Studios, we bridge the gap between your creative sanctuary and the global stage. As Ohio's first Dolby-certified Atmos studio, our 9.1.4 immersive audio suite offers a level of precision that home monitoring simply cannot match. Led by the decades of authority brought by Steve 'The Mix', we treat every project with the high-attention experience it deserves. It is time to hear your music with absolute clarity.
Elevate your sound with professional mastering at Starsound Studios. We are ready to help you reach your highest potential and deliver a result that stands the test of time. Your journey to sonic excellence starts here.
Frequently Asked Questions
What is headroom and why does my mastering engineer need it?
Headroom is the safety buffer between your loudest audio peak and the 0 dBFS digital ceiling. It is vital because it provides the engineer with the technical space to apply outboard processing without inducing digital clipping. When you understand how to prepare a song for mastering, you realize that leaving -3dB to -6dB of headroom allows for surgical EQ and harmonic enhancement. This preserves the transient impact of your drums while ensuring a clean signal path.
Should I remove all plugins from my master fader before exporting?
You should remove corrective limiters or maximizers, but keep "artistic" plugins that define your specific sound. If a compressor or EQ is essential to the "glue" and vibe of the mix, leave it on. However, bypass anything that aggressively squashes the dynamic range or shaves off transients. Providing a "dry" version alongside your processed version is a professional way to give the engineer options while clearly communicating your creative intent.
What is the best file format for mastering in 2026?
32-bit float WAV files are the gold standard for high-fidelity mastering today. This format offers near-infinite internal headroom, preventing accidental clipping during the export process. Always match the sample rate to your session's native setting, typically 44.1kHz or 48kHz. Avoid MP3s or other lossy formats at all costs. These compressed files discard critical harmonic data that cannot be recovered, limiting the sonic excellence the engineer can achieve in a professional suite.
How many reference tracks should I provide to the engineer?
Provide two to three reference tracks that represent your target tonal balance and energy. Selecting songs within your specific genre helps calibrate the engineer's ears to your creative vision. Be specific about what you like in each track, such as the vocal presence or the specific low-end weight. This focused context is much more useful than a long playlist, as it creates a clear roadmap for the final polish of your project.
Can a mastering engineer fix a bad mix or out-of-tune vocals?
Mastering is a process of enhancement, not fundamental repair. While an engineer can balance frequencies and improve overall clarity, they cannot fix deep mix issues like out-of-tune vocals or poor instrument balance. If your mix has significant problems, it is always better to address them in the session before bouncing. Learning how to prepare a song for mastering involves recognizing when a mix is truly ready for this final, transformative technical stage.
What is the difference between stereo mastering and Dolby Atmos mastering?
Stereo mastering focuses on a single two-channel file, while Dolby Atmos mastering involves placing audio "objects" in a three-dimensional 9.1.4 space. Atmos requires specific deliverables, often stems, and a minimum sample rate of 48kHz. This immersive process allows for a wrap-around listening experience that traditional stereo cannot provide. It requires a certified facility to ensure the spatial metadata translates accurately across all consumer playback systems and immersive streaming platforms.
Do I need to dither my files before sending them to Starsound Studios?
No, you should not apply dither to your export. Dithering is a specific final step used when reducing bit depth for distribution, such as moving from 24-bit to 16-bit. Applying it during your mix export can lead to an audible accumulation of low-level noise. Your mastering engineer will handle dithering as the very last process in the chain, ensuring the highest possible resolution is maintained throughout the professional engineering stages.
How much 'peak' volume should my mix have before mastering?
Your loudest peaks should ideally sit between -3dB and -6dB on your master meter. This isn't about the mix being "quiet"; it's about providing a clean signal for professional amplification. If your fader is hitting 0dB, you risk inter-sample peaks that cause digital distortion. Maintaining this conservative peak volume ensures the engineer has the necessary room to apply high-end analog processing without hitting a digital ceiling that degrades your final audio quality.


