

One master rarely serves vinyl and digital equally well. Mixing for vinyl vs digital is really about preparing format-specific masters: digital delivery has no groove-cutting constraints, while vinyl requires a master shaped for the physical medium. The differences come down to choices such as limiting, low-frequency stereo, and peak control.
It makes sense to want one finished version that carries the same energy everywhere. But preserving a track’s impact on vinyl can call for more headroom and lighter limiting, while a digital master can be optimized for its intended playback.
This guide explains when separate masters make a difference and how bass, stereo width, dynamics, and loudness affect the result. You’ll learn what to consider in the mix and why thoughtful mastering helps each format present the music clearly and intentionally.
Key Takeaways
- Prepare a dedicated vinyl master when the release needs to account for the cutting process, rather than simply reusing a loud digital print.
- Keep deep bass centered: stereo information below 80-100 Hz can make the cutting stylus move vertically and may affect playback.
- Preserve more headroom for vinyl by keeping limiting light; a separate digital master can then be shaped for its own loudness goals.
- Plan track order and side length with the record format in mind, since longer sides can mean trade-offs in playback quality.
Do You Need a Separate Master for Vinyl?
Yes, prepare a dedicated vinyl master when a release is also heading to digital. Digital mastering for streaming, CD, or file delivery doesn’t face the physical limits of a cutting lathe. Vinyl does. Its grooves must hold the audio signal in a form a stylus can track, so limiting, peak control, and stereo bass need different attention.
The underlying mastering work can overlap. Tonal balance, vocal clarity, and the feel of the mix matter in both versions. The format changes the finishing decisions: a digital master can use more limiting, while a vinyl master generally needs more headroom and softer peaks. Heavy clipping can exceed what the cutting lathe can accommodate.
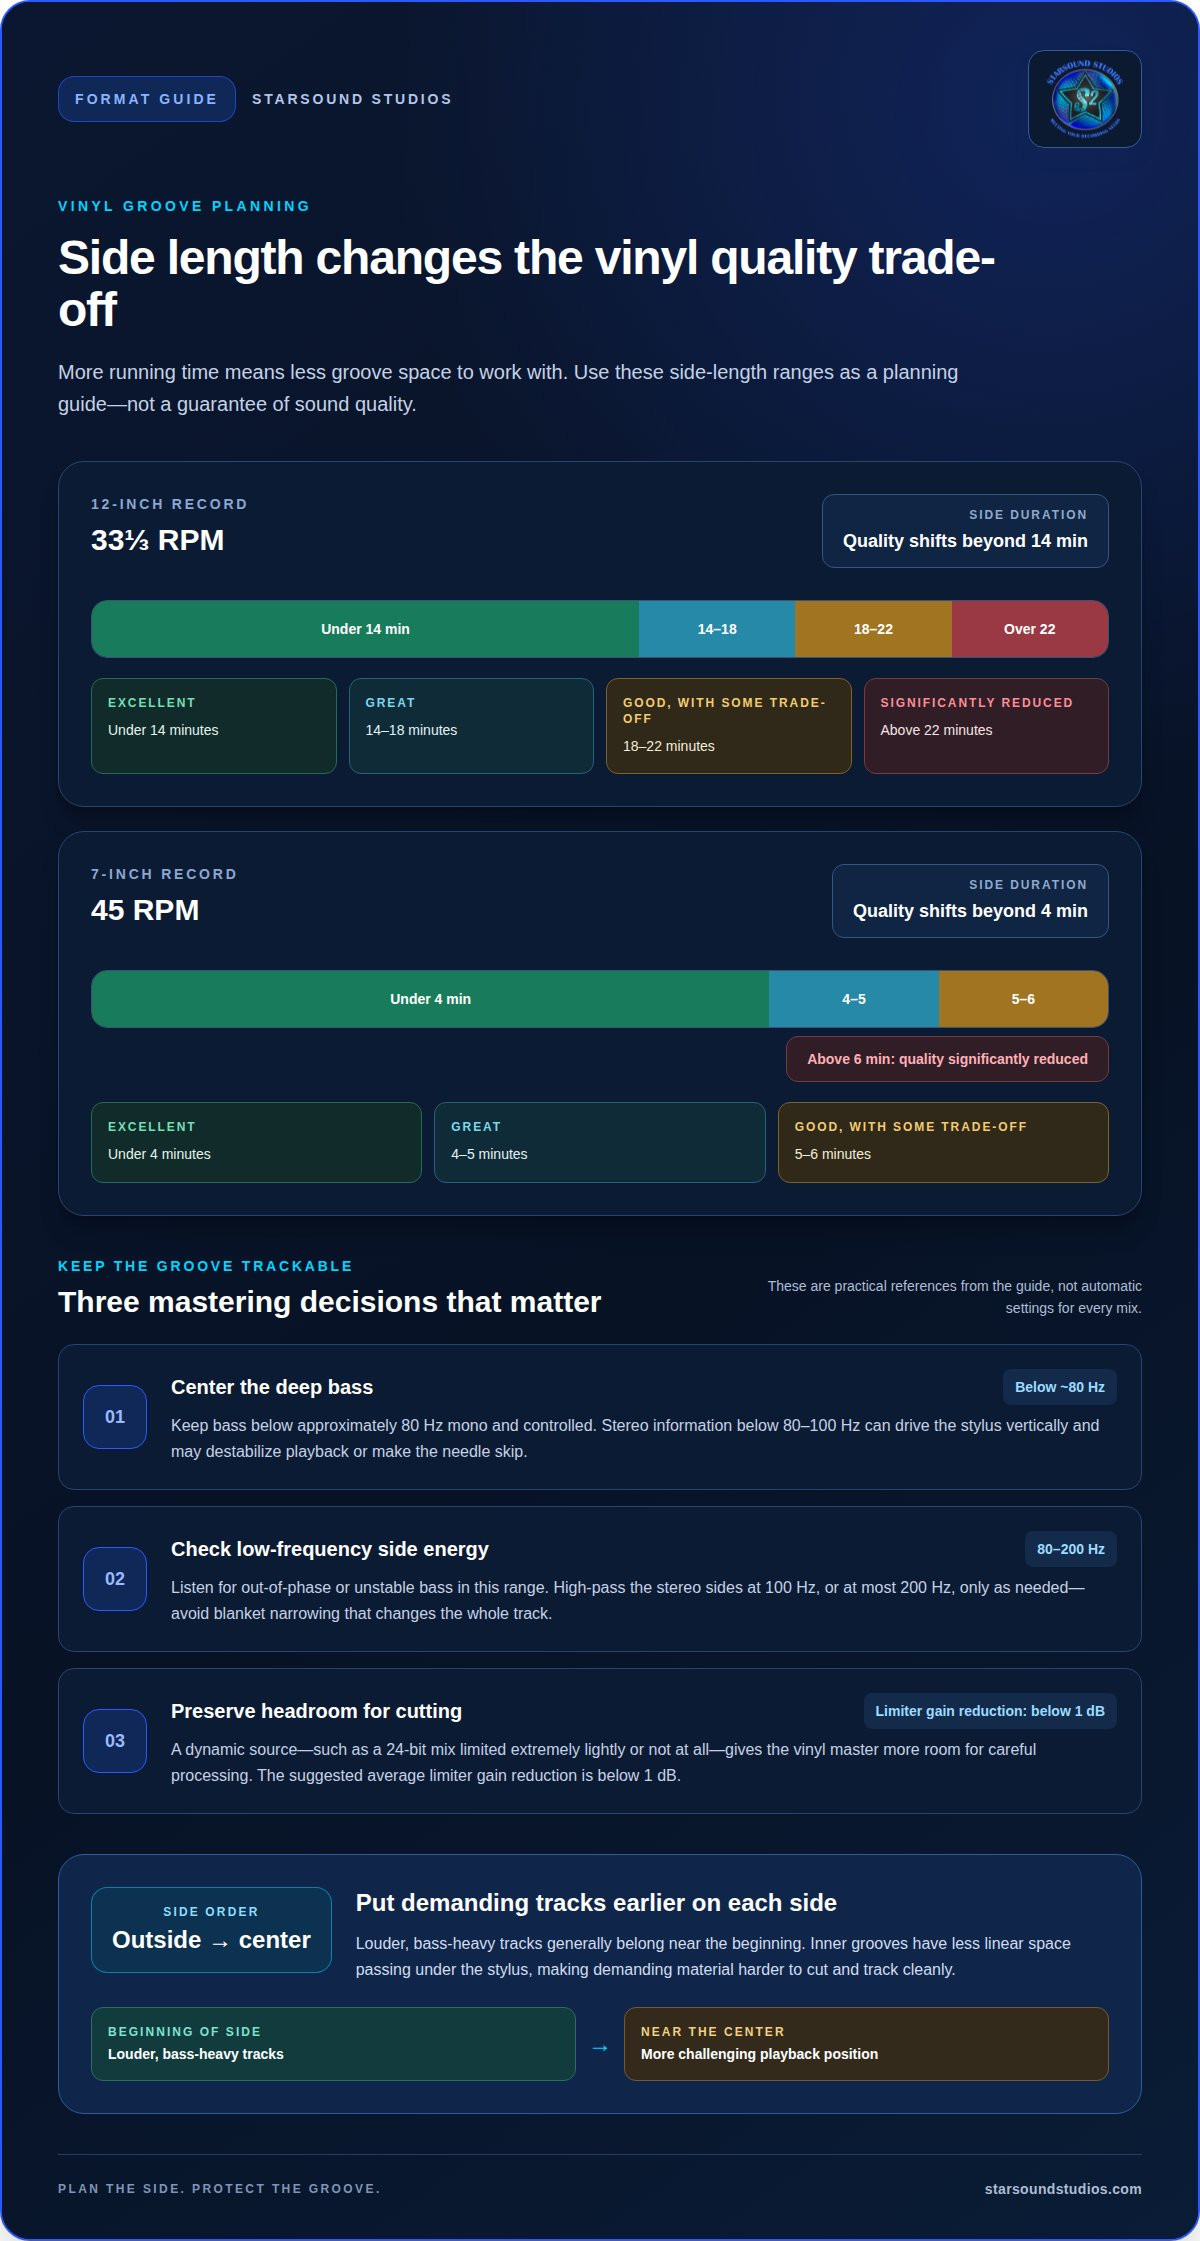
Start with a dynamic source. A 24-bit mix, limited extremely lightly or not at all, gives the vinyl master more room for careful processing. For vinyl, the suggested average limiter gain reduction is below 1 dB. That’s a useful reference, not a target that overrides how the music sounds. Dense transients and already-clipped mixes leave less room to shape peaks.
If loudness is a priority for the digital version, build it from a separate, less-limited mix. Adding gain to an unlimited version can make the digital master louder while preserving more dynamics in the vinyl master. Avoid using a single heavily limited print as the ideal starting point for both formats. It can leave the vinyl version with peaks and density that are harder to accommodate.
- Vinyl: preserve headroom, keep limiting light, and prepare the delivery for physical cutting.
- Digital: choose processing for its delivery format, then export the required files.
File preparation also differs. Vinyl mastering has specific delivery requirements, so confirm the preferred format with the cutting facility. For digital delivery, WAV or DDP files can be used for streaming or CD replication. A CD digital master has a 16-bit word length, while a vinyl mix export is recommended as a 24-bit WAV at the session sample rate.
Sequencing matters for vinyl. Tracks are arranged into sides, with spacing that supports transitions at each side break. The order and running time affect what the cutting stage must accommodate. A digital album can keep its sequence without dividing playback into record sides.
In practice, mixing for vinyl vs digital is less about creating two completely different mixes and more about preparing format-specific masters. Keep a clean, dynamic source, define the intended formats early, and create separate deliverables. This workflow lets each version retain its character while respecting the limits of its playback medium.
Vinyl bass and stereo-groove constraints
Vinyl grooves encode stereo as physical movement, so wide, powerful bass needs special care. Stereo information below 80-100 Hz can make the cutting stylus move vertically instead of laterally. That movement can make playback unstable or cause the needle to skip. Keeping deep bass centered helps the groove carry low frequencies more predictably.
A practical reference is to keep bass below approximately 80 Hz mono and controlled. This doesn’t mean narrowing the entire mix. Preserve stereo width in elements that don’t compromise low-frequency tracking, and listen for out-of-phase bass, especially around 80-200 Hz. If that range contains excess or unstable energy, adjust the mix or mastering rather than applying a blanket narrowing that changes the whole track.
Side information also matters. High-passing the sides at 100 Hz, or at most 200 Hz, can reduce problematic low-frequency stereo content while leaving centered bass intact. Treat those figures as processing guidance, not automatic settings: the music’s arrangement and existing stereo image determine how much correction it needs. A wide synth bass, for example, may need more attention than a centered kick and bass line.
Record length affects the available groove space. On a 12-inch record at 33⅓ RPM, sides under 14 minutes are classified as excellent quality; 14-18 minutes are great, and 18-22 minutes are good with some trade-off. Above 22 minutes, quality is significantly reduced. On a 7-inch record at 45 RPM, under 4 minutes is excellent, 4-5 minutes is great, and 5-6 minutes is good with some trade-off. Above 6 minutes, quality is significantly reduced.
Sequence with the record’s outside-to-center playback in mind. Louder, bass-heavy tracks generally belong near the beginning of each side. The inner grooves have less linear space passing under the stylus, making demanding material harder to cut and track cleanly. A dense, bright finale placed near the center of a side can therefore be a tougher playback challenge than the same track placed first.
- Center: keep deep bass focused in mono, especially below approximately 80 Hz.
- Review: listen for unstable stereo energy around 80-200 Hz.
- Sequence: place louder, bass-heavy tracks earlier on each side.
- Plan: balance running time against the desired groove space and sound quality.
Thoughtful stereo-image decisions help retain width without letting deep bass undermine reliable groove playback.
Differences in the resulting sound
The format doesn’t automatically give a track a particular character. Vinyl isn’t inherently warmer, and digital isn’t inherently harsher. The audible difference comes from the master’s processing and playback limits. Vinyl’s frequency response is listed as 20 Hz-20 kHz, with caveats, but that range alone doesn’t describe how a specific record will sound.
Dynamics are a major part of the contrast. A vinyl master usually retains more headroom and softer peaks, while a digital master can be pushed louder with limiting. Digital or CD releases can tolerate several dB of average limiter gain reduction before distortion becomes too noticeable. Yet adding 4 or 6 dB of limiting to an unlimited file can change its sound, reducing transient impact and making dense passages feel less open.
That difference is easy to hear in a drum-heavy chorus. A kick and snare may feel more forceful in a limited digital master, but repeated peak control can soften their attack. A lighter vinyl master can preserve more movement between hits. Neither version is automatically better: the choice depends on whether the production’s energy comes from sustained loudness or from contrast between quiet and loud moments.
Streaming loudness is another consideration. Compare the masters at a matched listening level. Otherwise, the louder version can seem more exciting simply because it plays louder, masking changes in punch, vocal presence, or detail.
Use a focused comparison rather than relying on memory. Listen to the same chorus in both masters, then check the opening, a quieter verse, and the final peak. Pay attention to cymbal attacks, vocal sibilance, bass definition, and whether the track still breathes. For example, a bright mix may sound more fatiguing after aggressive digital limiting, even when its average level seems competitive.
For a fair decision, switch between versions at similar playback levels and note what each treatment changes. If the digital master gains loudness but loses transient definition, reconsider the limiting. If the vinyl version feels less forceful, assess whether its preserved dynamics serve the arrangement. These comparisons turn format decisions into deliberate sonic choices, rather than assumptions about how either medium should sound.
Ready to refine how your masters translate across formats? Explore mastering for your release.
Starsound Studios: Stereo Mixing
Starsound Studios in North Royalton, near Cleveland, Ohio, offers Stereo Mixing and Mastering for artists preparing music for different playback formats. If your mix needs a clearer stereo image or you’re ready to shape a finished track for release, these services connect creative decisions with the technical demands of the final master.
Bring the intended formats into the conversation early. A focused stereo mix can establish the balance and impact of the track, while mastering helps prepare the finished audio for delivery. For projects built around immersive playback, Starsound Studios also offers Dolby Atmos Mixing (9.1.4), alongside Recording for artists developing their sound from the start.
Ready to refine your mix or prepare a release? Contact Starsound Studios to discuss your project.
Shape the Release Around Your Intent
Start by deciding what you want listeners to feel, then make each format serve that intention. A thoughtful approach to mixing for vinyl vs digital isn’t about chasing two unrelated sounds. It’s about preserving the character of the performance while making deliberate choices for where and how people will hear it.
Before finalizing a release, identify the moments that define its identity: a vocal’s intimacy, the weight of a kick, or the space around a guitar. Those priorities can guide decisions about balance, translation, and the finished master. A clear artistic direction gives the technical choices a purpose.
Starsound Studios can help artists move from that direction toward a polished release. Contact Starsound Studios about your master to discuss your project and the sound you want to bring forward.
Make the format part of the creative vision, not an afterthought. Your music deserves to arrive with its intent intact.
Frequently Asked Questions
So which should you choose?
Choose the format based on where your listeners will hear the release, and prepare a version for each destination when releasing on both. For a digital-only single, focus on a digital master. For a vinyl pressing, plan for a vinyl master and the physical cutting process. If you’re deciding whether vinyl fits the project, consider its artistic purpose and how the track sequence works across record sides.
How does mixing for vinyl differ from mixing for digital streaming?
The mix should support the format-specific master, rather than imitate a mastering adjustment. For streaming, assess how the balance translates through headphones and speakers, including at different playback levels. For a vinyl-bound mix, pay close attention to phase and low-frequency width before mastering. For example, check whether a wide bass synth still feels solid when its stereo image is narrowed. Both formats benefit from clear balances and controlled harshness.
What frequency and stereo limitations should be considered when mixing for vinyl?
Consider the full spectrum, but pay particular attention to deep stereo bass, sibilance, and extreme high-frequency energy. Vinyl’s stated response range is 20 Hz-20 kHz, with caveats, so that range shouldn’t be treated as a promise of identical playback at every frequency. A practical listening check is to compare the mix in mono and stereo, then inspect whether bass loses focus or vocal sibilance becomes distracting.
How much low-frequency stereo content is safe for vinyl mastering?
There isn’t a universal safe amount that suits every record; the key issue is how the stereo bass moves the cutting stylus. As a working reference, keep bass below approximately 80 Hz mono. Stereo information below 80-100 Hz can cause vertical stylus movement and playback problems. Check the side signal and listen to the bass in mono, especially when kick and sub-bass overlap.
How should bass, kick, and sub-bass be mixed for vinyl?
Give the kick and sub-bass distinct roles, then keep their deepest energy centered. For example, let the kick define the transient while the bass sustains the note, rather than letting both create uncontrolled low-frequency buildup. Listen for phase cancellation in mono and tame excess or out-of-phase energy around 80-200 Hz. Keep the arrangement’s impact, but avoid relying on wide sub-bass to create it.
How do loudness, compression, and peak levels differ for vinyl and digital releases?
Digital masters can generally use more limiting than vinyl masters, but louder isn’t automatically better. Compare versions at matched playback levels, listening for transients, vocal clarity, and fatigue. A limiter ceiling can prevent a digital signal from exceeding 0 dB and clipping, while heavy clipping is unsuitable preparation for vinyl cutting. Keep the musical dynamics intentional, and judge compression by what it does to the performance, not only its meter readings.


