

A world-class mix doesn't start with a fader push; it begins the moment you commit your tracks to disk. Your demo has the soul, but without technical precision, it will never achieve the cinematic scale your music deserves. You've poured your heart into every shimmering synth layer and vocal harmony. It's incredibly draining to hand over that passion only to have an engineer reject the files because of clipping or confusing organization. We understand that frustration. You want your vision to translate perfectly from your creative sanctuary to a professional studio environment.
Mastering how to export stems for mixing is the definitive bridge between a home-grown project and a polished, professional output. This guide provides the grounded assurance you need to prepare your files with absolute precision. We'll explore the technical nuances of the latest DAW updates, including Pro Tools 2026.4 and Logic Pro 12.3.1. You'll learn to maintain 24-bit audio fidelity while organizing your session for a seamless transition into stereo or immersive Dolby Atmos 9.1.4 environments. By the end, you'll have the confidence to deliver a clean, organized set of files that ensures a faster turnaround and a result that sounds exactly as you intended.
Key Takeaways
- Distinguish between grouped stems and raw multitracks to ensure you provide the exact level of control your project requires for a professional mix.
- Maintain pristine audio fidelity by exporting in 24-bit WAV format while keeping your sample rate identical to your native session settings.
- Avoid common technical pitfalls in Pro Tools, Logic, and Ableton by disabling normalization and master bus processing before you begin the export.
- Master the definitive workflow for how to export stems for mixing to streamline collaboration with your engineer and ensure your creative vision translates perfectly.
- Prepare your music for the future of immersive audio by learning why dry, individual tracks are essential for a certified 9.1.4 Dolby Atmos mix.
Stems vs. Multitracks: Why Your Mixing Choice Matters
Confusion between these two terms is the primary reason engineers reject files. It's the first hurdle you'll face when learning how to export stems for mixing. While many producers use the words interchangeably, they represent two completely different philosophies in the studio. A multitrack represents the raw DNA of your song. It includes every individual microphone and synth layer in its most granular form. If you have twelve tracks of drums, a multitrack delivery includes all twelve as separate, isolated files.
A stem is a different beast entirely. It's a sub-mix of those individual elements. Instead of twelve drum tracks, you provide one stereo file that combines them all. Understanding the nuance of Stems vs. Multitracks is vital because it dictates how much control your engineer has over the final sonic landscape. Choosing the wrong format can limit the creative potential of your project before the mixing process even begins.
The Technical Definition of a Professional Stem
Technically speaking, a stem is a stereo file derived from a sub-mix. It's a consolidated stereo bounce of a specific instrument group. These are standard in film post-production where a re-recording mixer needs to adjust the "Drums" or "Strings" quickly against dialogue without touching every individual mic. In music, stems are often used for revision-heavy workflows or live performance backing tracks. They preserve your specific processing and balance while allowing for broad-stroke adjustments later in the production cycle.
Why Starsound Studios Prefers Multitracks for Full Mixing
When you book stereo mixing at Starsound Studios, we usually request multitracks rather than stems. This gives us the freedom to reach into the heart of the production. Stems limit an engineer's ability to fix phase issues between two kick drum mics or resolve EQ clashes between a lead vocal and a specific harmony. If those elements are already baked into a single stereo file, our surgical tools are limited.
Before you begin the process of how to export stems for mixing, ask yourself if you want the engineer to enhance your existing balance or build a world-class mix from the ground up. For a full-scale transformation, raw multitracks are your best friend. Stems are better suited for final mastering tweaks, vocal-up versions, or specialized delivery requirements. Delivering the right format ensures your creative vision is supported by the highest level of technical precision.
Essential Technical Standards for High-Fidelity Exports
Precision is the heartbeat of a world-class production. When you prepare your files, you aren't just moving data; you're preserving the emotional energy of your performance. High-fidelity exports ensure that every transient and harmonic detail survives the journey from your home studio to a professional facility. While there are many ways to package audio, the industry standard remains the audio format WAV. It provides a lossless, uncompressed container that guarantees your sounds reach the engineer exactly as you heard them. Mastering the technical side of how to export stems for mixing prevents the heartbreak of digital degradation that often plagues amateur releases.
Sample Rate and Bit Depth: Choosing the Pro Standard
Consistency is your greatest ally during the export process. You should always export your stems at the same sample rate as your project session to avoid the artifacts created by sample rate conversion. While 44.1kHz is standard for CD quality, 48kHz has become the modern benchmark for video and Atmos compatibility. If you're planning a Certified Dolby Atmos Mix, staying at 48kHz or higher is essential for technical compliance. Regarding bit depth, 24-bit is the minimum requirement for professional work. Many artists now utilize 32-bit float as a technical safety net. This format allows for internal DAW processing that exceeds 0.0 dBFS without immediate clipping, providing an extra layer of protection for your audio's dynamic range.
Managing Headroom and Avoiding Digital Distortion
The "Zero-Clipping" rule is non-negotiable in the digital domain. Digital distortion is brittle, harsh, and usually impossible to remove once it's baked into a file. To provide your engineer with the necessary creative space, you should aim for -3dB to -6dB of headroom on every exported track. This isn't just about the peak level on your meter. You must also watch for inter-sample peaks, which are hidden transients that can clip during the digital-to-analog conversion process. By maintaining a healthy distance from the 0.0 dBFS ceiling, you ensure that your professional stereo mixing experience starts with clean, workable audio. This disciplined approach to gain staging allows the engineer to focus on the art of the mix rather than repairing damaged files. It's the difference between a mix that feels open and airy and one that feels congested and flat.
- Always match your export sample rate to your session settings to prevent conversion errors.
- Use 24-bit or 32-bit float to preserve the full dynamic depth of your recording.
- Maintain -6dB of headroom to give the mixing engineer room to apply professional processing.
- Verify that no individual file peaks above 0.0 dBFS before finalizing your delivery package.
DAW-Specific Export Workflows: Pro Tools, Logic, and Ableton
Every DAW speaks a different technical language, but the end goal is universal: perfect synchronization. Before you touch an export button, ensure every track in your session starts at Bar 1, Beat 1. This simple step guarantees that when your engineer imports your files, every vocal trill and drum fill lands exactly where it should. Learning how to export stems for mixing requires a deep understanding of your software's specific quirks to avoid common pitfalls like misaligned files or unintended volume changes. When you provide perfectly aligned audio, you're not just sending data; you're handing over a clean canvas for the engineer to paint on.
The Logic Pro and Ableton Live Quick-Export Guide
In Logic Pro 12.3.1, the most efficient path is selecting all tracks and using the Command-E shortcut. This opens the "Export All Tracks as Audio Files" menu. Be cautious here. You'll see a checkbox for "Include Volume/Pan Automation." Unless your automation is an essential creative effect that defines the sound, leave this unchecked. It allows your engineer the headroom needed to build a dynamic mix from scratch. You want to provide the raw ingredients, not a half-baked cake.
Ableton Live 12 users should look for the "Export Audio/Video" menu and set the "Rendered Track" dropdown to "All Individual Tracks." The most critical rule in Ableton is turning off the "Normalize" function. Normalization can destroy the relative balance you've carefully crafted, forcing the engineer to spend hours undoing what should have been a simple export. Adhering to these Essential Technical Standards is what separates home-grown demos from professional-grade deliverables ready for a global stage.
The Pro Tools "Starsound" Workflow
Pro Tools 2026.4 offers several ways to package your audio, but we recommend the "Consolidate Clips" method. By highlighting your entire session and using Option-Shift-3, you create a single, continuous audio file for every track. Once consolidated, you can simply select the clips in the Clip List and choose "Export Clips as Files." This bypasses the real-time bounce process, saving you valuable time while ensuring your files are perfectly aligned for the mix.
Many sound engineers prefer this clean, consolidated approach over messy session folders or the "Freeze/Commit" workflow. While "Commit" is excellent for rendering complex plugin chains, consolidation provides a foolproof set of files that work in any DAW. It's the most reliable way to ensure your vision remains intact during the transition to a professional studio. Mastering how to export stems for mixing this way makes you a dream collaborator for any high-end facility.
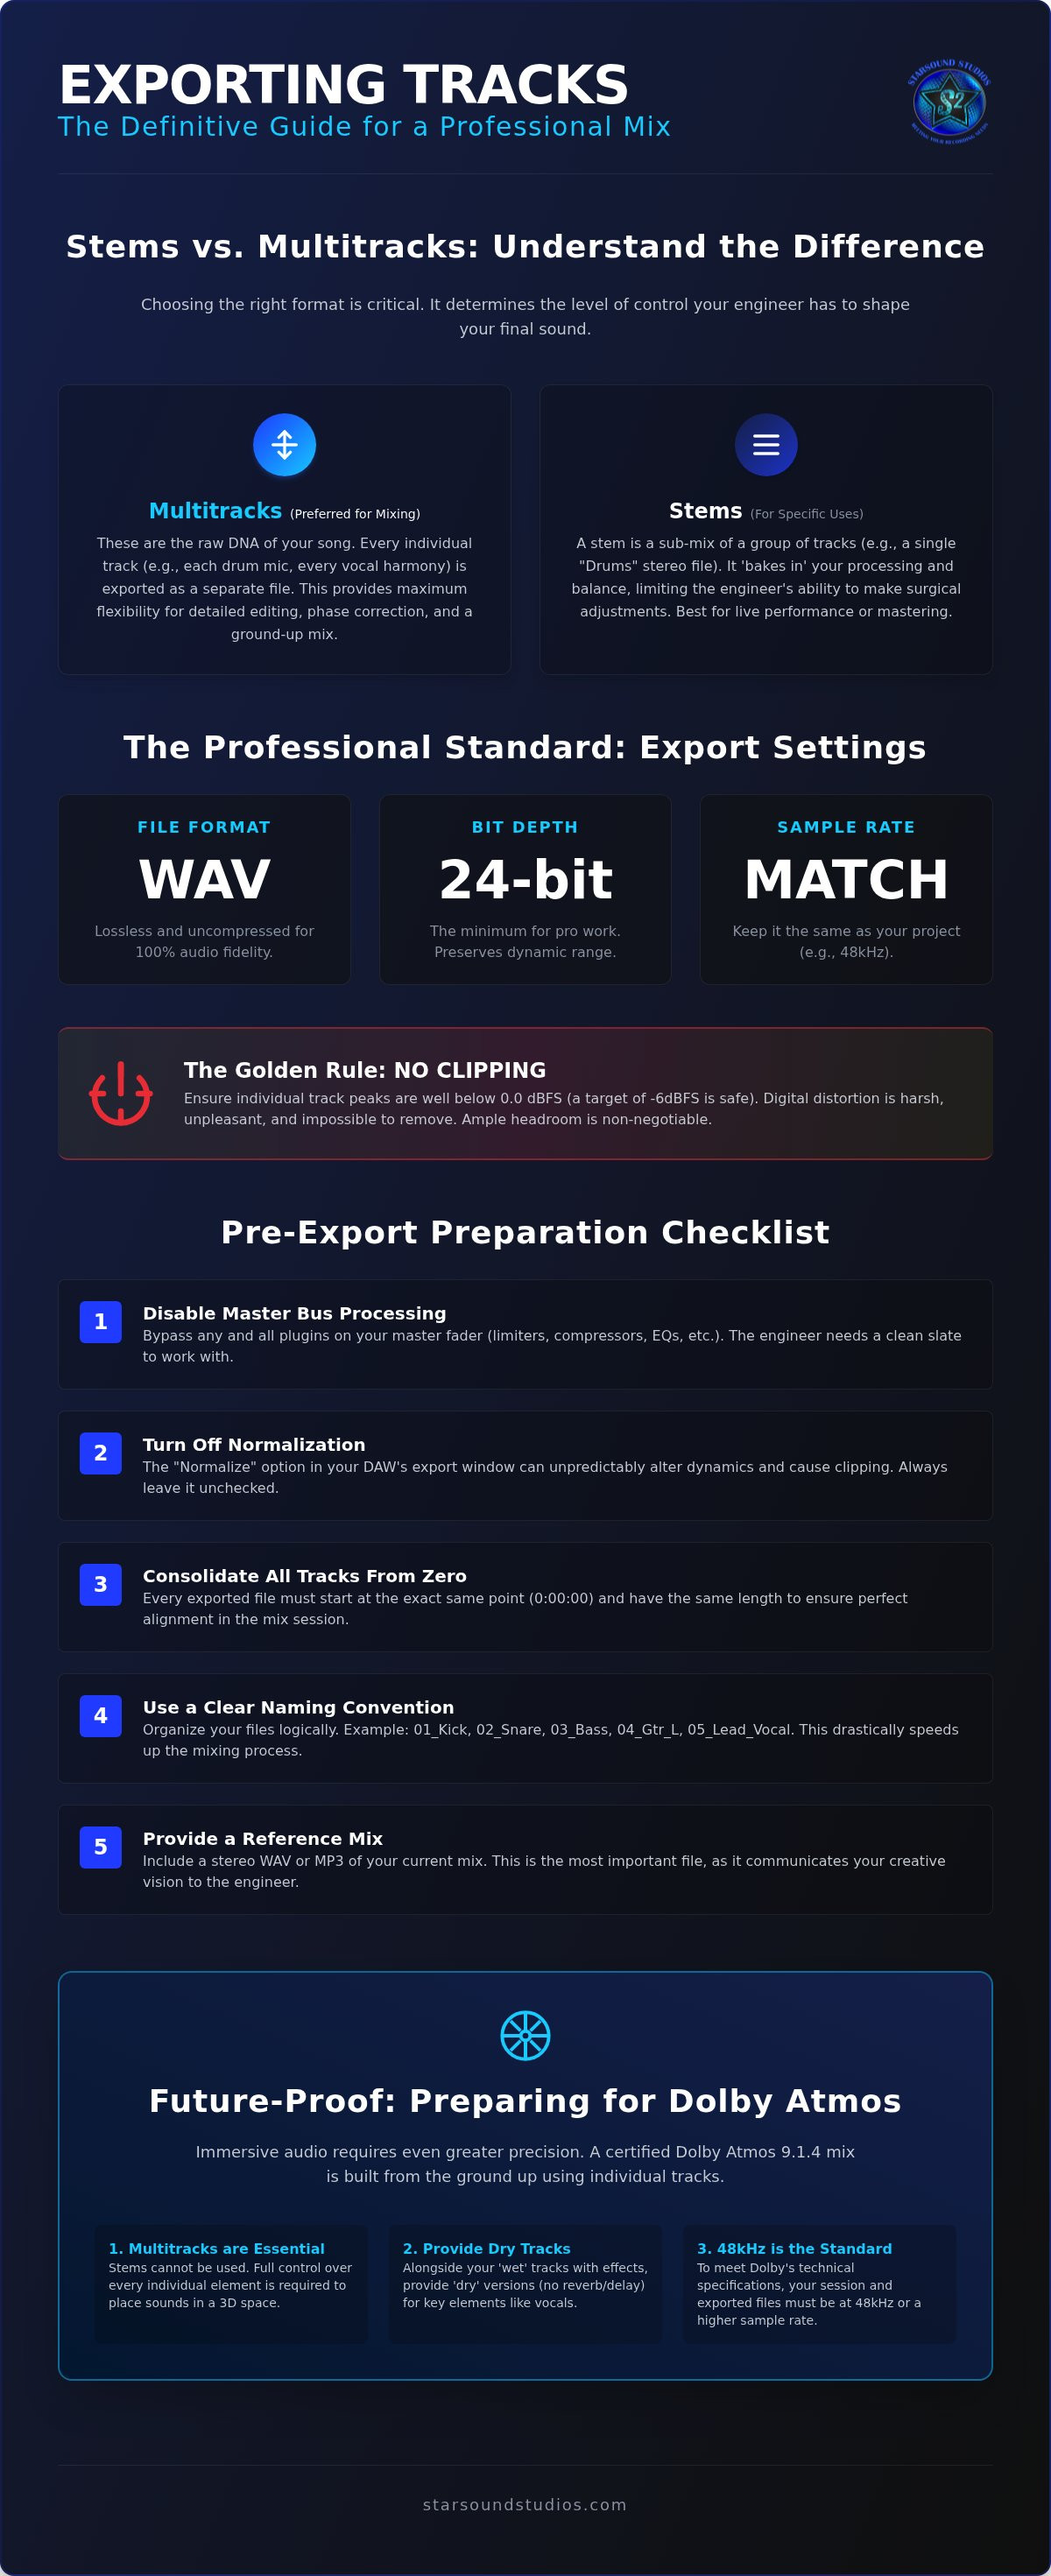
The Step-by-Step Stem Preparation Checklist
Organization is the silent partner of a world-class mix. When you deliver a cluttered session with vague file names, you're forcing your engineer to spend hours on digital housekeeping instead of sonic sculpture. Mastering how to export stems for mixing requires a disciplined approach to the "pre-flight" phase of your project. Your goal is to provide a set of files that are so clean and well-organized that the engineer can hit "play" and hear your vision immediately. This level of preparation signals that you're a serious professional who respects the collaborative process.
- Step 1: Commit creative effects, remove corrective processing. If a specific delay or distortion defines the character of a synth, keep it. Remove generic EQs or compressors used only to make your demo louder.
- Step 2: Clear the Master Fader. Remove all limiters, compressors, and "make-better" plugins from your stereo output. The engineer needs the full dynamic range to do their job effectively.
- Step 3: Clean the heads and tails. Remove pops, clicks, and unwanted background noise from the start and end of every clip. Ensure every file starts exactly at Bar 1, Beat 1.
- Step 4: Audit for consistency. Check that mono sources remain mono files. Exporting a single lead vocal as a stereo file doubles the storage space and complicates the engineer's panning workflow.
- Step 5: Apply the Starsound Naming Standard. Use a logical, numerical system that keeps tracks grouped together naturally in any DAW.
Creative Effects vs. Mixing Effects: What to Keep?
Deciding what to "bake in" to your stems is a common point of anxiety for artists. The rule of thumb is simple: if the effect is a signature part of the sound's identity, keep it. A vocal with a specific, rhythmic ping-pong delay should be exported with that delay active. If you're unsure, the "Dry vs. Wet" rule is your best friend. Provide one version of the track with the effects and a second "dry" version. This gives the engineer the ability to use your creative direction as a guide while maintaining the freedom to use high-end outboard gear for the final polish. It's about providing options, not limitations.
Naming Conventions and File Organization
Generic names like "Audio 1" or "Track 22" are the enemies of efficiency. We utilize the "Number-Instrument-Attribute" formula to ensure instant clarity. A file named 01_Kick_In_Dry.wav tells the engineer exactly what the sound is, where it sits in the kit, and its processing state. Always include a "ReadMe" text file in your delivery folder. This should list the song's tempo (BPM), the key, and any specific notes regarding the vibe or reference tracks you love. This small detail transforms you from a client into a collaborator. Ready to hear your tracks through our world-class signal chain? Book your stereo mixing session today and let's bring your vision to life.
Preparing Your Music for a Certified Dolby Atmos Mix
The horizon of music production has shifted. While stereo remains a cornerstone, Dolby Atmos mixing has redefined how audiences experience sound. It's a leap from a flat canvas to a living, breathing 3D environment. In Cleveland, artists are increasingly looking to translate their vision into this immersive format. However, the process of how to export stems for mixing takes on a new level of complexity when you're preparing for a 9.1.4 speaker array. You aren't just sending tracks; you're providing the spatial objects that will move through a three-dimensional field.
Atmos thrives on separation. In a traditional stereo mix, grouping your guitars or backing vocals into stems is often helpful. In the immersive world, those groups can become limitations. We need individual elements to place them precisely above, behind, or around the listener. High-resolution WAV files are the absolute foundation here. They provide the sonic clarity required for the Atmos renderer to translate your music across different playback systems, from premium home theaters to spatial-audio-enabled headphones.
The Difference Between Stereo Prep and Atmos Prep
Baked-in stereo reverb is a common hurdle. When you render a synth with a heavy stereo delay, you're locking that sound into a 2D plane. For Atmos, we prefer dry tracks. This allows us to use spatial mapping to place the "dry" sound in one location while sending its reflections to the ceiling or the back of the room. It creates a sense of scale that stereo simply can't match. To meet professional delivery requirements, 24-bit/48kHz is the non-negotiable minimum. Clean transients are essential. Without them, the precise positioning that defines an immersive mix can feel blurred or unfocused.
Collaborating with Starsound Studios for Remote Mixing
Distance is no longer a barrier to world-class quality. Our remote mixing workflow is designed to be as seamless as an in-person session. Once you've mastered how to export stems for mixing using our checklist, you can upload your files directly to our secure server. Steve "The Mix" brings over a decade of expertise to every project, personally reviewing your stems to ensure they're ready for our Dolby-certified environment. This collaborative mentorship ensures your technical details are flawless so you can focus on the creative spirit of your work.
Ready to hear your music in immersive 3D? Upload your stems to Starsound Studios today.
Elevate Your Sound to World-Class Standards
Your music is more than just a collection of files; it's a legacy in the making. By mastering the technical nuances of how to export stems for mixing, you've removed the barriers between your creative vision and a professional, polished result. You now have the definitive checklist to provide clean, organized multitracks that preserve every ounce of your performance's energy. Whether you're preparing a tight stereo mix or an expansive 9.1.4 immersive experience, your commitment to these technical standards ensures your work is in the best possible hands.
At Starsound Studios, we're passionate about transforming those precisely prepared files into something legendary. As Ohio’s first certified Dolby Atmos studio, we offer the specialized 9.1.4 monitoring and mentor-level expertise needed to bring your music into the future. Our remote mixing services connect global artists with our high-end facility, providing a creative sanctuary where the science of audio meets the soul of your art. Ready to hear the difference professional precision makes? Book a mixing session at Starsound Studios today. Let's create something timeless together.
Expert Answers for Perfect Stem Delivery
Should I export my stems with effects like reverb and delay turned on?
You should keep effects that are essential to the character of the sound, such as a rhythmic delay or a unique distortion. If the reverb is just a general space, it's often better to provide a dry version. This gives your engineer the freedom to use high-end outboard gear. When you're learning how to export stems for mixing, the safest bet is to deliver both "Dry" and "Wet" versions of critical tracks.
What is the best file format for exporting stems in 2026?
The industry standard in 2026 remains the 24-bit or 32-bit float WAV file. This lossless format preserves the full dynamic range and frequency response of your recording. You should always match the sample rate to your original session settings. While 44.1kHz is common, 48kHz is preferred for modern video and immersive audio compatibility. Avoid compressed formats like MP3, as they introduce irreversible artifacts that degrade the final mix quality.
Do I need to normalize my tracks before exporting them for mixing?
No, you should never normalize your tracks before exporting them for a professional mix. Normalization destructively alters the relative volume balance you've established in your session. It can also raise the noise floor and eat up the headroom your engineer needs for processing. Instead, focus on maintaining a healthy peak level between -3dB and -6dB. This ensures the files remain clean and ready for surgical EQ and compression during the mixing stage.
How do I ensure all my tracks stay perfectly in sync when the engineer imports them?
Perfection in synchronization is achieved by ensuring every exported file starts at exactly the same point, typically Bar 1, Beat 1. Even if a vocal doesn't enter until the second verse, the exported file should include the silence preceding it. This "dead air" acts as a technical anchor. When the engineer drops your files into a new session, everything will align instantly without the need for manual nudging or guesswork.
What is the difference between a stem and a sub-mix?
While the terms are often used interchangeably, a stem is a technical deliverable consisting of a stereo group of related tracks. A sub-mix is the internal routing within your DAW used to control those groups during production. In a professional context, you provide stems, like "All Drums" or "All Vocals," to allow for efficient revisions. Understanding how to export stems for mixing correctly ensures these sub-grouped files maintain their sonic integrity throughout the collaboration.
Should I leave my volume and pan automation on when exporting?
It's generally best to disable volume and pan automation unless it's a vital creative component of the sound. If a synth filter sweep or a specific panning effect defines the riff, keep it active. However, static volume balances and basic panning should be removed. This allows the mixing engineer to use their professional monitoring environment to set the final stage, ensuring every element sits perfectly in the stereo or immersive field.
Can I send a Pro Tools session instead of exporting individual stems?
You can send a full Pro Tools session, but it must be meticulously organized and the "Save Copy In" function must be used to include all audio files. Many engineers actually prefer individual consolidated WAV files because they are DAW-agnostic. This eliminates issues with missing plugins or software version mismatches. If you choose to send a session, ensure all creative processing is committed and the folder structure is clean to avoid technical delays.
How much headroom should I leave on my master bus before bouncing stems?
You should aim for -3dB to -6dB of headroom on your master bus, but more importantly, ensure no individual track is clipping. Digital distortion is unforgiving and cannot be undone. By leaving this "breathing room," you give the engineer the necessary space to apply analog-style saturation, compression, and EQ. This technical discipline results in a mix that feels open, dynamic, and ready for the final competitive polish of the mastering stage.


